
With reference to my previous blog on:
1. AWS:How to create and activate a new account in AWS ?
https://vskumar.blog/2018/09/01/1-awshow-to-create-and-activate-a-new-account-in-aws/
I have made a scenario based “AWS services usage” blog in this content. Which can be considered as a Proof of Concept [POC] Project also.
If you are new for cloud technology, I have made a video cum blog for you to understand its initiation/evaluation concepts. This video is more useful for PMs/Cloud Architects/DevOps role based people.
For video Visit:
For the above video’s blog:
https://vskumarcloudblogs.wordpress.com/2016/11/30/how-to-initiate-a-cloud-transformation/
Now, let us move forward with this blog content.
In this AWS exercise, I have described/demonstrated on WordPress[WP] infrastructure creation using a free tier account.
At the end of this blog a micro level lab practiced steps are copied and a recorded video is there on my channel.
I would like to explain from architecture/design perspective through this blog, before you go to Lab steps.
After doing this exercise, simply and finally we can come into the following conclusions:
a) Creating a blogging infrastructure can be fully automated through AWS services.
b) Infrastructure can be created at any time on-demand without any up-front
commitment for how long we will use it in AWS.
c) We can pay for our infrastructure depending on how many hours we use it.
d) Infrastructure consists of several parts,
such as; i) virtual servers, ii) load balancers, and iii) databases.
e) Infrastructure can be deleted with one click without costing to us.
This process is powered by AWS automation. So it will not be billed to our free tier account after deletion!!.
First let us analyze on WP and its components.
How a WordPress infrastructure can be planned?
Assume we have a startup company, which publishes more white papers and blogs.
Assuming; our startup company currently uses WordPress[WP] to host over 500 blogs on our own servers. The blogging infrastructure must be highly available, because customers don’t tolerate outages of any servers. To evaluate whether a migration is possible through AWS services, we need to do the following three Activities planning and try out with AWS free-tier account:
A) Set up a highly available blogging infrastructure in AWS.
B) Estimate monthly costs of the infrastructure.
C) Finally, Delete our blogging infrastructure to save cost from free-tier account.
For our understanding on WP;
- WordPress[WP] is written in PHP and uses a MySQL database to store data.
- Apache is used as the web server to serve the blog pages.
- With this information in our mind, we map our requirements to AWS services to test the infrastructure creation.
Now, let us analyze on “what are the AWS services required for our WP test infrastructure?”.
We need the below AWS services to do this activity:
I. Elastic Load Balancing (ELB),
II. Elastic Compute Cloud (EC2),
III. Relational Database Service (RDS) for MySQL and
IV. Security groups.
Let us analyze what are the functions/benefits of these AWS services.
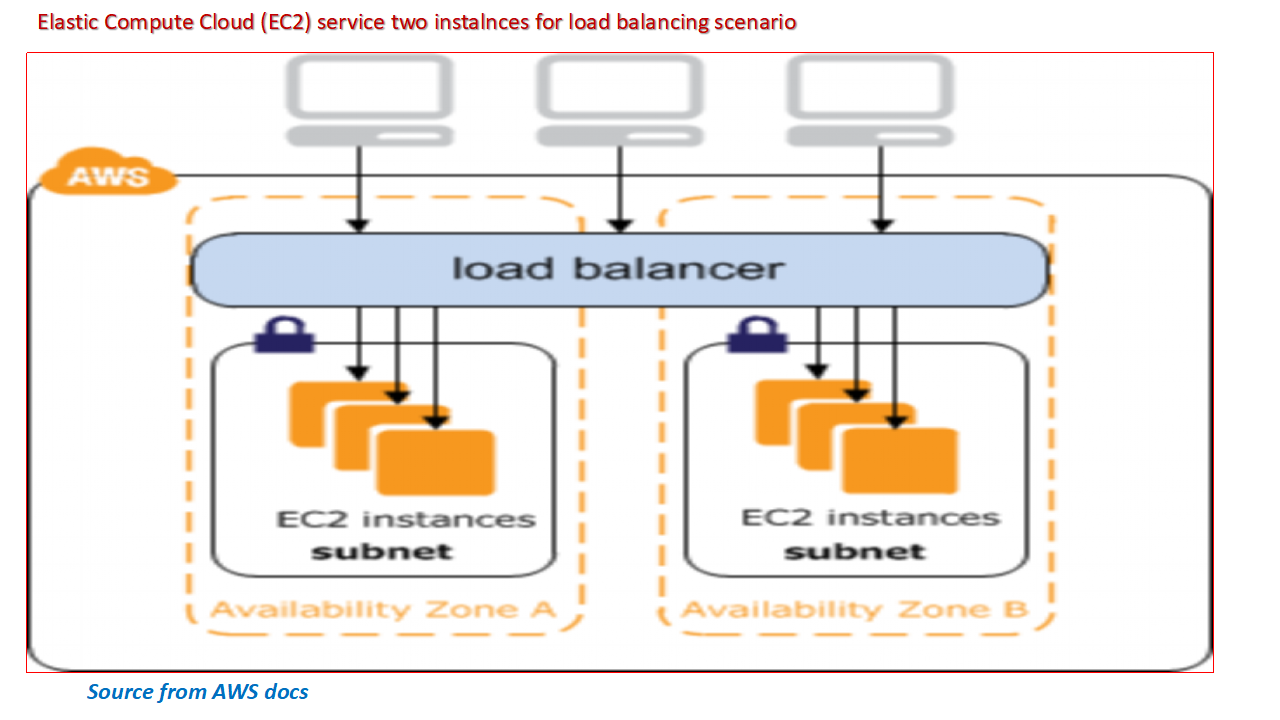
I. Elastic Load Balancing (ELB):
AWS offers a load balancer as a service.
The Elastic Load Balancer (ELB) distributes traffic to a bunch of servers behind it in a cloud environment. It’s highly available by default.
Let us assume our startup company’s blogs are published globally. From many countries these can be accessed by the users. Assume there are lot of users access this content globally. Then in traditional method your load is not balanced without having physical servers connected through VPNs/networks, etc. in different locations. Think about the Hardware/Software/maintenance/FMG cost for this traditional infrastructure. We can not think it being a startup company to spend much. No way!! Hence we need to depend on cloud service provider.
With AWS ELB, this can be balanced by distributing the blog users traffic to different virtual servers under cloud environment. To denote this distributed load balancing architecture, I have collected a diagram on;
WordPress infrastructure and Load Balancing through ELB AWS service.
Which is pasted here for your clarity on the ELB function.

II. Elastic Compute Cloud (EC2):
It is A virtual server which is provided by the Elastic Compute Cloud (EC2) service of AWS. We will use a Linux server with an optimized distribution called Amazon Linux to install Apache, PHP, and WordPress during our exercise. Please note; we are not limited to Amazon Linux only; we can also choose Ubuntu, Debian, Red Hat, or Windows. Virtual servers can fail at any time, so we need at least two of them for contingency planning. The load balancer will distribute the traffic between them. The beauty of AWS service in case of a server failure is; the load balancer will stop sending traffic to the failed server, and the remaining [contingency] server will need to handle all the requests until the failed server is replaced. Let us not worry on this communication! You will be intimated the status through alerts.
A sample architecture diagram is pasted here FYI with two EC2 instances.
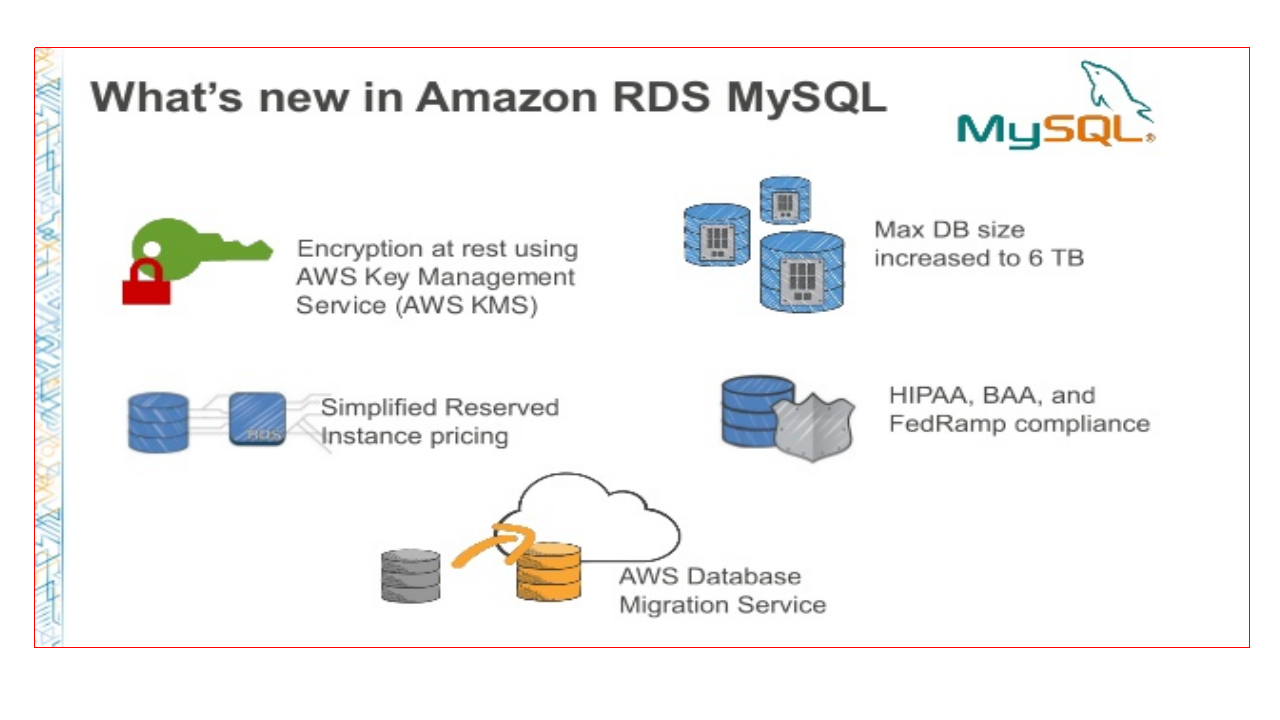
III. Relational Database Service (RDS) for MySQL:
WordPress relies on the popular MySQL database. AWS provides MySQL as a Relational Database Service (RDS). We can choose the database size (like; storage, CPU, RAM), and RDS takes care of the rest (backups, updates). RDS can also provide a highly available MySQL database by replication. In traditional [non-cloud] model we had the similar setup. It occurs huge costing. By using AWS cloud services this can be easily maintained with minor costing only.
On this context; from the below diagram we can see the MYSQL features from AWS services offering.
V. Security groups:
In every application architecture we need to have the security features in place. Either these can be embed in the applications or through security tools it can be applied. So the entire architecture is protected that way.
But in cloud services many providers provide these services differently with their services offering.
The Security groups are a fundamental service of AWS to control network traffic like a firewall in traditional systems. Security groups can be attached to a lot of services like ELB, EC2, and RDS. For example; with security groups, we can configure our load balancer as below:
It only accepts requests on port 80 from the internet. Web servers only accept connections on port 80 from the load balancer. And MySQL only accepts connections on port 3306 from the web servers. If we want to log in to our web servers via SSH, we must also open port 22. Similar ways the architecture setup can be configured.
FYI, I have considered a diagram from AWS docs; which denotes a typical AWS multi-tier approach security services with a Firewall:
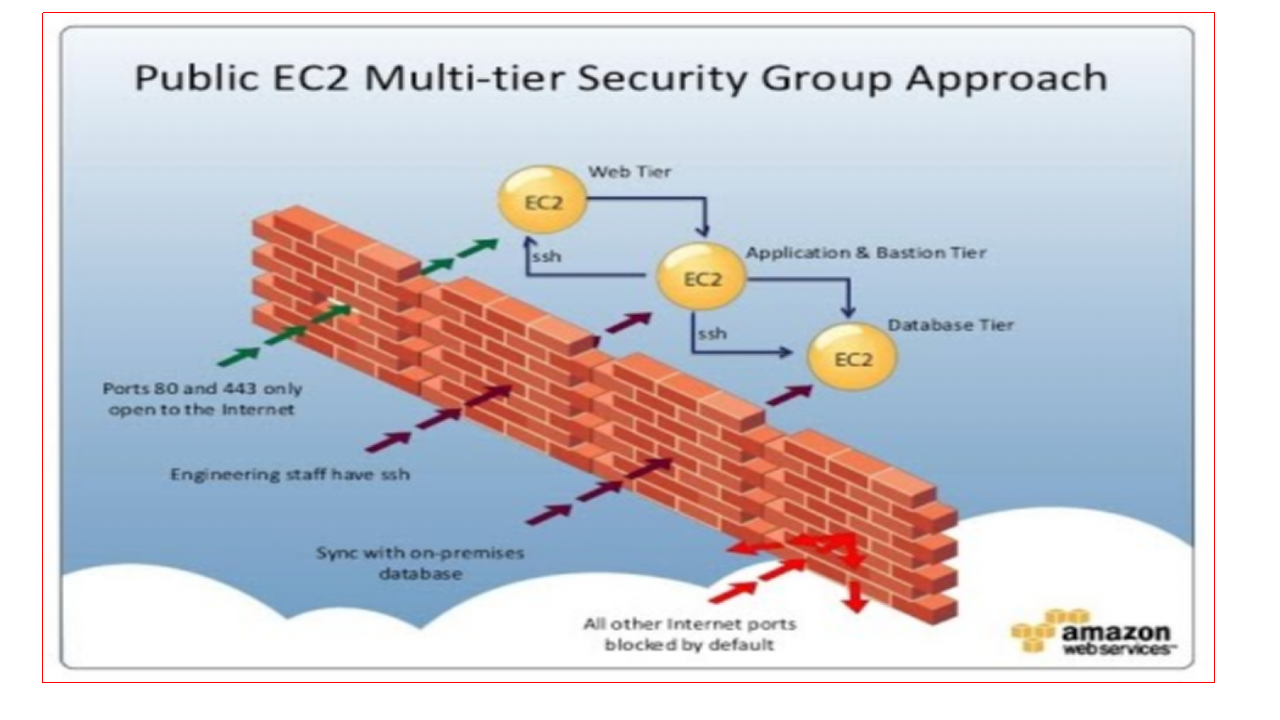
As shown in the above diagram, A security group acts as a virtual firewall for our instance to control inbound and outbound traffic. When we launch an instance in a Virtual Private Cloud[VPC], we can assign the instance to up to five security groups. It means in any VPC AWS provides five different security groups.
So, now what is our start company plan for security?:
Let us assume our startup company’s blogging infrastructure consists of two load-balanced web servers running a) WordPress and b) a MySQL database server.
The following tasks are performed automatically in the background through AWS:
- Creating an ELB.
- Creating a RDS MySQL database.
- Creating and attaching security groups.
- Creating two web servers.
- Creating two EC2 virtual servers.
- Installing Apache and PHP via yum.
- Install php, php-mysql, mysql, httpd.
- Downloading and extracting the latest version of WordPress from http://wordpress.org/latest.tar.gz
- Configuring WordPress to use the created RDS MySQL database
- Starting Apache.
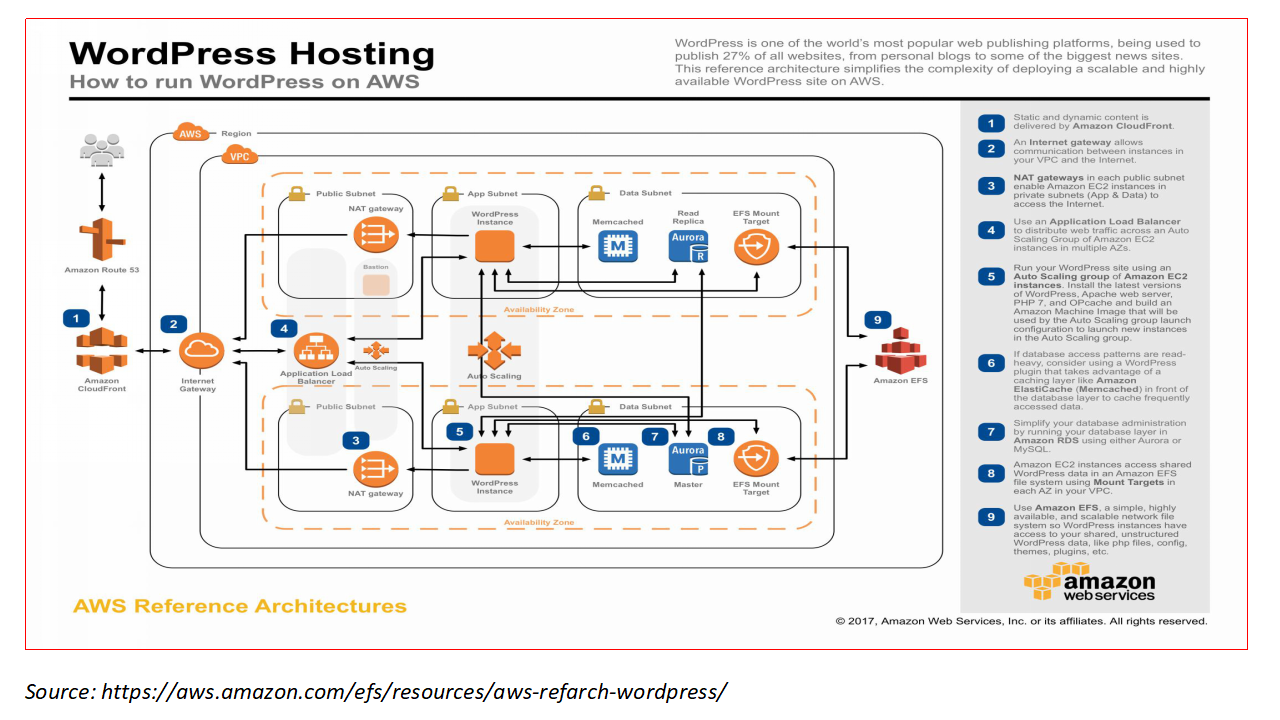
Before going to the above steps, I would like to show the below diagram for your understanding on “The setup of WP hosting on AWS”. You can download it through the URL given and see it as an image file for your understanding.
Now, let us recap our beginning conclusions for this blog. We need to do the below activities till end of the exercise.
-
Creating a blogging infrastructure.
-
Analyzing costs of a blogging infrastructure.
-
Exploring a blogging infrastructure.
-
Shutting down a blogging infrastructure.
-
Deleting infrastructure from AWS Account.
1. What actions we need to consider for Creating blogging infrastructure in AWS?: To create the blogging infrastructure we need the below steps to follow on AWS console.
Note: Please note time to time the screen flows [micro level steps] might change on AWS, but the process should be the same to understand on creation of this WP infra.
- Open the AWS Management Console at https://console.aws.amazon.com.
- Click Services in the navigation bar, and click the Cloud-Formation service.
- Click on Create Stack to start the four-step wizard.
Now we will see what are these 4 steps wizard process it contains.
I. Creating a blogging infrastructure: Step 1 of 4
You need to name your infrastructure. Enter “wordpress” as the Name. For Source option, select and Specify an Amazon S3 Template URL as shown in the screen [lab exercise screen]. Copy this URL and save somewhere in a text file for future reference/usage. About this process, during lab demo you will understand clearly.
II. Creating a blogging infrastructure: Step 2 of 4
Click Next to set the KeyName to “vskumarkey” [example only, you can give any name], for Step 2 of 4. Click Next to create a tag for our infrastructure into next screen. These steps can be seen clearly in lab practices steps.
III. Creating a blogging infrastructure: Step 3 of 4
A tag consists of a key-value pair and can be used to add information to all parts of our infrastructure. We can use tags to differentiate between testing and production resources, add the cost center to easily track costs in our organization [if any], or mark resources that belong to a certain application if we host multiple applications in the same AWS account.
In this example, we will use a tag to mark all of our resources that belong to the “wordpress system”. This will help us later to easily find our infrastructure. Use “system” as the key and “wordpress” as the value. Click Next. Finally, we will see a confirmation page for Step 4 of 4. For clarity look into lab steps.
IV. Creating a blogging infrastructure: Step 4 of 4
In the Estimate Cost row, click Cost. This will open a new browser tab in the background. Keep this browser open only. We will come back to this screen later. Switch back to the original browser tab and click Create. We can see next Review screen in the next page.
Now, our infrastructure will be created. This Review screen shows that wordpress is in the state of CREATE_IN_PROGRESS. It takes 15-20 mts to complete this process.
Now, please take a look at the result by refreshing the page. Select the “WordPress” row, where Status should be CREATE_COMPLETE. If the status is still CREATE_IN_PROGRESS, be patient until the status becomes CREATE_COMPLETE.
Switch to the Outputs tab [below part of the screen], which is the Blogging infrastructure result. There we can find the URL to our “wordpress system”; click it to visit the system.
What is AWS Automation here?:
As we have discussed in the beginning of this blog, one of the key concepts of AWS is automation. We can automate everything. In the background, our blogging infrastructure was created based on a blueprint with its automation. So the above mentioned [10] tasks have been performed in the background by AWS cloud formation service. You can see the beauty of this automation during lab demonstration.
Blogging infrastructure result:
Now we’ve created our blogging infrastructure, let us take a look at it. Our infrastructure consists of the following as we discussed in this blog:
- Web servers
- Load balancer
- MySQL database
Now; we will use the resource groups feature of the Management Console to get an overview.
Exploring the created WP Blogging infrastructure
Now let us understand;
What is Resource Group in AWS?:
- A resource group is a collection of AWS resources.
- Resource is an abstract term for something in AWS like an EC2 server, a security group, or a RDS database.
- Resources can be tagged with key-value pairs. In such case; let us note we can have more than one key-value pairs.
- Resource groups specify what tags are needed for a resource to belong to the group.
- Furthermore, a resource group specifies the region(s) where the resource should reside in. It means globally these resource groups can be deployed for its functioning.
- We can use resource groups to group resources if we run multiple systems in the same AWS account. This way we are sharing the resources among the projects or app architectures.
- Let us note that we have tagged the blogging infrastructure with the key “system” and the value “wordpress”.
- As an example; from now on, we will use this notation for key-value pairs: (system:wordpress). We’ll use that tag to create a resource group for our WordPress infrastructure. For further clarity please look into the lab steps/video.
Now let us understand;
How to create a resource group in AWS?:
-
- In the AWS part of the top navigation bar, click Create a Resource Group.
- Set Group Name to “wordpress” or whatever you like.
- Add the tag system with the value wordpress.
- Select the region N. Virginia [for example]. [I have used my existing account]
- Save the resource group.
- It will take you to next screen shown in next page. Follow the below steps.
How to see the Blogging infrastructure web servers via resource groups details?:
- Select Instances under EC2 on the left to see the web servers.
- By clicking the arrow icon in the Go column, you can easily jump to the details of a single web server.
- Now, You are looking at the details of your web server, which is also called an EC2 instance.
Details of web servers running the blogging infrastructure:
- On this screen the interesting/important details are as below:
- Instance type: It tells us about how powerful your instance is.
- Public IP address: The IP address that is reachable over the internet. You can use that IP address to connect to the server via SSH.
- Security groups: If you click on View Rules, you’ll see the active firewall rules like the one that enabled port 22 from all sources (0.0.0.0/0).
- AMI ID: Let us recollect that we used the Amazon Linux operating system (OS). If you click the AMI ID, you will see the version number of the OS, among others.
We also need to know the utilization of webservers, like how we used to monitor in live [for production boxes].
Looking for webserver utilization and metrics in AWS:
2. In the screen; Select the Monitoring tab to see how your web server is utilized.
3. This will become part of our job: really knowing how the infrastructure is doing.
4. AWS collects some metrics and shows them in the Monitoring section. If the CPU is utilized more than 80%, you should add a third server to prevent page load times from increasing.
Now let us understand on;
How to check the Blogging infrastructure load balancer via resource groups?:
- We can find the load balancer by selecting Load Balancers under EC2 on the left to the page.
- By clicking the arrow icon in the Go column, you can easily jump to the details of the load balancer.
- Now, we are looking at the details of your load balancer.
- Here; the most interesting part is, “How the load balancer forwards traffic to the web servers?“.
- The blogging infrastructure runs on port 80, which is the default HTTP port.
- The load balancer accepts only HTTP connections to forward to one of the web servers that also listen on port 80.
- The load balancer performs a health check on the virtual servers attached.
- Both virtual servers are working as expected, so the load balancer routes traffic to them.
How to check the MySQL server ?:
Details of the MySQL database which stores data for the blogging infrastructure
- Now; let’s look at the MySQL database. You can find the database in a resource group named wordpress.
- Select DB Instances under RDS at left.
- By clicking the arrow icon in the Go column, you can easily jump to the details of the database.
- Now the details of our MySQL database are shown in the screen.
- The benefit of using RDS is that we no longer need to worry about backups because AWS performs them automatically.
- Updates are performed by AWS in a custom maintenance window. Keep in mind that you can choose the right database size in terms of storage, CPU, and RAM, depending on your needs.
- AWS offers many different instance classes, from 1 core with 1 GB RAM up to 32 cores with 244 GB RAM.
Note: I would like to emphasize to compare the traditional [non-cloud] approach. We were using scheduler to backup the DB periodically. Some times we used to shutdown the live systems to take the backups. So, from AWS RDS services we do not need interruption to the business to take backup, RDS takes care everything. We can save the role of sysadmin/DBA while using the AWS services. This way the resources efforts and business services down time are saved.
As we planned three activities for this whole exercise as on now; we have completed the activity of “A) Set up a highly available blogging infrastructure in AWS.”
Now, we are going to work on; “B) Estimate monthly costs of the infrastructure.”
- As the part of this exercise is’ cost estimation also need to be done.
- To analyze the cost of our blogging infrastructure, we will use the AWS Simple Monthly Calculator.
- Recollect that we clicked the Cost link in the previous section to open a new browser tab.
- Now, switch to that browser tab, and you will see a screen as shown in the below chart.
- To Estimate of our Monthly Bill, and expand the Amazon EC2 Service and Amazon RDS Service rows.
Now, Let us see and understand the below chart.
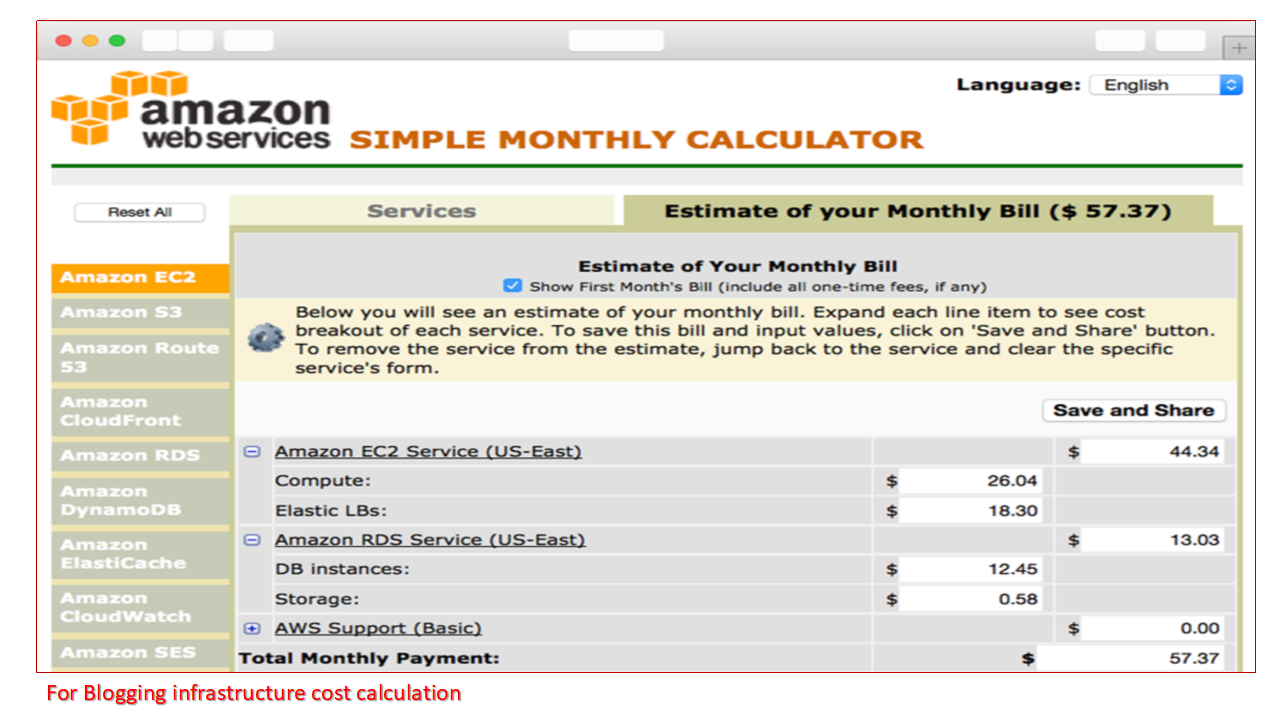
Now it’s time to evaluate costs. We can see on How much does it cost?
- In this example, our infrastructure will cost is around $60 per month.
- Let us keep in mind that this is only an estimate.
- We are billed based on the actual usage till the end of the month.
- Everything is on-demand and usually billed by hours of usage or by gigabytes of usage.
- But what influences the usage for this infrastructure?
Let us analyze different situations and identify the costing parameters as below:
Traffic processed by the load balancer: Let us assume; Expect the costs to go down in during festival/vacation season like; “December and the summer”. When the people are on vacation and not looking at our blogs.
Storage needed for the database: If our startup company increases the number of blogs, the database will grow, so the cost of storage will increase this way.
Number of web servers needed: A single web server is billed by hours of usage. If two web servers are not enough to handle all the traffic during the day, we may need a third server. By default we need to keep in our AWS/EC2 setup. In that case, we will consume more hours of virtual servers.
Now we had a clear overview of the blogging infrastructure creation and its cost estimation/Analysis. Similar way you will be able to do for your AWS migration projects also.
Now; with reference to the 3rd step, it is time to shut down the infrastructure and complete our AWS migration evaluation exercise.
Let us recap our planned 3rd activity;
C) Finally, Delete our blogging infrastructure to save cost from free-tier account.
Now, go to the CloudFormation service in the Management Console and do the following:
- Select the WordPress row.
- Click Delete Stack, as shown in top of the screen.
- After you confirm the deletion of the infrastructure, it takes few minutes for AWS to delete all of the infrastructure’s dependencies.
- Please note; this is an efficient way to manage our infrastructure.
- Just as the infrastructure’s creation was automated, its deletion is also completely automated.
- You can create and delete infrastructure on-demand whenever you would like, and you only pay for infrastructure when you create and run it.
<===== I copied the relevant lab practiced steps for your easy use ======>
These steps were used as on dated: 9th Sept 2018 on my free-tier account for student purpose.
The AWS might change its Screens flow or UI part time to time.
Hence from the above blog narration some detailed steps are given in the below lab practice steps for your easy use/practice.
1. Sign-in to your AWS console account from URL:
https://aws.amazon.com/
2. Login to the account.
3. Click on Services.
4. Please note we need to use Cloudformation service of AWS in this exercise.
Hence click on Cloudformation.
5. You will be shown the screen to create a new stack. Click on it. Note as mentioned in my blog it has 4 step process.
6. Now, select a sample template. Choose WordPress blog. It creates/shows the S3 template url.
7. Copy the S3 Template URL into a file for future usage.
8. Now, click on Next to go to next screen.
9. Under Specify Details columns, mention the details.
10. Please note my Infra name I want to give “wordpress”.
11. It has the predefined DB “wordpressdb”, I will keep it.
12. I can give DB Passwords, as required in the entry boxes/columns.
13. Dbuser “vskumarwp”. It has instance type t2.small.
14. Now, as you are aware we need to have the local SSH keys which we have created earlier. I have some keys I have selected one. [If you are new for this account, create the SSH keys…]
15. I need to give the range of IPs to be used for our wp servers.
I want to use 192.168.116.9/15.
16. Now, need to click on next…
Please note the above steps are required for you….
17. Let me give System as “worpress” and key as “system” as mentioned in my blog.
18. I want to skip ARN value in this exercise, due to as I mentioned in blog I would like to follow. I will not have any ARN, Hence monitoring is not mandated for me in this exercise. Then press “Next”.
19. Now, we will see the review screen as mentioned in Blog. On reveiw screen press Create button.
20. We are in creation process screen as mentioned in Blog.
CREATE COMPLETE IS DONE NOW.
21. Now let me click on my instance vskumarwp.
22. Now, go to the top navaigation bar and select the resource groups.
23. Select create resource group. You will get a new screen which has some entries and selections. Give tag key as “worpress” and press create group.
24. Next screen it shows wordpress as the resource group name.
25. Now, go to EC2 instance from the left side shown.
Now, you can see in bottom of the screen as mentioned in the blog.
26. I can see ELB by clicking on ELB option in the left panel.
Please note I have not given the ARN. Hence the Monitoring option is not selected.
Due to it might charge me.
27. You can see the cloud watch options through monitoring button in the below part of the screen.
28. Please note the security groups are attached by default.
29. Please note if I want to use this EC2 instance which is prepared for WP, I need to launch in AWS services live.
Which is going to be billed. Hence I will stop at this point.
30. The FINAL step is to delete the Instance of WP. I will go to cloudformation option.
Then it displays the current instance. I will select it and go to actions and select the DELETE STACK Option.
It prompts for ‘YES/NO’, Select Yes. It can take some time to perform deletion.
31. Once it is deleted it will comeback to the Stack creation screen.
Please note I have checked it, there are no existing instances in my current account.
We can see it as terminated instance.
32. So, this way we can create infra and delete it very easily.
33. So, let us have a final conclusion, section from blog.
34. Please call me if you need any coaching for AWS course….
THANKS FOR WATCHING MY VIDEOS/BLOGS ……..
Watch the below video on this blog Narration:
https://www.facebook.com/watch/?v=254567748762273
For the above steps a 40 mts videos has been made and hosted on my channel. Please look into it also.
================= End of Lab practice ===============================>
Now, after doing all the above steps we can compare our conclusions mentioned in the beginning of this blog. I copied the same for your cross check!!
a) Creating a blogging infrastructure can be fully automated through AWS services.
b) Infrastructure can be created at any time on-demand without any up-front
commitment for how long we will use it in AWS.
c) We can pay for our infrastructure depending on how many hours we use it.
d) Infrastructure consists of several parts,
such as; virtual servers, load balancers, and databases.
e) Infrastructure can be deleted with one click without costing to us.
This process is powered by AWS automation. So it will not be billed to our free tier account after deletion.
I assume now, you are a fearless user of AWS to create the infrastructure through your free-tier account and delete and maintain the account without a cost to your CC/Account.
If you are interested to learn Virtualization with Vagrant visit:
1. Vagrant/Virtual Box:How to create Virtual Machine[VM] on Windows 10?:
Note to the reader of this blog:
If you are not a student of my class, and looking for it please contact me by mail with your LinkedIn identity. And send a connection request with a message on your need. You can use the below contacts. Please note; I teach globally.
This blog is created as an video also. There are series of videos made till end of the lab session. At the end, the lab practices are also recorded for your use with your free AWS account.
For some more AWS Specimen POCs visit the below FB web pages:
Build Cloud Solution Architects
If you want to learn indepth Cloud/DevOps Architec role with Infra setup upto IAC Automation the following course can help you to convert into the demanding role:
https://vskumar.blog/2020/01/20/aws-devops-stage1-stage2-course-for-modern-tech-professional/
There are many global working professionals are inclined on this curriculum. Watch the videos and ping me on Facebook: https://www.facebook.com/shanthikumar.vemulapalli
