This video has the discussion on S3 Glacier POC:
The attached video has the lab demonstration.
You can watch and give your message.

This video has the discussion on S3 Glacier POC:
The attached video has the lab demonstration.
You can watch and give your message.
With reference to my previous blog on:
1. AWS:How to create and activate a new account in AWS ?
https://vskumar.blog/2018/09/01/1-awshow-to-create-and-activate-a-new-account-in-aws/
I have made a scenario based “AWS services usage” blog in this content. Which can be considered as a Proof of Concept [POC] Project also.
If you are new for cloud technology, I have made a video cum blog for you to understand its initiation/evaluation concepts. This video is more useful for PMs/Cloud Architects/DevOps role based people.
For video Visit:
For the above video’s blog:
https://vskumarcloudblogs.wordpress.com/2016/11/30/how-to-initiate-a-cloud-transformation/
Now, let us move forward with this blog content.
In this AWS exercise, I have described/demonstrated on WordPress[WP] infrastructure creation using a free tier account.
At the end of this blog a micro level lab practiced steps are copied and a recorded video is there on my channel.
I would like to explain from architecture/design perspective through this blog, before you go to Lab steps.
After doing this exercise, simply and finally we can come into the following conclusions:
First let us analyze on WP and its components.
C) Finally, Delete our blogging infrastructure to save cost from free-tier account.
For our understanding on WP;
Now, let us analyze on “what are the AWS services required for our WP test infrastructure?”.
Let us analyze what are the functions/benefits of these AWS services.
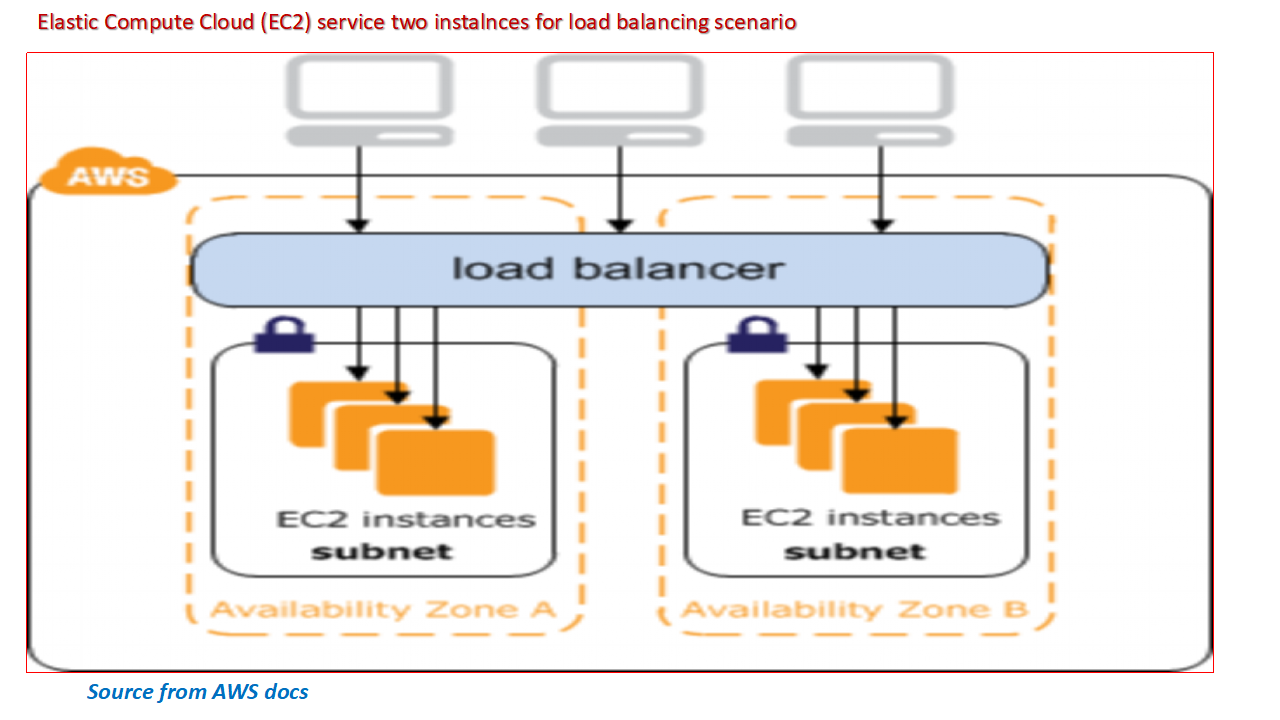
AWS offers a load balancer as a service.
The Elastic Load Balancer (ELB) distributes traffic to a bunch of servers behind it in a cloud environment. It’s highly available by default.
Let us assume our startup company’s blogs are published globally. From many countries these can be accessed by the users. Assume there are lot of users access this content globally. Then in traditional method your load is not balanced without having physical servers connected through VPNs/networks, etc. in different locations. Think about the Hardware/Software/maintenance/FMG cost for this traditional infrastructure. We can not think it being a startup company to spend much. No way!! Hence we need to depend on cloud service provider.
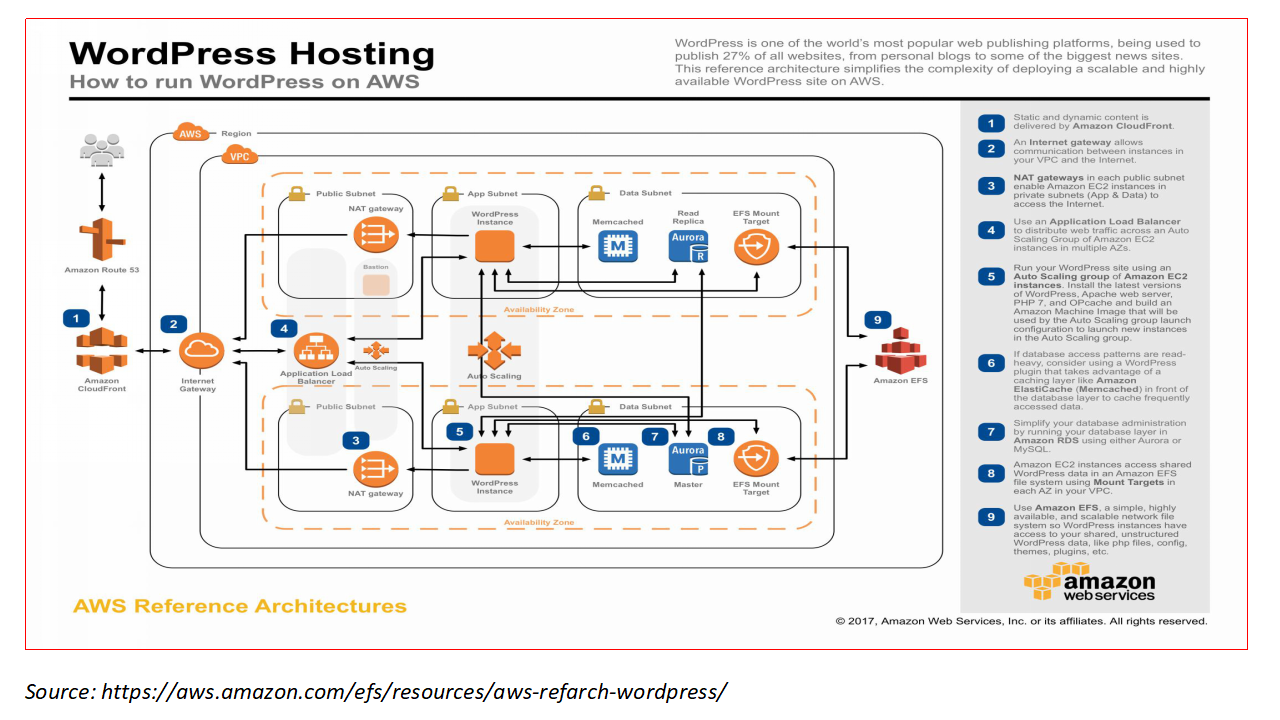
With AWS ELB, this can be balanced by distributing the blog users traffic to different virtual servers under cloud environment. To denote this distributed load balancing architecture, I have collected a diagram on;
WordPress infrastructure and Load Balancing through ELB AWS service.
Which is pasted here for your clarity on the ELB function.

It is A virtual server which is provided by the Elastic Compute Cloud (EC2) service of AWS. We will use a Linux server with an optimized distribution called Amazon Linux to install Apache, PHP, and WordPress during our exercise. Please note; we are not limited to Amazon Linux only; we can also choose Ubuntu, Debian, Red Hat, or Windows. Virtual servers can fail at any time, so we need at least two of them for contingency planning. The load balancer will distribute the traffic between them. The beauty of AWS service in case of a server failure is; the load balancer will stop sending traffic to the failed server, and the remaining [contingency] server will need to handle all the requests until the failed server is replaced. Let us not worry on this communication! You will be intimated the status through alerts.
A sample architecture diagram is pasted here FYI with two EC2 instances.
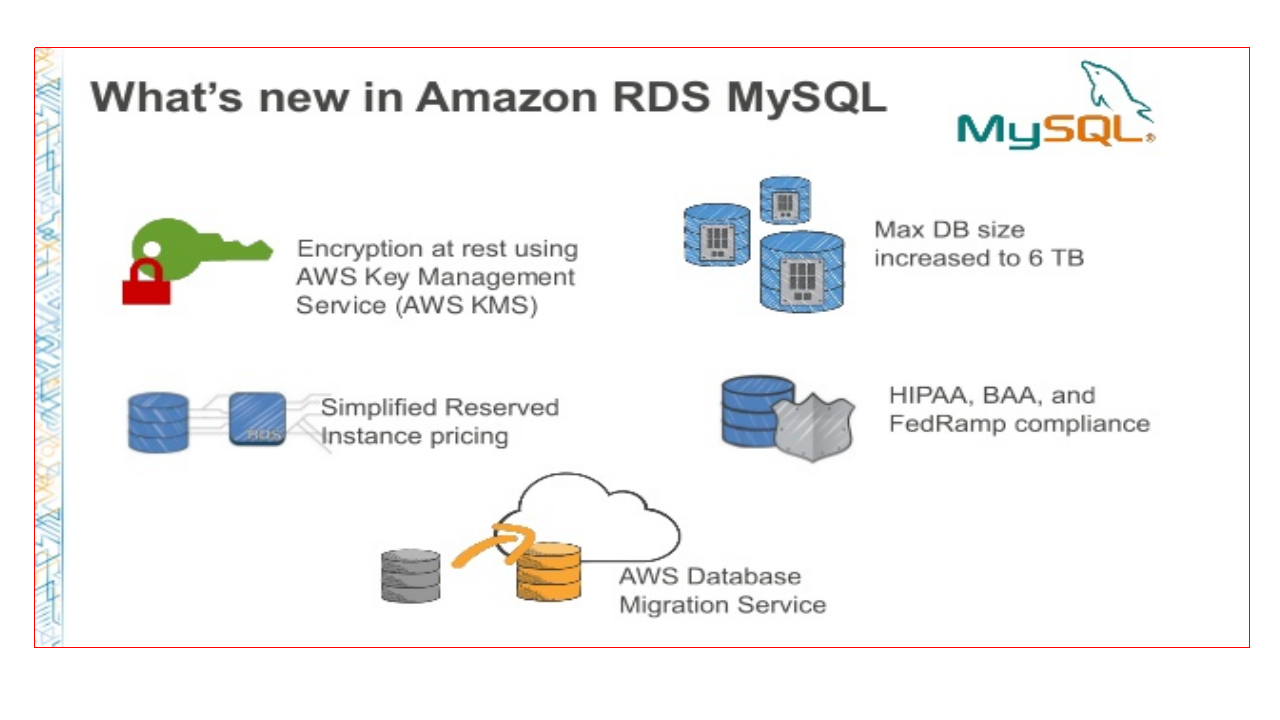
WordPress relies on the popular MySQL database. AWS provides MySQL as a Relational Database Service (RDS). We can choose the database size (like; storage, CPU, RAM), and RDS takes care of the rest (backups, updates). RDS can also provide a highly available MySQL database by replication. In traditional [non-cloud] model we had the similar setup. It occurs huge costing. By using AWS cloud services this can be easily maintained with minor costing only.
On this context; from the below diagram we can see the MYSQL features from AWS services offering.
In every application architecture we need to have the security features in place. Either these can be embed in the applications or through security tools it can be applied. So the entire architecture is protected that way.
But in cloud services many providers provide these services differently with their services offering.
The Security groups are a fundamental service of AWS to control network traffic like a firewall in traditional systems. Security groups can be attached to a lot of services like ELB, EC2, and RDS. For example; with security groups, we can configure our load balancer as below:
It only accepts requests on port 80 from the internet. Web servers only accept connections on port 80 from the load balancer. And MySQL only accepts connections on port 3306 from the web servers. If we want to log in to our web servers via SSH, we must also open port 22. Similar ways the architecture setup can be configured.
FYI, I have considered a diagram from AWS docs; which denotes a typical AWS multi-tier approach security services with a Firewall:
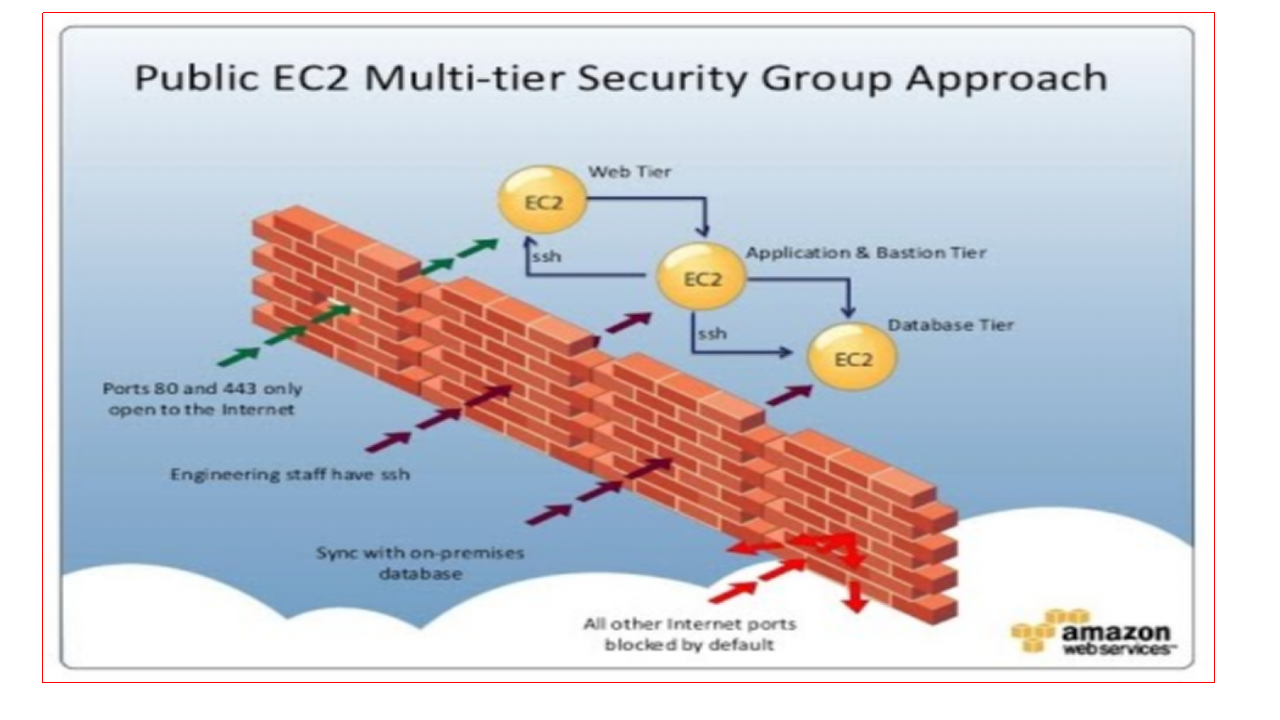
As shown in the above diagram, A security group acts as a virtual firewall for our instance to control inbound and outbound traffic. When we launch an instance in a Virtual Private Cloud[VPC], we can assign the instance to up to five security groups. It means in any VPC AWS provides five different security groups.
So, now what is our start company plan for security?:
Let us assume our startup company’s blogging infrastructure consists of two load-balanced web servers running a) WordPress and b) a MySQL database server.
The following tasks are performed automatically in the background through AWS:
Before going to the above steps, I would like to show the below diagram for your understanding on “The setup of WP hosting on AWS”. You can download it through the URL given and see it as an image file for your understanding.
Now, let us recap our beginning conclusions for this blog. We need to do the below activities till end of the exercise.
1. What actions we need to consider for Creating blogging infrastructure in AWS?: To create the blogging infrastructure we need the below steps to follow on AWS console.
Note: Please note time to time the screen flows [micro level steps] might change on AWS, but the process should be the same to understand on creation of this WP infra.
Now we will see what are these 4 steps wizard process it contains.
I. Creating a blogging infrastructure: Step 1 of 4
You need to name your infrastructure. Enter “wordpress” as the Name. For Source option, select and Specify an Amazon S3 Template URL as shown in the screen [lab exercise screen]. Copy this URL and save somewhere in a text file for future reference/usage. About this process, during lab demo you will understand clearly.
II. Creating a blogging infrastructure: Step 2 of 4
Click Next to set the KeyName to “vskumarkey” [example only, you can give any name], for Step 2 of 4. Click Next to create a tag for our infrastructure into next screen. These steps can be seen clearly in lab practices steps.
III. Creating a blogging infrastructure: Step 3 of 4
A tag consists of a key-value pair and can be used to add information to all parts of our infrastructure. We can use tags to differentiate between testing and production resources, add the cost center to easily track costs in our organization [if any], or mark resources that belong to a certain application if we host multiple applications in the same AWS account.
In this example, we will use a tag to mark all of our resources that belong to the “wordpress system”. This will help us later to easily find our infrastructure. Use “system” as the key and “wordpress” as the value. Click Next. Finally, we will see a confirmation page for Step 4 of 4. For clarity look into lab steps.
IV. Creating a blogging infrastructure: Step 4 of 4
In the Estimate Cost row, click Cost. This will open a new browser tab in the background. Keep this browser open only. We will come back to this screen later. Switch back to the original browser tab and click Create. We can see next Review screen in the next page.
Now, our infrastructure will be created. This Review screen shows that wordpress is in the state of CREATE_IN_PROGRESS. It takes 15-20 mts to complete this process.
Now, please take a look at the result by refreshing the page. Select the “WordPress” row, where Status should be CREATE_COMPLETE. If the status is still CREATE_IN_PROGRESS, be patient until the status becomes CREATE_COMPLETE.
Switch to the Outputs tab [below part of the screen], which is the Blogging infrastructure result. There we can find the URL to our “wordpress system”; click it to visit the system.
What is AWS Automation here?:
As we have discussed in the beginning of this blog, one of the key concepts of AWS is automation. We can automate everything. In the background, our blogging infrastructure was created based on a blueprint with its automation. So the above mentioned [10] tasks have been performed in the background by AWS cloud formation service. You can see the beauty of this automation during lab demonstration.
Blogging infrastructure result:
Now we’ve created our blogging infrastructure, let us take a look at it. Our infrastructure consists of the following as we discussed in this blog:
What is Resource Group in AWS?:
Now let us understand;
How to create a resource group in AWS?:
Details of web servers running the blogging infrastructure:
We also need to know the utilization of webservers, like how we used to monitor in live [for production boxes].
Looking for webserver utilization and metrics in AWS:
2. In the screen; Select the Monitoring tab to see how your web server is utilized.
3. This will become part of our job: really knowing how the infrastructure is doing.
4. AWS collects some metrics and shows them in the Monitoring section. If the CPU is utilized more than 80%, you should add a third server to prevent page load times from increasing.
Now let us understand on;
How to check the Blogging infrastructure load balancer via resource groups?:
How to check the MySQL server ?:
Details of the MySQL database which stores data for the blogging infrastructure
Note: I would like to emphasize to compare the traditional [non-cloud] approach. We were using scheduler to backup the DB periodically. Some times we used to shutdown the live systems to take the backups. So, from AWS RDS services we do not need interruption to the business to take backup, RDS takes care everything. We can save the role of sysadmin/DBA while using the AWS services. This way the resources efforts and business services down time are saved.
As we planned three activities for this whole exercise as on now; we have completed the activity of “A) Set up a highly available blogging infrastructure in AWS.”
Now, we are going to work on; “B) Estimate monthly costs of the infrastructure.”
Now, Let us see and understand the below chart.
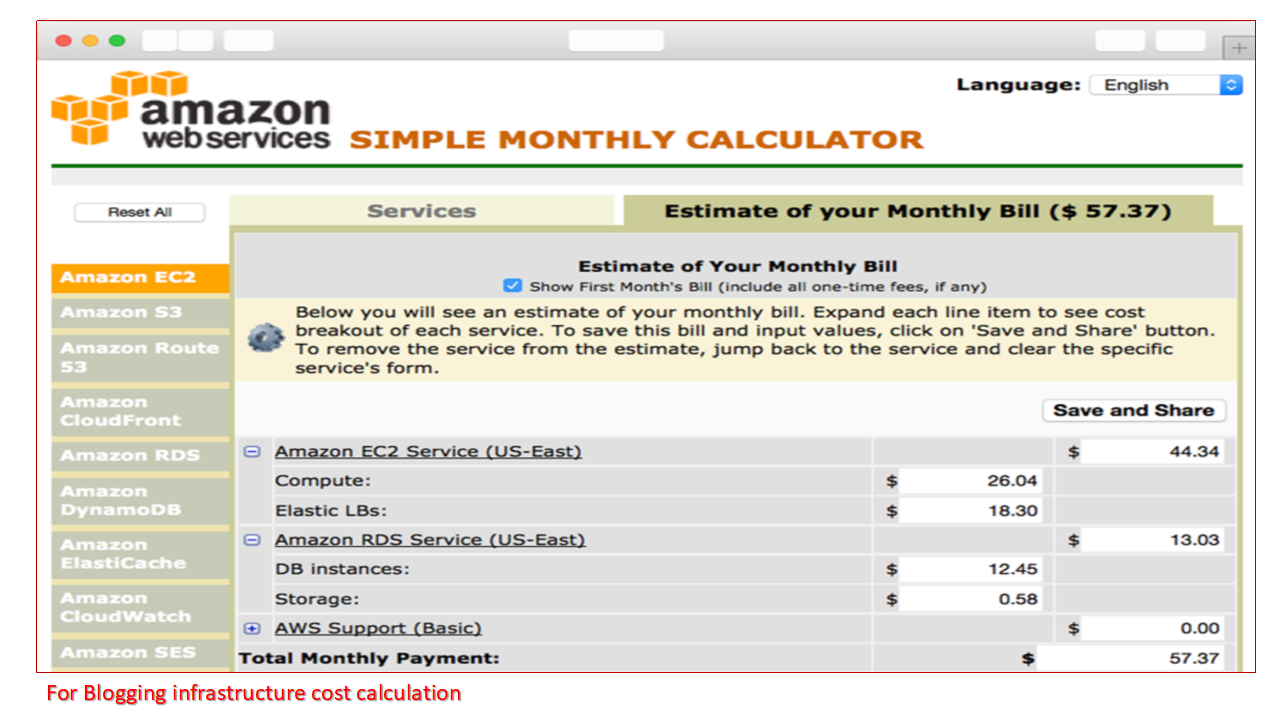
Now it’s time to evaluate costs. We can see on How much does it cost?
Let us analyze different situations and identify the costing parameters as below:
Traffic processed by the load balancer: Let us assume; Expect the costs to go down in during festival/vacation season like; “December and the summer”. When the people are on vacation and not looking at our blogs.
Storage needed for the database: If our startup company increases the number of blogs, the database will grow, so the cost of storage will increase this way.
Number of web servers needed: A single web server is billed by hours of usage. If two web servers are not enough to handle all the traffic during the day, we may need a third server. By default we need to keep in our AWS/EC2 setup. In that case, we will consume more hours of virtual servers.
Now we had a clear overview of the blogging infrastructure creation and its cost estimation/Analysis. Similar way you will be able to do for your AWS migration projects also.
Now; with reference to the 3rd step, it is time to shut down the infrastructure and complete our AWS migration evaluation exercise.
Let us recap our planned 3rd activity;
C) Finally, Delete our blogging infrastructure to save cost from free-tier account.
Now, go to the CloudFormation service in the Management Console and do the following:
<===== I copied the relevant lab practiced steps for your easy use ======>
These steps were used as on dated: 9th Sept 2018 on my free-tier account for student purpose.
The AWS might change its Screens flow or UI part time to time.
Hence from the above blog narration some detailed steps are given in the below lab practice steps for your easy use/practice.
1. Sign-in to your AWS console account from URL:
https://aws.amazon.com/
2. Login to the account.
3. Click on Services.
4. Please note we need to use Cloudformation service of AWS in this exercise.
Hence click on Cloudformation.
5. You will be shown the screen to create a new stack. Click on it. Note as mentioned in my blog it has 4 step process.
6. Now, select a sample template. Choose WordPress blog. It creates/shows the S3 template url.
7. Copy the S3 Template URL into a file for future usage.
8. Now, click on Next to go to next screen.
9. Under Specify Details columns, mention the details.
10. Please note my Infra name I want to give “wordpress”.
11. It has the predefined DB “wordpressdb”, I will keep it.
12. I can give DB Passwords, as required in the entry boxes/columns.
13. Dbuser “vskumarwp”. It has instance type t2.small.
14. Now, as you are aware we need to have the local SSH keys which we have created earlier. I have some keys I have selected one. [If you are new for this account, create the SSH keys…]
15. I need to give the range of IPs to be used for our wp servers.
I want to use 192.168.116.9/15.
16. Now, need to click on next…
Please note the above steps are required for you….
17. Let me give System as “worpress” and key as “system” as mentioned in my blog.
18. I want to skip ARN value in this exercise, due to as I mentioned in blog I would like to follow. I will not have any ARN, Hence monitoring is not mandated for me in this exercise. Then press “Next”.
19. Now, we will see the review screen as mentioned in Blog. On reveiw screen press Create button.
20. We are in creation process screen as mentioned in Blog.
CREATE COMPLETE IS DONE NOW.
21. Now let me click on my instance vskumarwp.
22. Now, go to the top navaigation bar and select the resource groups.
23. Select create resource group. You will get a new screen which has some entries and selections. Give tag key as “worpress” and press create group.
24. Next screen it shows wordpress as the resource group name.
25. Now, go to EC2 instance from the left side shown.
Now, you can see in bottom of the screen as mentioned in the blog.
26. I can see ELB by clicking on ELB option in the left panel.
Please note I have not given the ARN. Hence the Monitoring option is not selected.
Due to it might charge me.
27. You can see the cloud watch options through monitoring button in the below part of the screen.
28. Please note the security groups are attached by default.
29. Please note if I want to use this EC2 instance which is prepared for WP, I need to launch in AWS services live.
Which is going to be billed. Hence I will stop at this point.
30. The FINAL step is to delete the Instance of WP. I will go to cloudformation option.
Then it displays the current instance. I will select it and go to actions and select the DELETE STACK Option.
It prompts for ‘YES/NO’, Select Yes. It can take some time to perform deletion.
31. Once it is deleted it will comeback to the Stack creation screen.
Please note I have checked it, there are no existing instances in my current account.
We can see it as terminated instance.
32. So, this way we can create infra and delete it very easily.
33. So, let us have a final conclusion, section from blog.
34. Please call me if you need any coaching for AWS course….
THANKS FOR WATCHING MY VIDEOS/BLOGS ……..
Watch the below video on this blog Narration:
https://www.facebook.com/watch/?v=254567748762273
For the above steps a 40 mts videos has been made and hosted on my channel. Please look into it also.
================= End of Lab practice ===============================>
Now, after doing all the above steps we can compare our conclusions mentioned in the beginning of this blog. I copied the same for your cross check!!
I assume now, you are a fearless user of AWS to create the infrastructure through your free-tier account and delete and maintain the account without a cost to your CC/Account.
If you are interested to learn Virtualization with Vagrant visit:
Note to the reader of this blog:
If you are not a student of my class, and looking for it please contact me by mail with your LinkedIn identity. And send a connection request with a message on your need. You can use the below contacts. Please note; I teach globally.
This blog is created as an video also. There are series of videos made till end of the lab session. At the end, the lab practices are also recorded for your use with your free AWS account.
For some more AWS Specimen POCs visit the below FB web pages:
Build Cloud Solution Architects
If you want to learn indepth Cloud/DevOps Architec role with Infra setup upto IAC Automation the following course can help you to convert into the demanding role:
https://vskumar.blog/2020/01/20/aws-devops-stage1-stage2-course-for-modern-tech-professional/
There are many global working professionals are inclined on this curriculum. Watch the videos and ping me on Facebook: https://www.facebook.com/shanthikumar.vemulapalli
In this blog, I have given the link to the discussion video:
a) Creating a Bucket on S3.
b) Uploading an Object.
c) Sharing the object URL.
d) Testing the object URL for its display in Different Laptop.
Watch this attached video

I am publishing series of blogs on DevOps tools practice. The interested people can keep watching this site or you can subscribe/follow.
In this blog we will see what are the pre-requisites for Jenkins 2.9 to install and how to install Jenkins.
=====================================>
Visit my current running facebook groups for IT Professionals with my valuable discussions/videos/blogs posted:
https://www.facebook.com/groups/1911594275816833/about/
https://www.facebook.com/groups/585147288612549/about/
Build Cloud Solution Architects [With some videos of the live students classes/feedback]
https://www.facebook.com/vskumarcloud/
=====================================>
MicroServices and Docker [For learning concepts of Microservices and Docker containers]
https://www.facebook.com/MicroServices-and-Docker-328906801086961/
To setup Jenkins, you need to have Java 9 in your local machine.
Hence in the Step1 to setup Java, you need to follow the below steps:
STEP1: How to download and install JDK SE Development kit 9.0.1 ?:
go to URL:
http://www.oracle.com/technetwork/java/javase/downloads/jdk9-downloads-3848520.html
You will see the below page [as on today’s display]

From this web page, Click on Windows file jdk-9.0.1_windows-x64_bin
It will download.
Double click on the file.
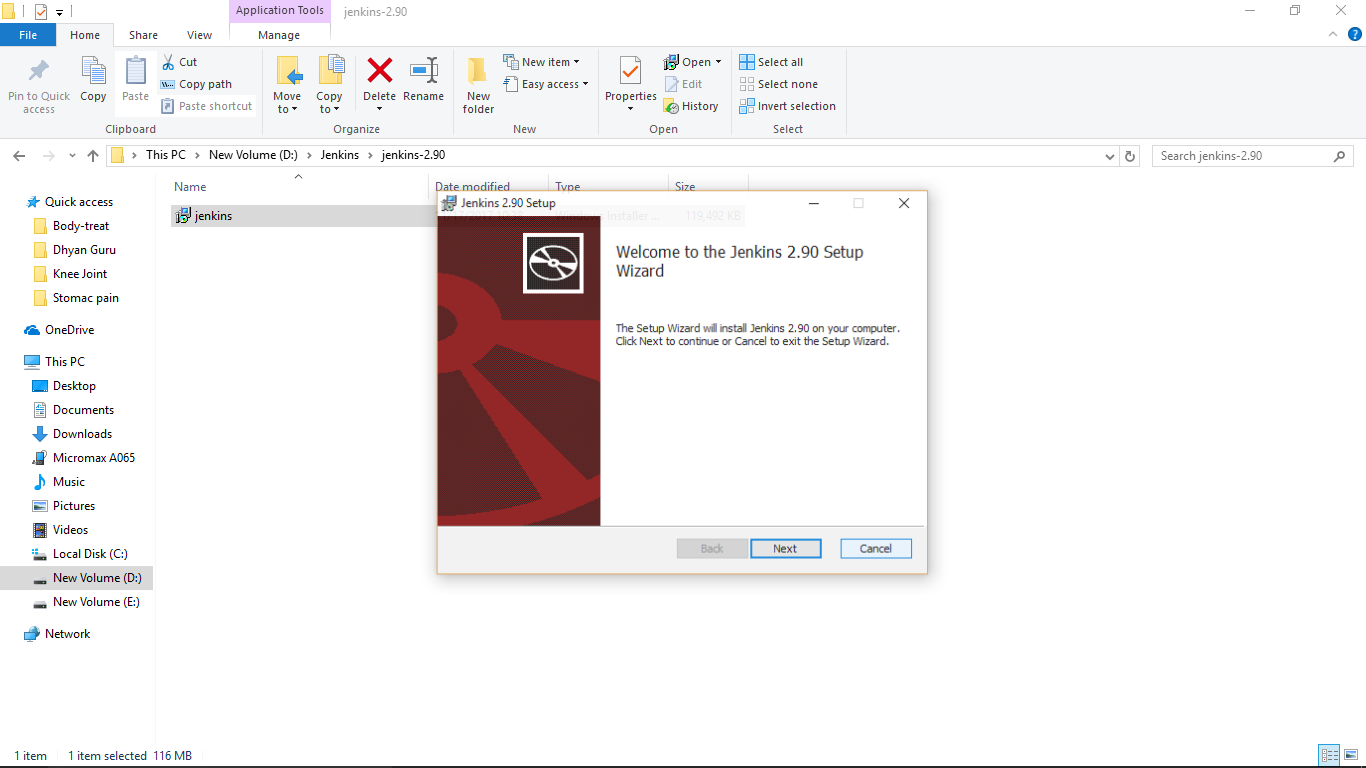
You will see the series of screens, while it is doing installation. I have copied some of them here.


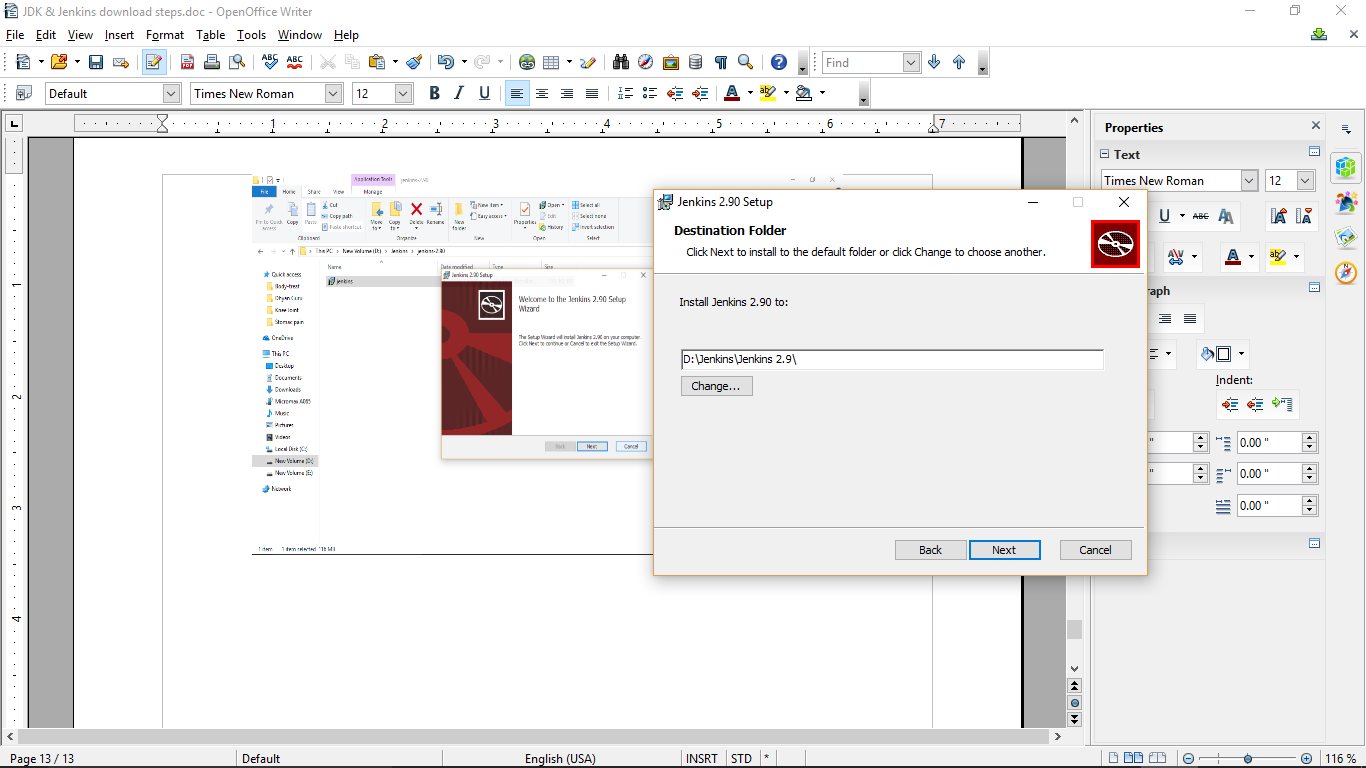
You can change the directory if you want, in the above screen.
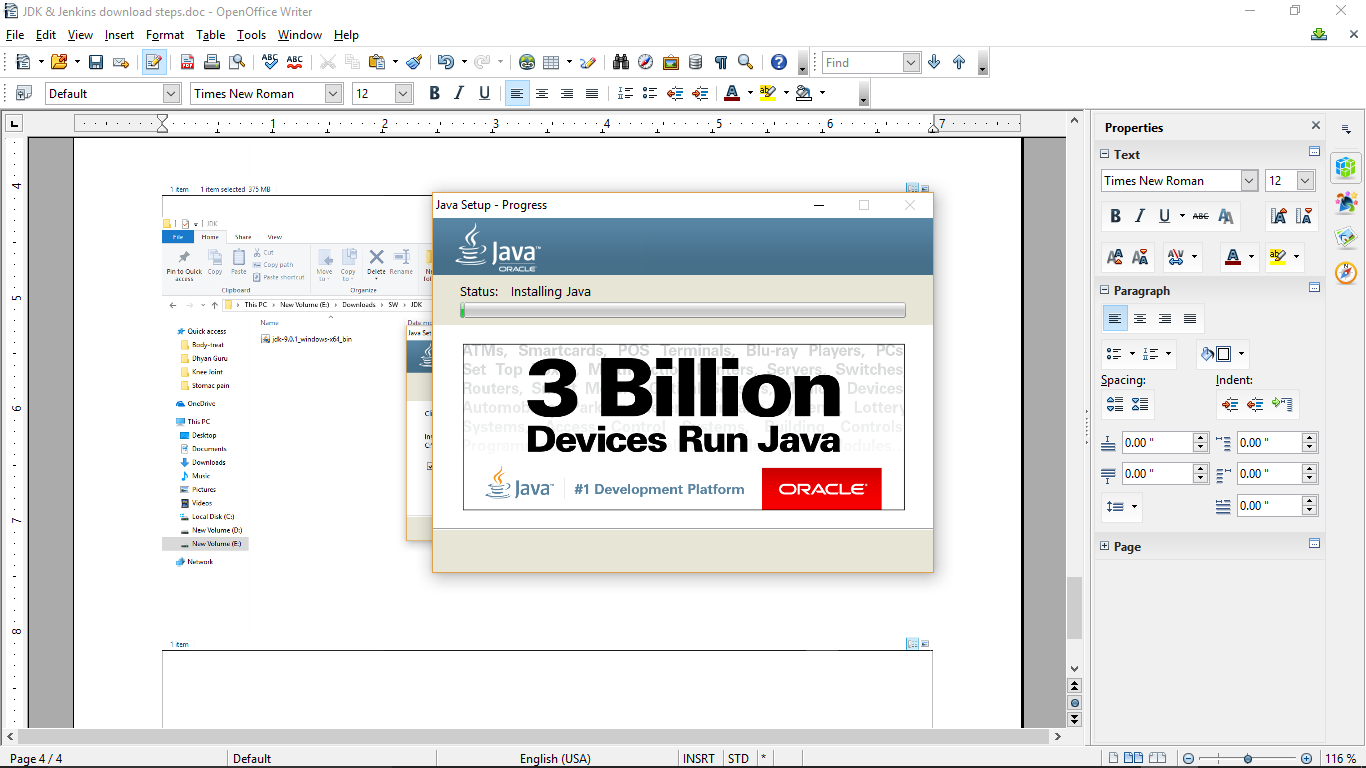
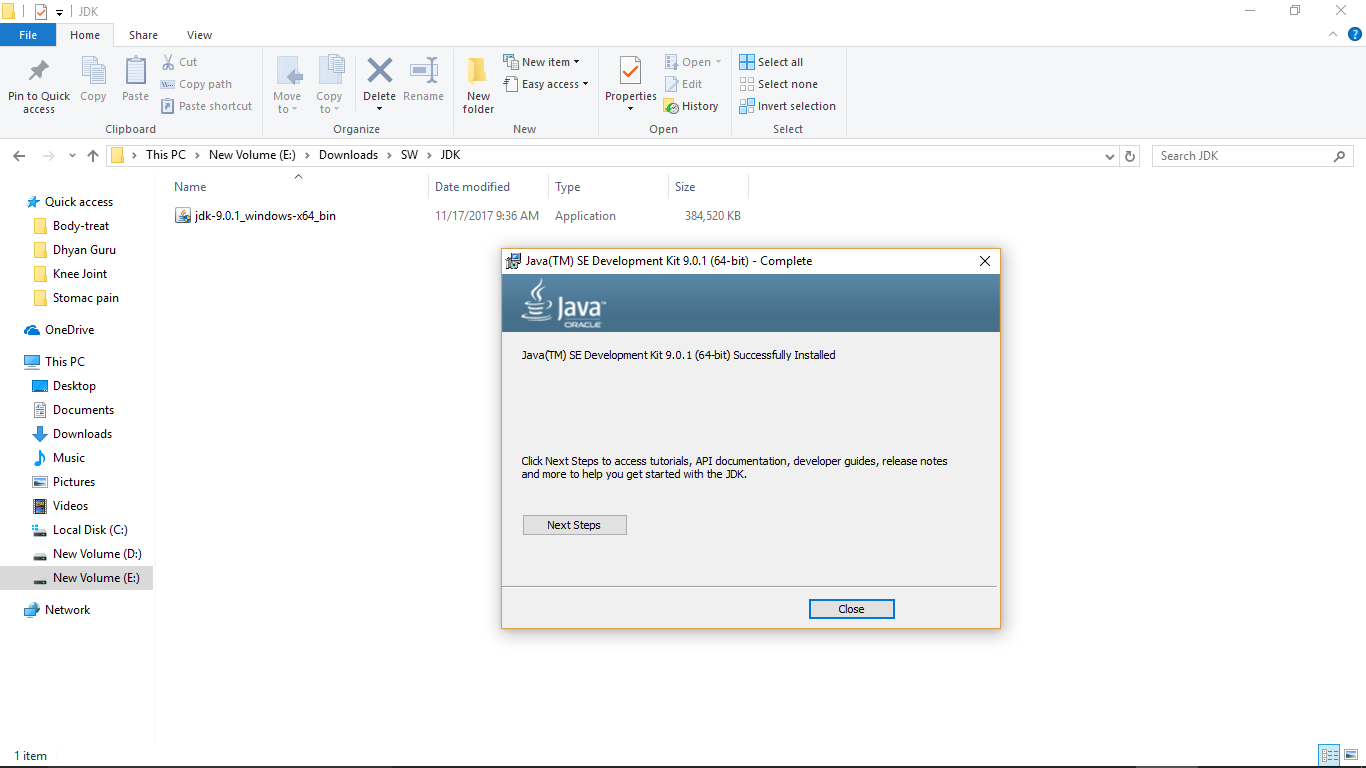
Finally you should get the below screen as installed it successfully.
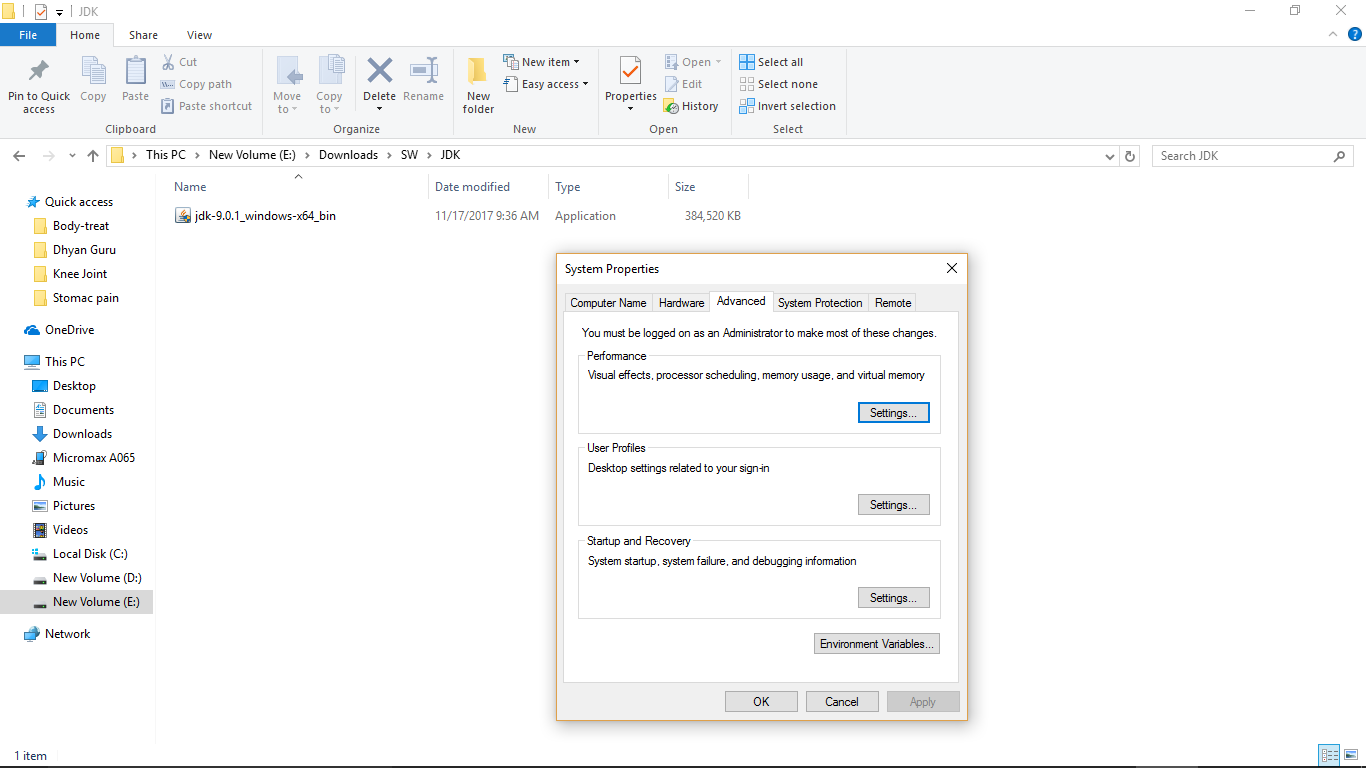
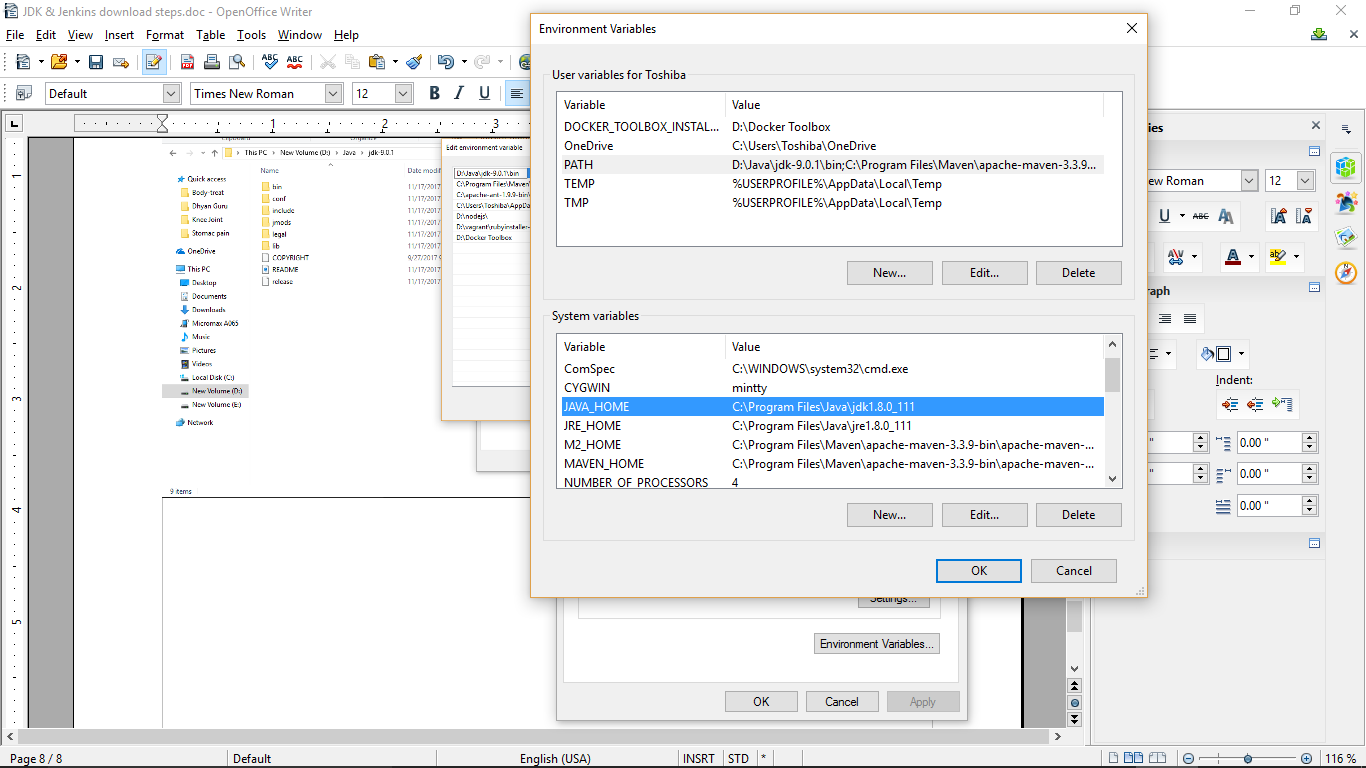
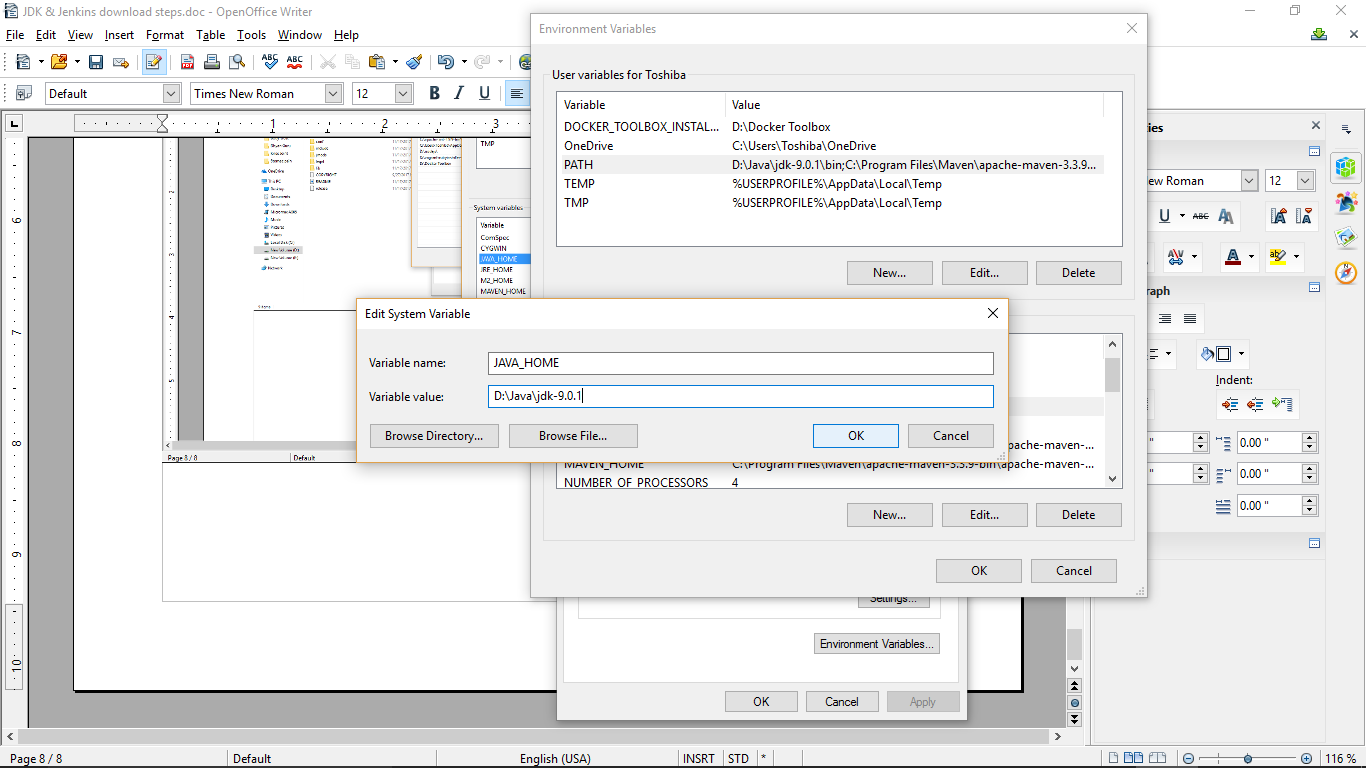
Now, you need to set the Java environment and path variable in Windows setting.
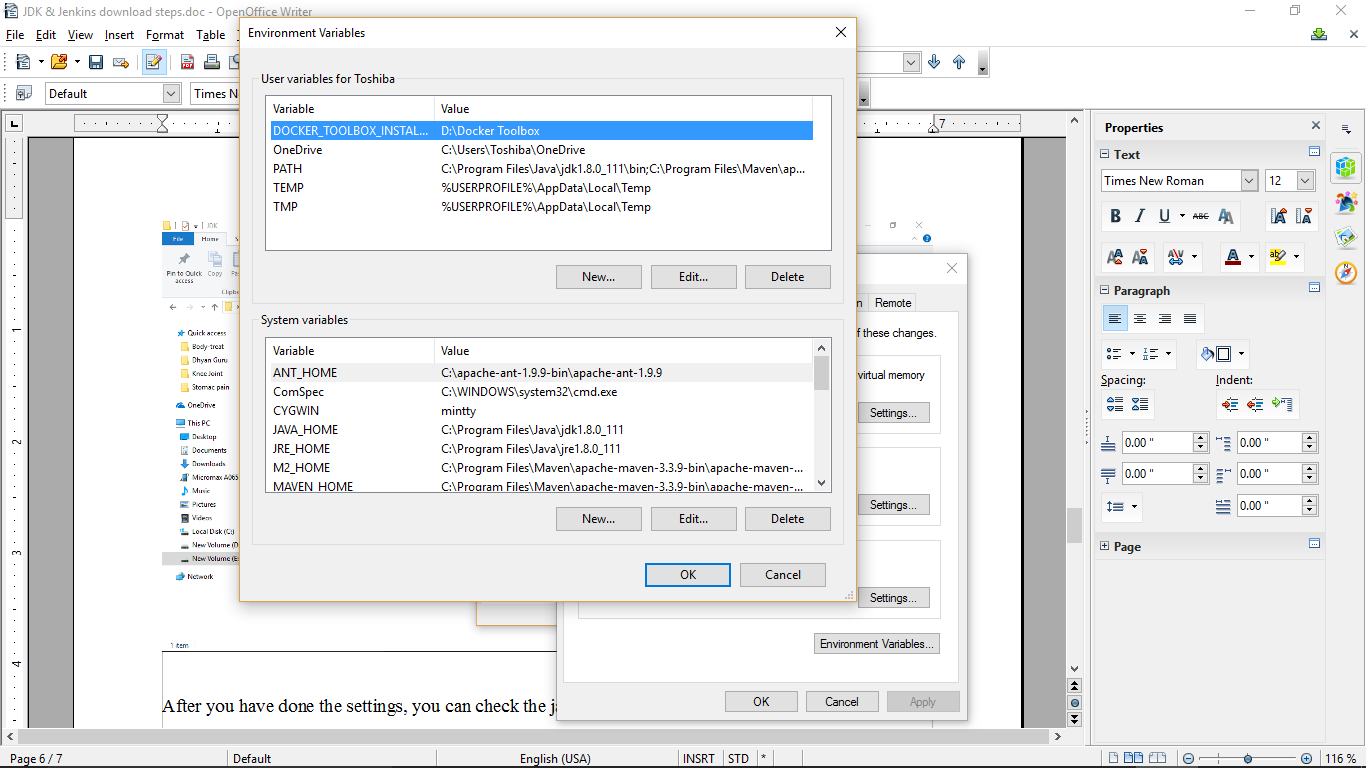
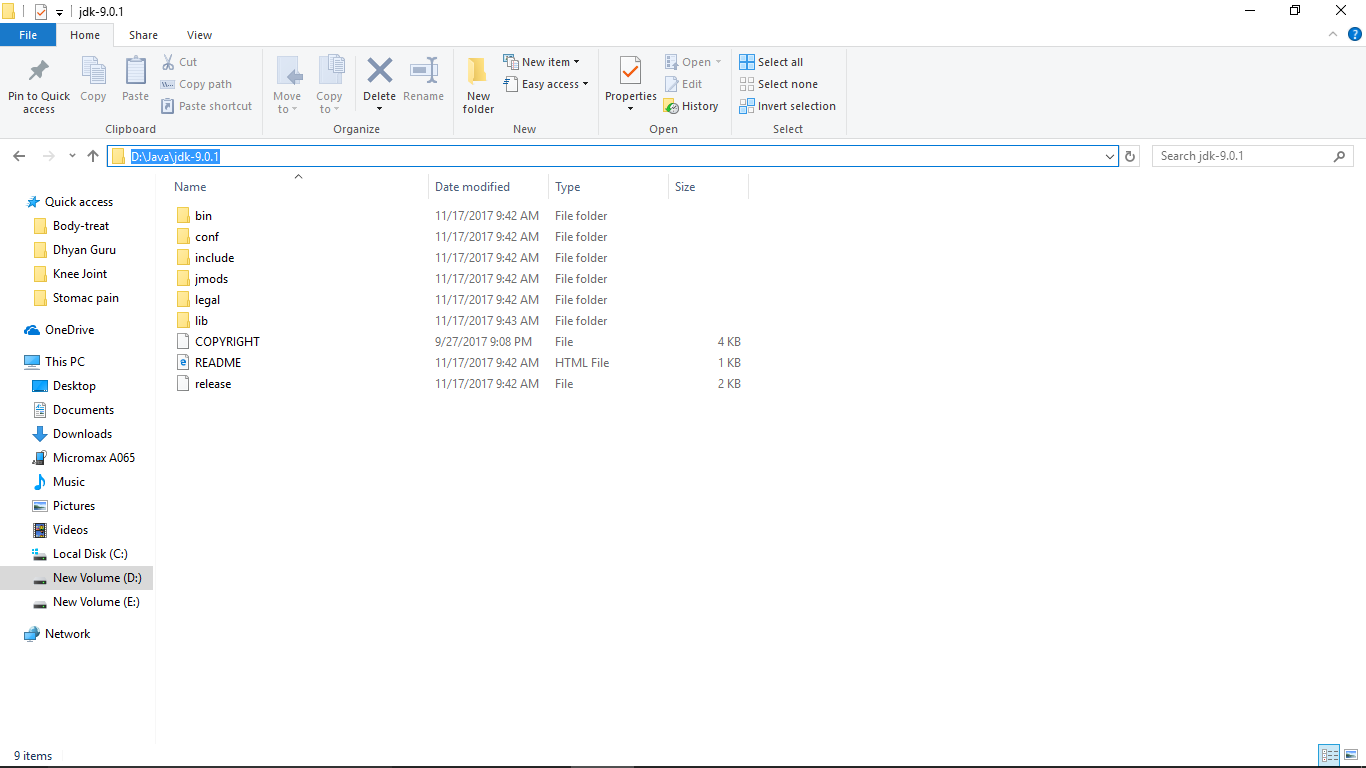
My Java directory path is:
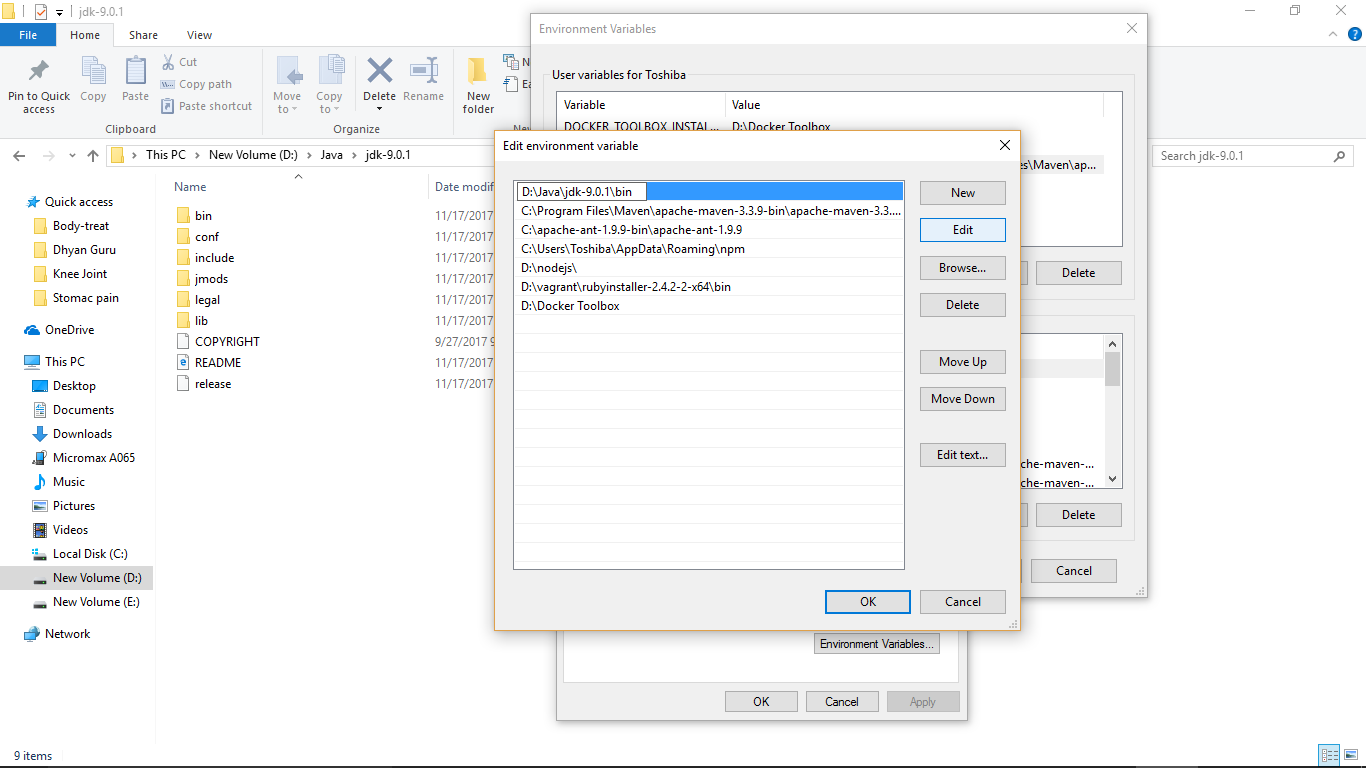
You need to edit the below path variables also for the latest path:
After you have done the settings, you can check the java version as below in a command prompt:

You should get the same version.
Now, You need a simple java program to run and check your compiler and runtime environment.
Please goto google search and check for “Java Hello wordl program”.
Follow the below URL:
https://en.wikiversity.org/wiki/Java_Tutorial/Hello_World!
Copy the program into a text file named as hellowworld.java
Then compile and run the program as below:

If you are getting the above, then your installed java software is working fine.
You need to remember the below:
To compile this program you need to use the below command in command prompt of that program directory:
D:\JavaSamples\Javatest>javac HellowWorld.java
To run the java program you need to use the below command:
D:\JavaSamples\Javatest>java HellowWorld
Hello World
Now, you can plan for setting up Jenkins.
STEP2: How to setup Jenkins on Windows ?:
Follow the below link to download Jenkins for Windows-x64
https://jenkins.io/download/thank-you-downloading-windows-installer/
It downloads the installer as below:
You can see the downloaded installer file for Jenkins.
How to install Jenkins?:
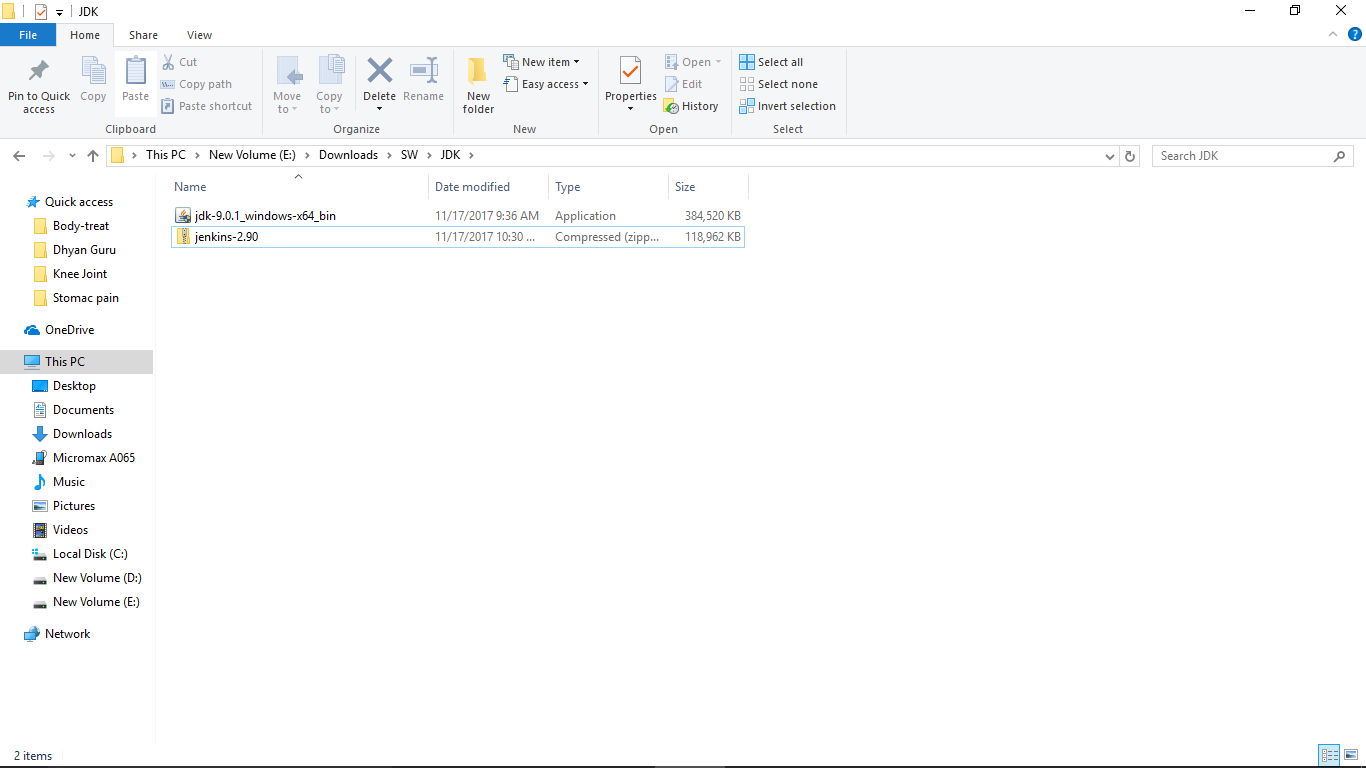
Now you can copy this file into a new directory as Jenkins.
I have copied into the below directory.
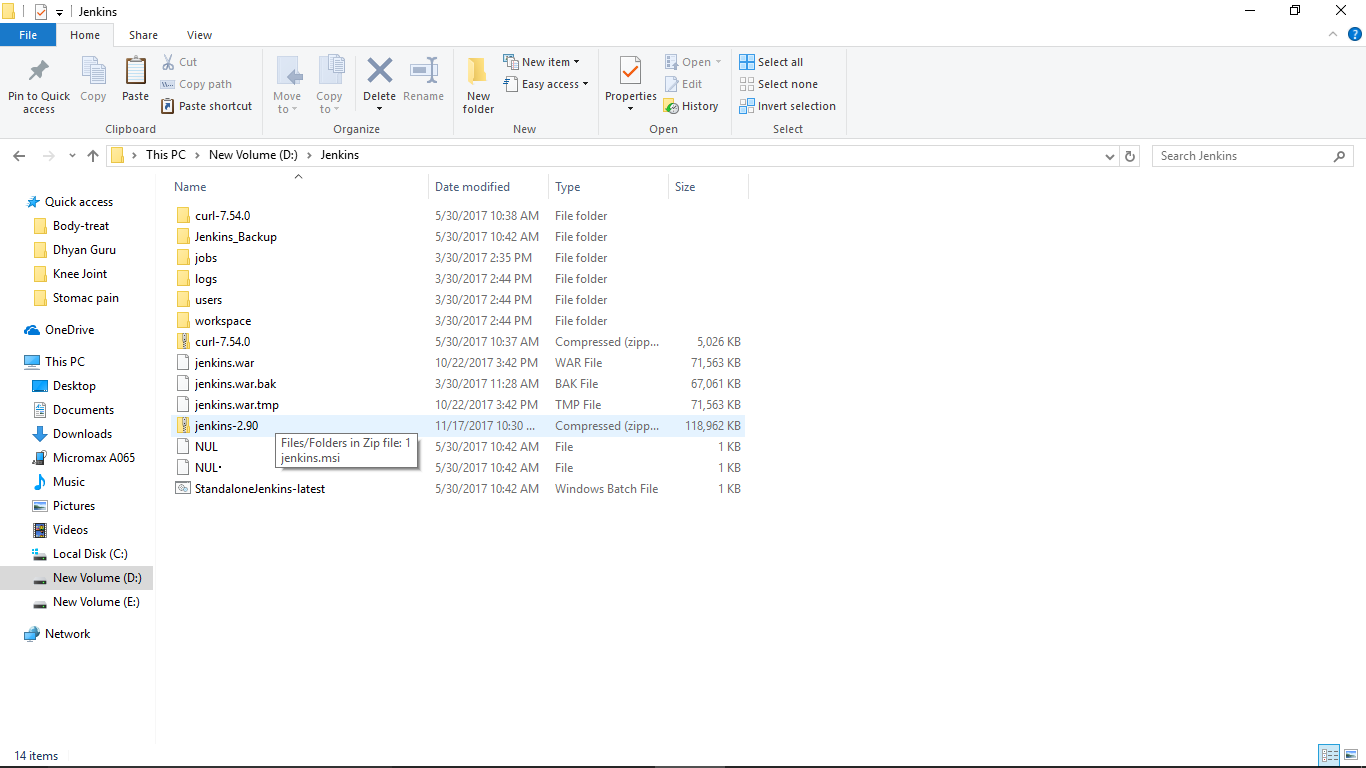
You need to unzip this file.
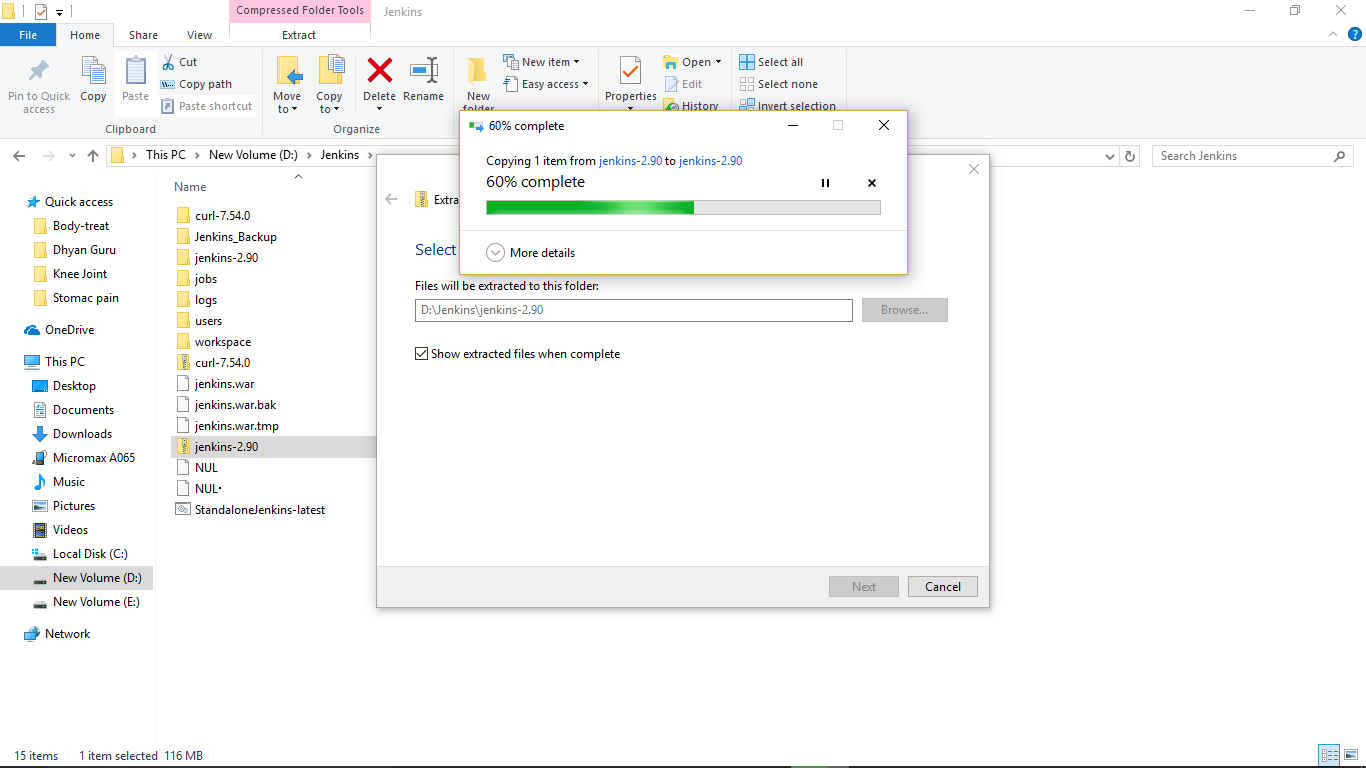
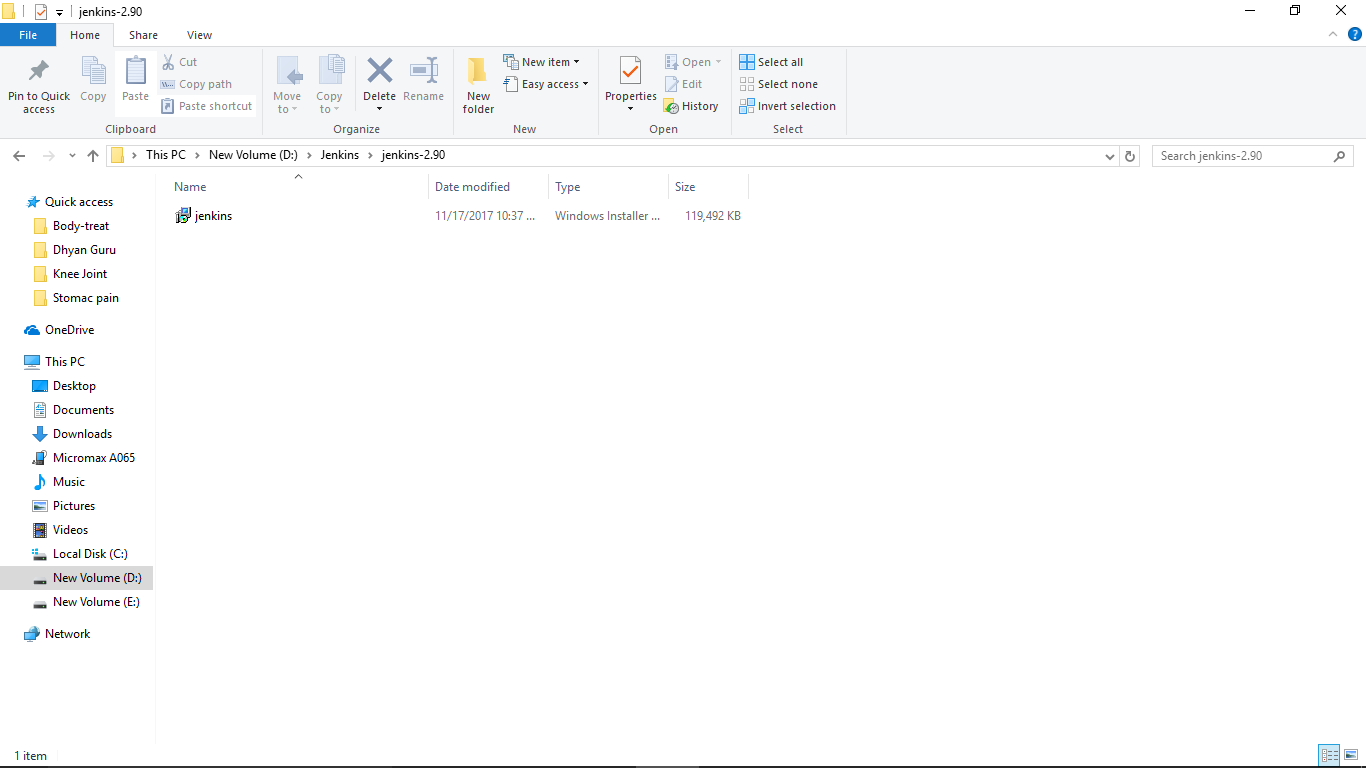
You can see the new directory is created with its unzipped files:
You can double click on it and can see the below screen:
I have changed the path as below:
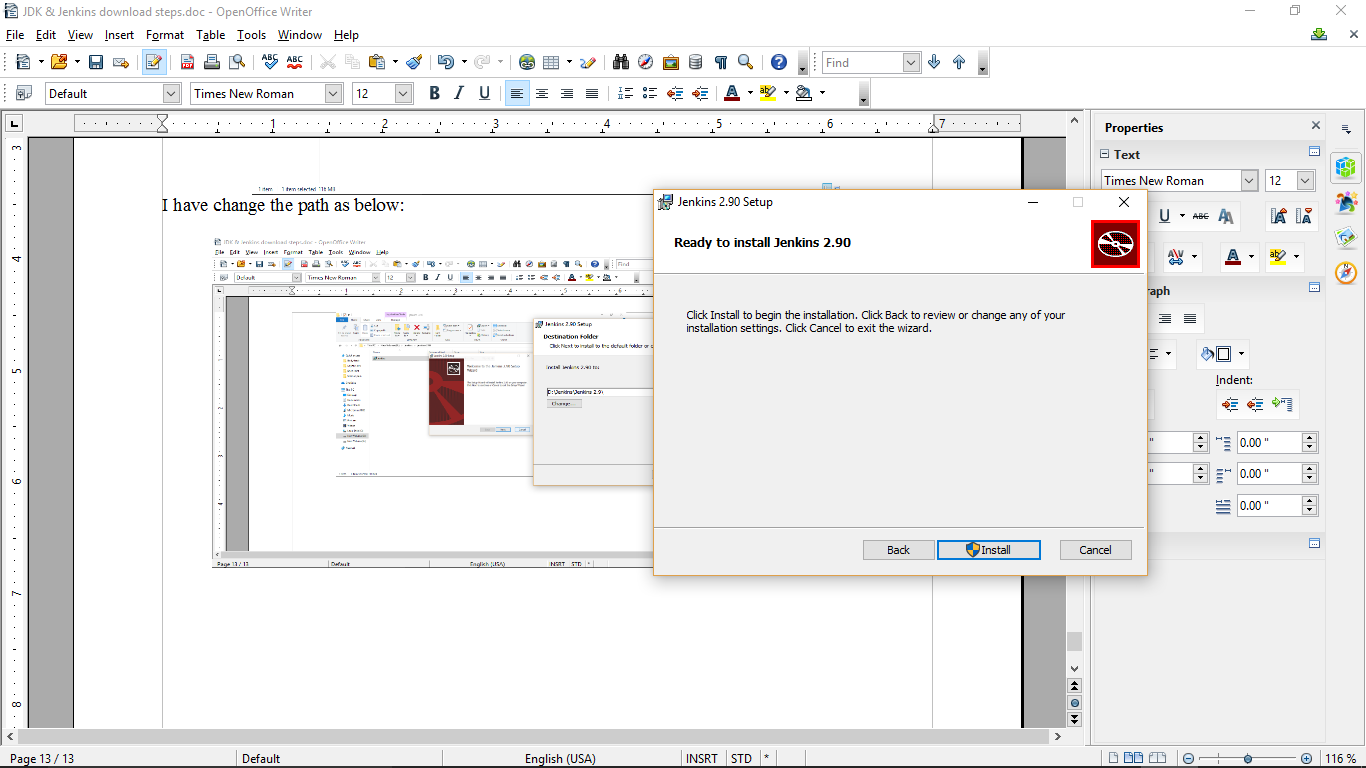
Click on install and say “Yes” in windows confirmation screen.
You can see the below screen:
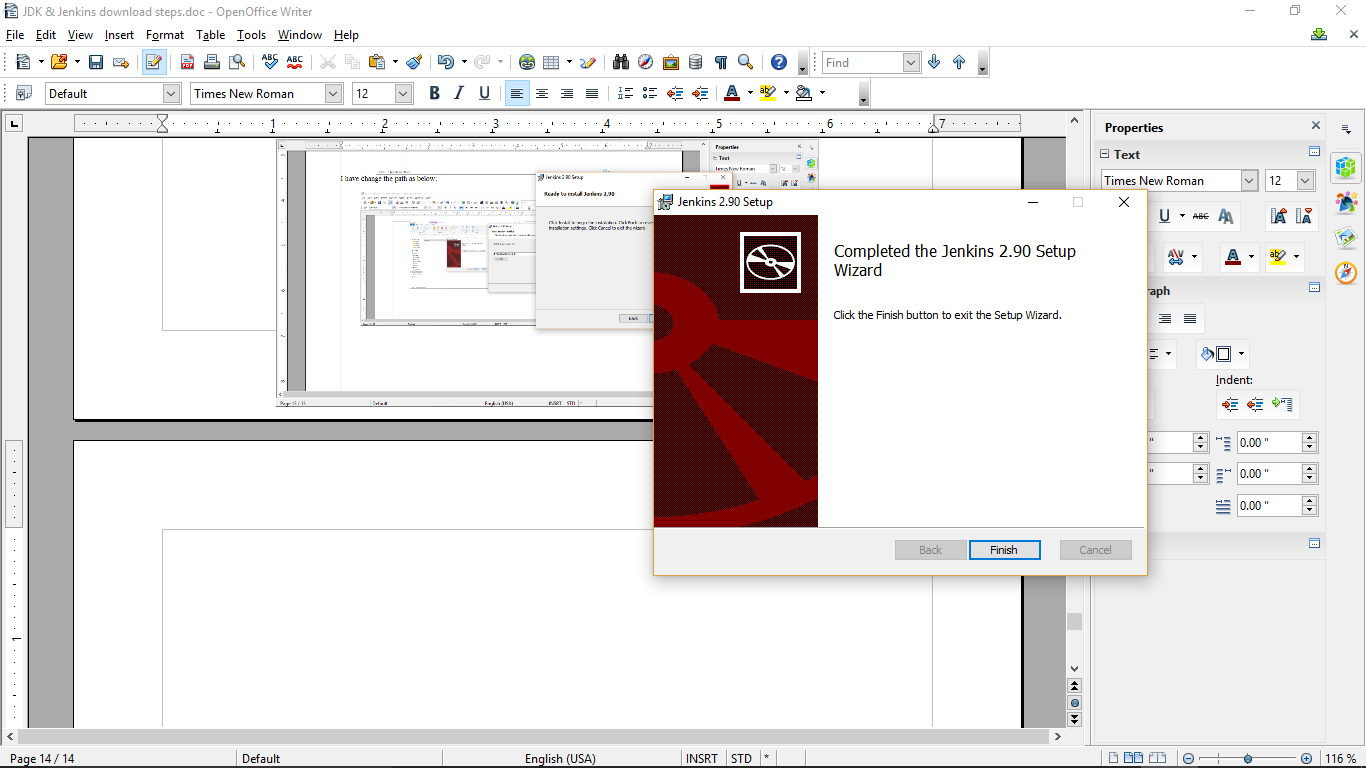
Once you click on finish, it will take you to a browser:
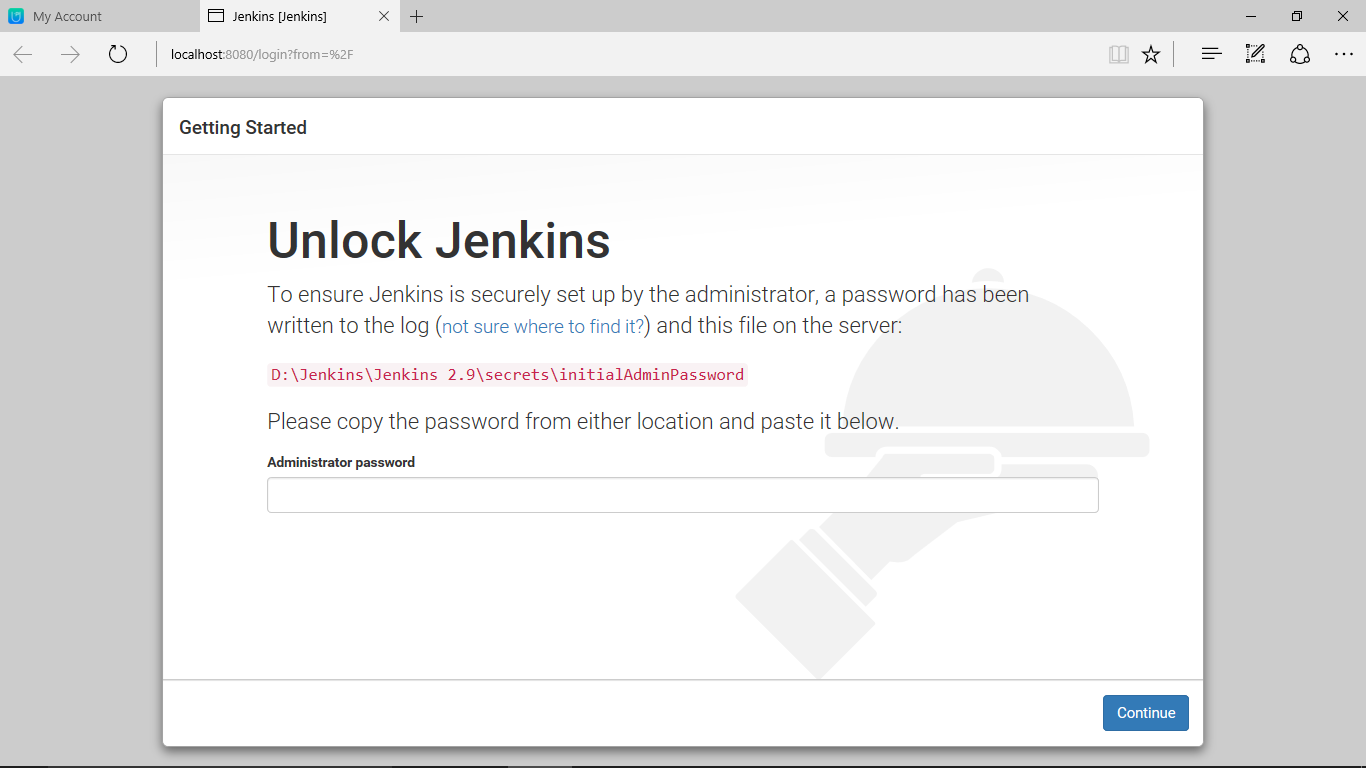
Jenkins will have a default user id as “admin” and the password.
The password is available from the given path.
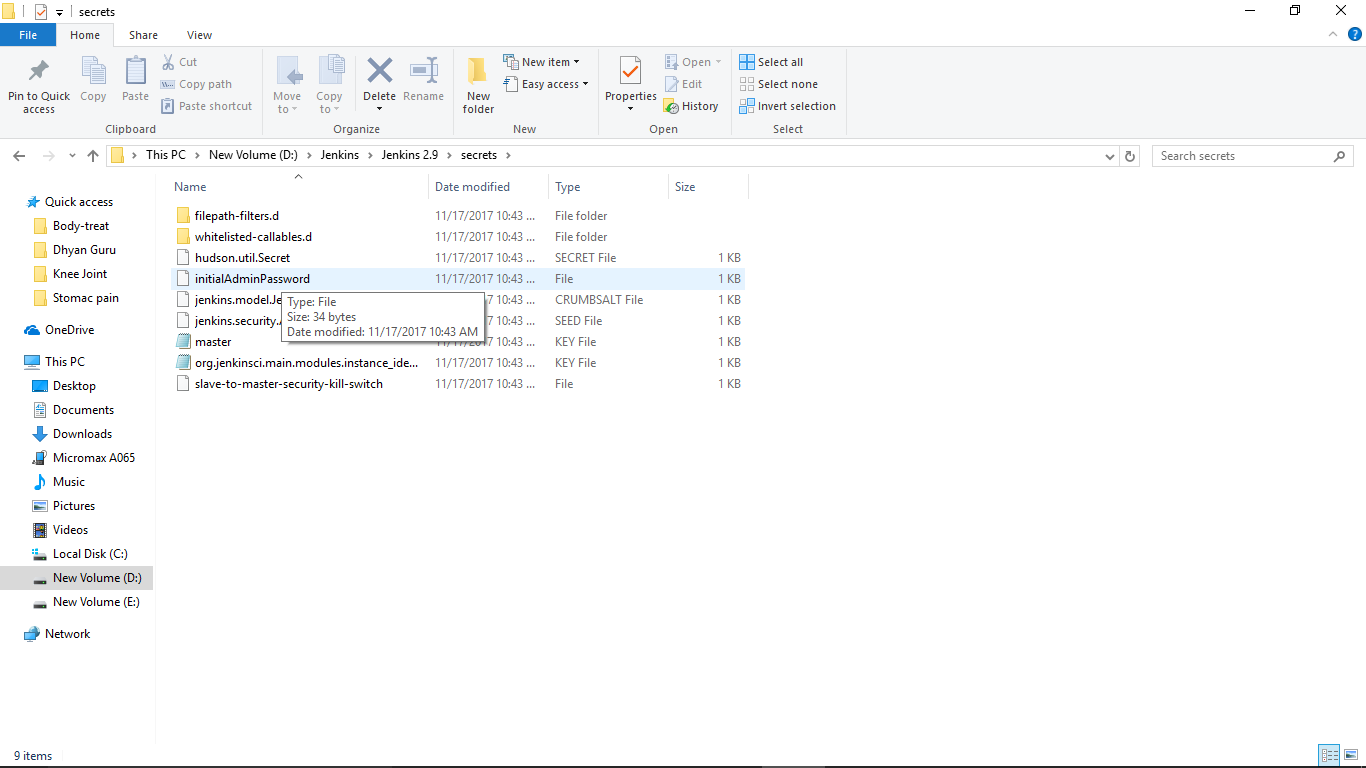
You can open this file in notepad as below:
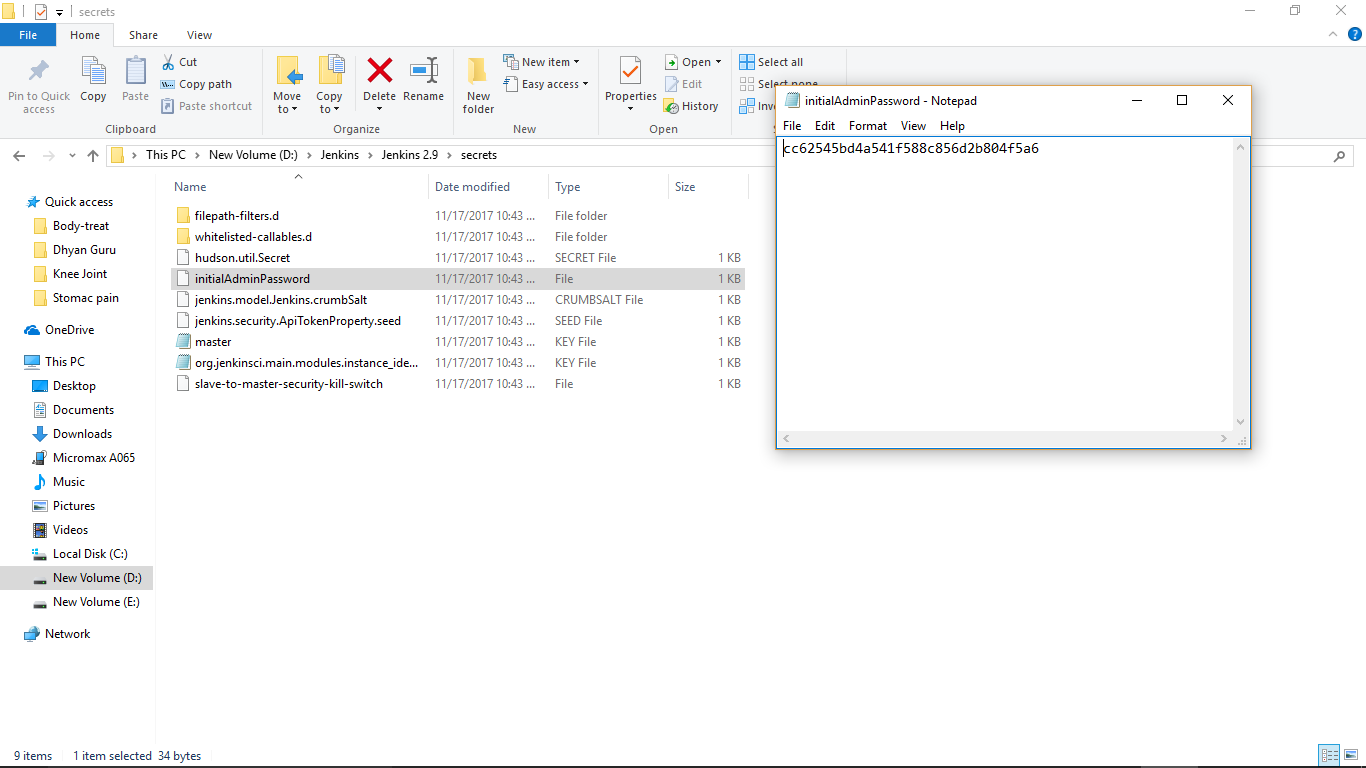
Now, copy this password as below into windows clipboard.
Now you goto the Jenkins browser and paste this password.
Close your notepad.
Now, on browser press continue.
You can see the Jenkins initial screen as below for plugins selection:

Jenkins will have 100s of plugins. But there are default plugins those can be used initially to save you disk space and time. Hence now, you click on “Install suggested plugins”.
It will show the below screen as it is working for this activity:
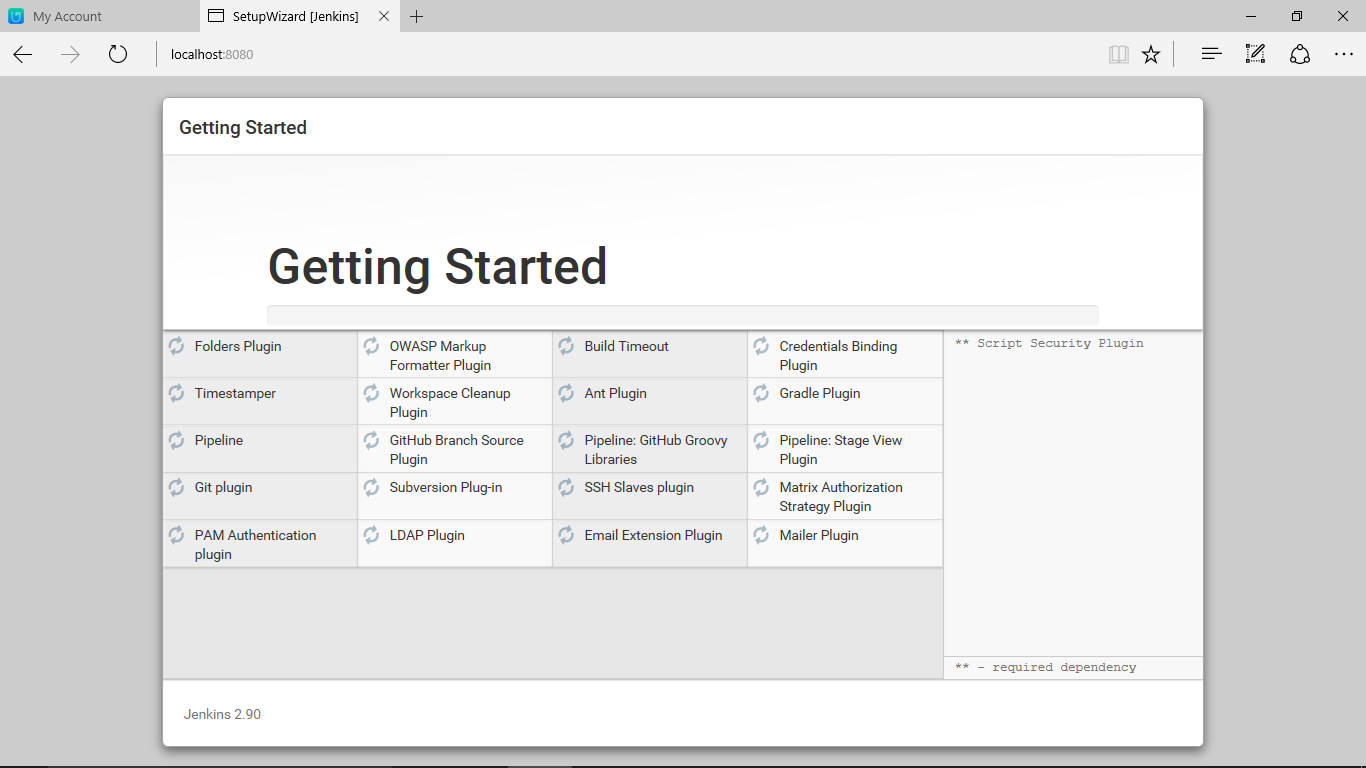
You can see in the right side window the tasks what Jenkins is doing:
You can also watch as it is doing one by one the plugins installation and the tasks on right side.
It might take more than 30 mts depends on your internet speed and the RAM.
I am copying some of the screens as it is moving on …

Once the plugins are installed, you can see the 1st screen to setup your 1st admin user id and password as below:
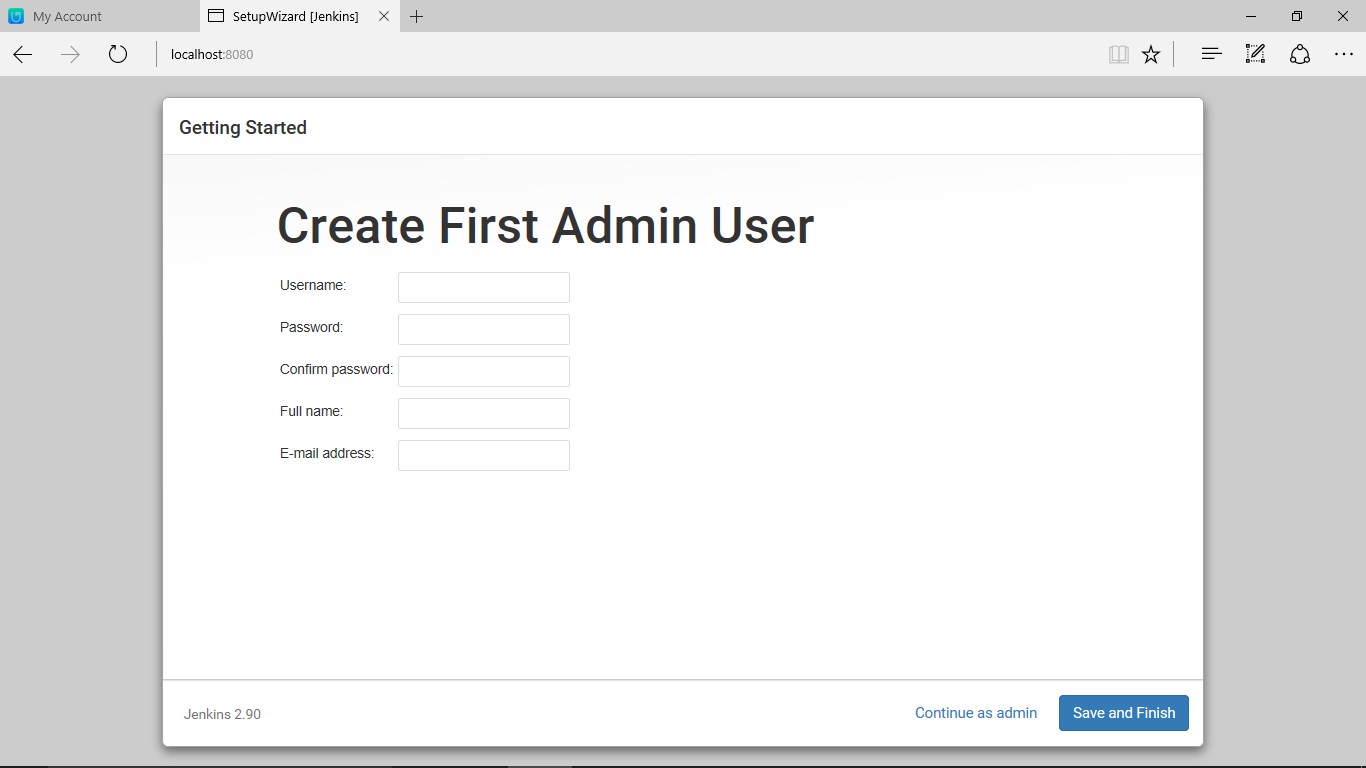
You can enter the details and click on “Save and Finish” button.
Now, it shows the below screen with Jenkins readyness to use:
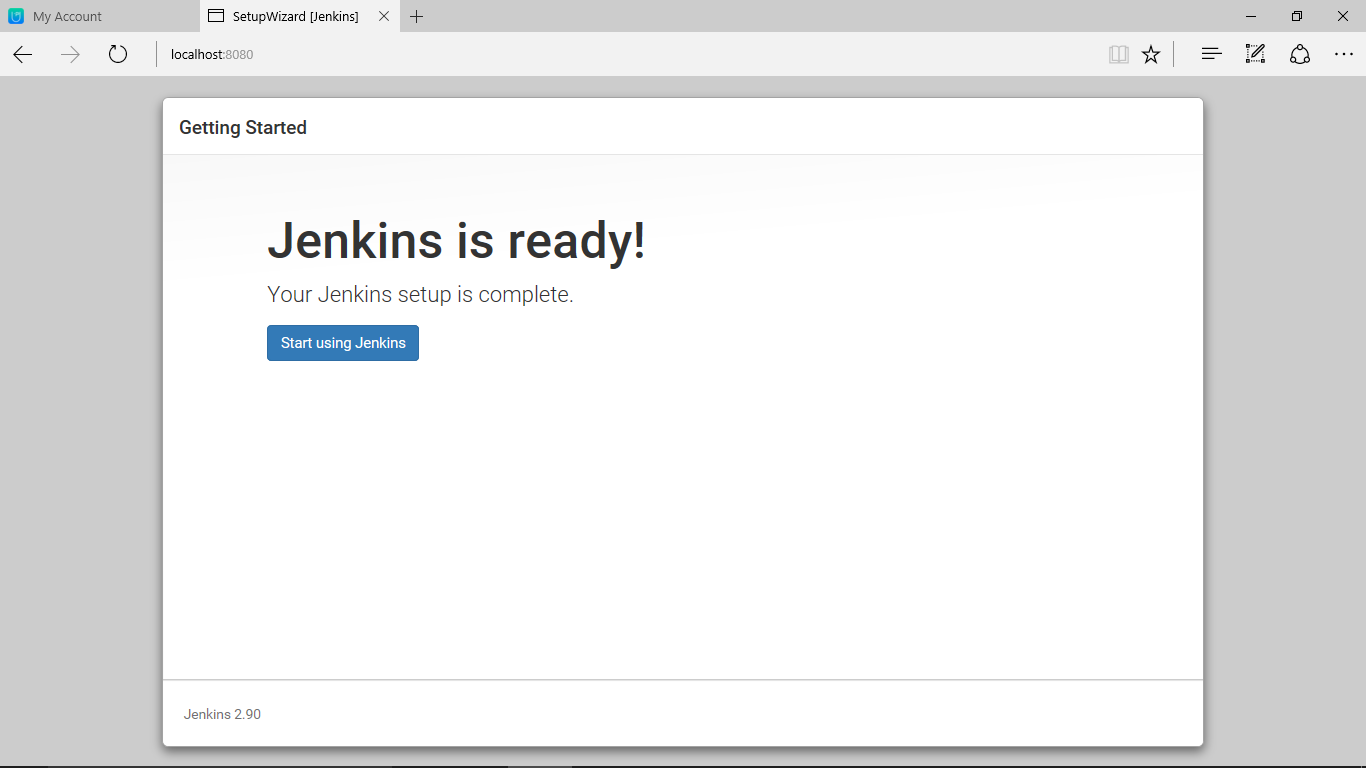
When you click on “Start using Jenkins” button,
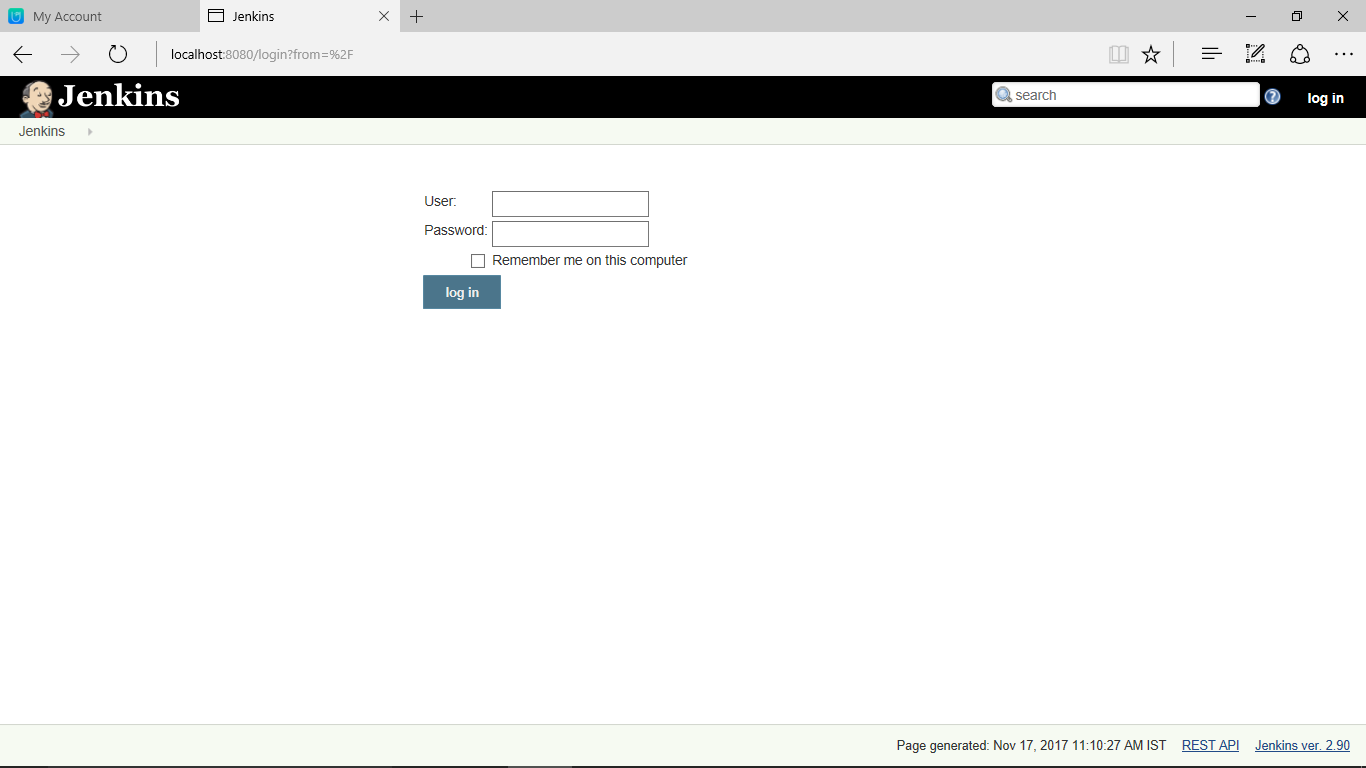
You can see the below screen as in the beginning of the Jenkins usage:

Please observe the right corner and verify your created user id.
Now, let us do some login and logout operations to make sure it is working.
When you logout you can see the below screen:
Now let us understand the url of Jenkins server which we are using:
When we install Jenkins in any machine either Windows or Linux.
By default its url should be : http://localhost:8080/
Your local host is your current machine Ip address.
You can see the screen now with the above url:

Now, you can try one more option, check your ip address from command prompt as below:
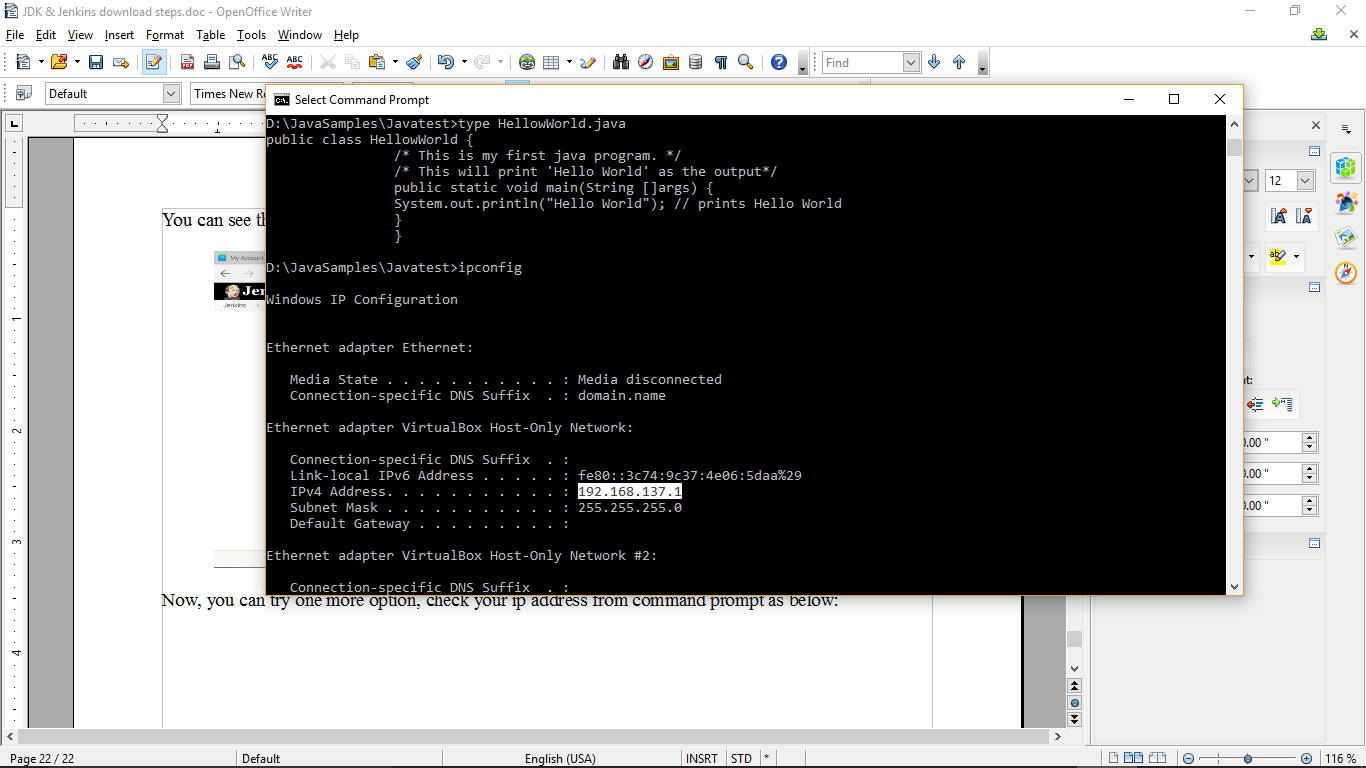
You can pickup the 1st IP address which displays from the command prompt screen.
And key-inn the below url in your browser:
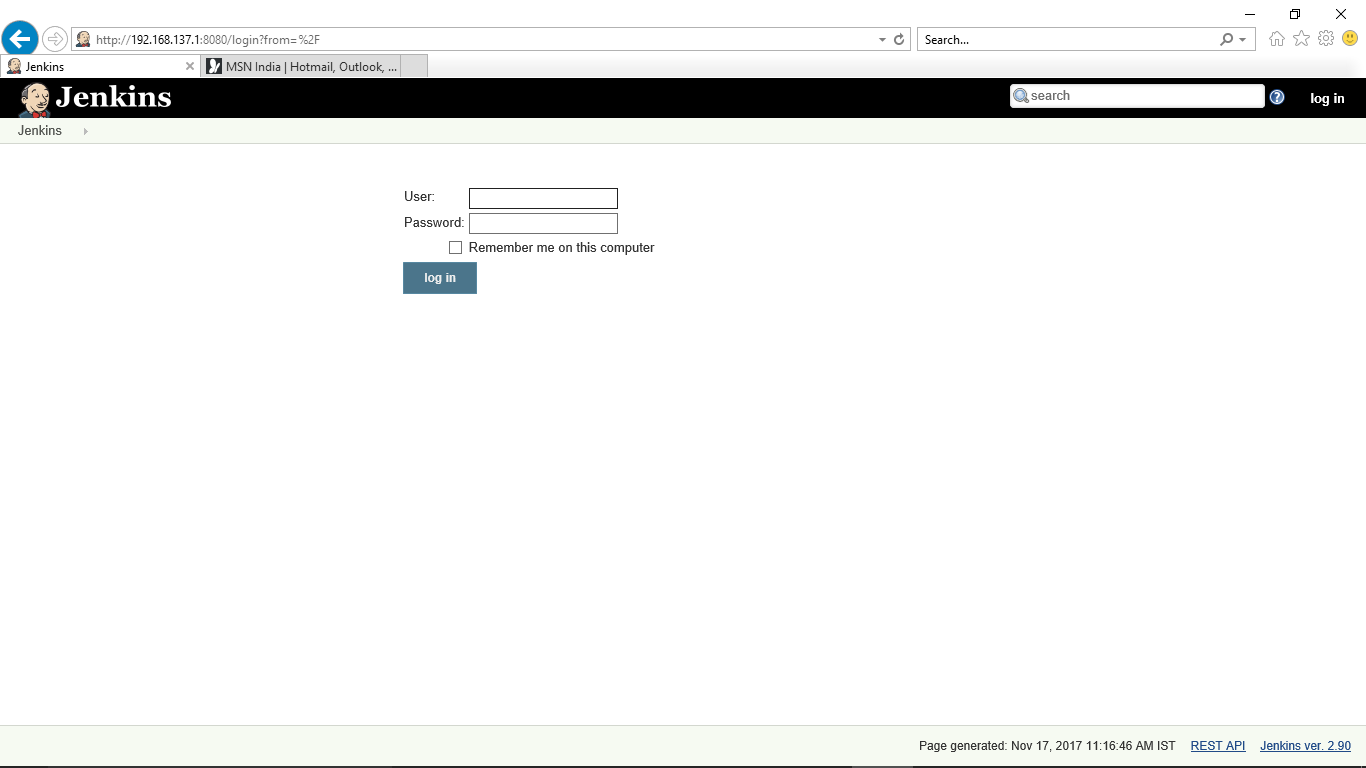
http://192.168.137.1:8080/login?from=%2F
Your ip need to be used in place of 192.168.137.1
Now, let us see What is 8080?:
Every server software creates a port address to access its web pages from the installed machine. In our case Jenkins has been configured on 8080 port as default. The 8080 is a default port for Jenkins. Similarly other server softwares also will have their specific ports.
Now, I have used a different browser using the above url to access Jenkins web page as below:
Using the login screen I am logging into my admin user id: vskumar2017 , which was created earlier.

You can also check in your windows services on Jenkins running status.
Please note on this setup, you have made a standalone Jenkins by using your PC or Laptop.
Now, you can restart your windows machine. You need to start Jenkins as fresh service.
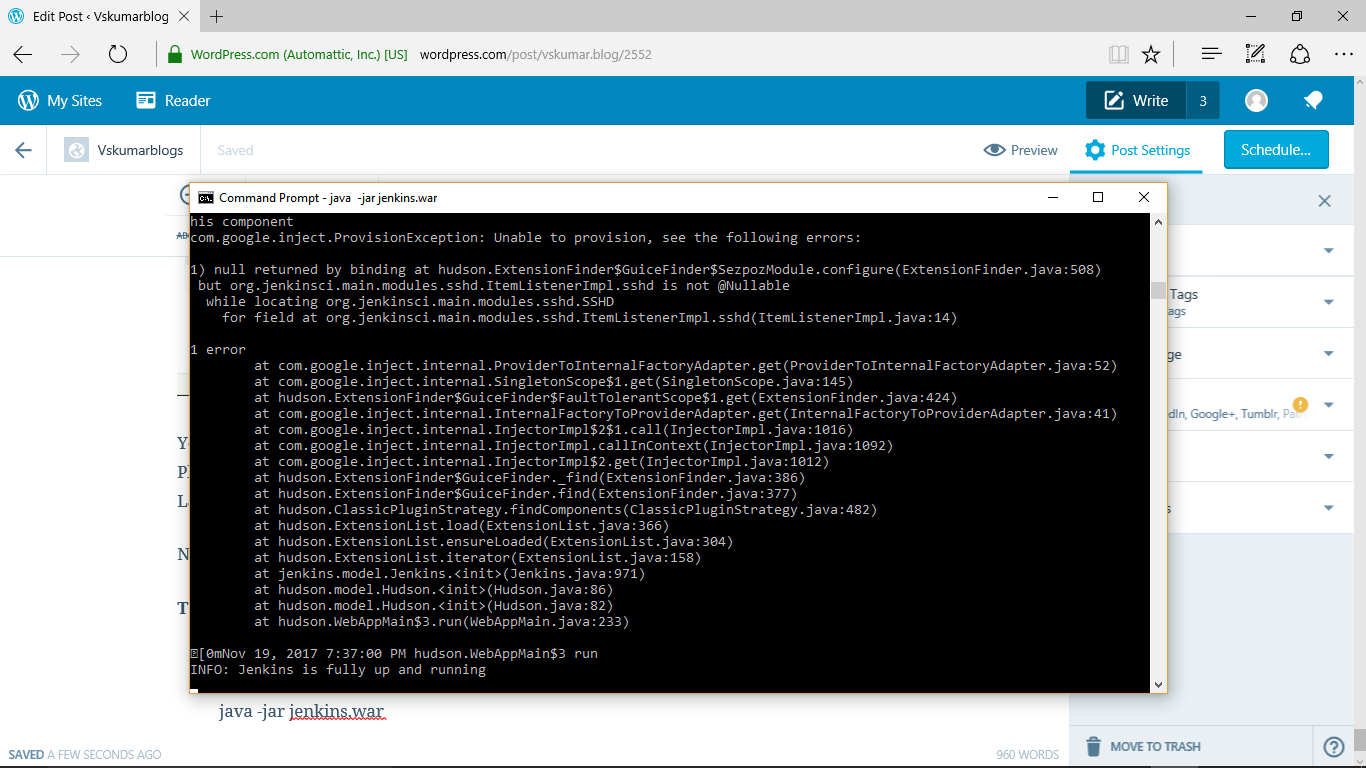
Open browser and Use you can check the Jenkins access. It should be showing the login page.
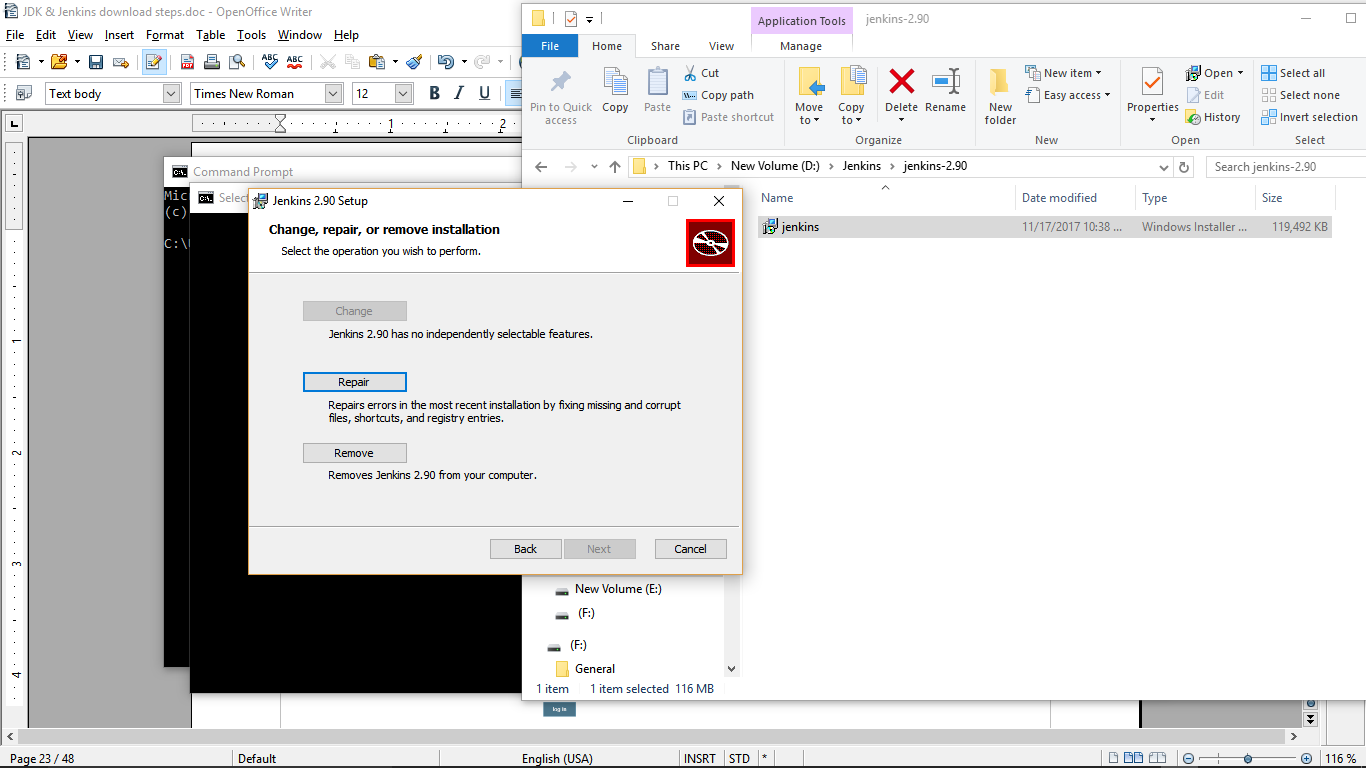
How to remove Jenkins from your system?:
If you want to remove Jenkins from your system, you can find the Jenkins Windows installer file from the Jenkins directory and double click on it. You can see the below window to choose your action:
So far we have seen the installation of Java 9 and Jenkins.
Some times, you might need to configure other servers [Ex:Tomcat, etc,]. They might also use 8080 port. Hence there will be conflict. We need to change the port# in that case.
Now, How to change your 8080 port to other port#?:
Please find Jenkins.xml in Jenkins dir:
Ex:
In my system I have the URL:D:\Jenkins\Jenkins 2.9
You need to replace 8080 with the required port# in the below line:
<arguments>-Xrs -Xmx256m -Dhudson.lifecycle=hudson.lifecycle.WindowsServiceLifecycle -jar “%BASE%\jenkins.war” –httpPort=8080 –webroot=”%BASE%\war”</arguments>
In the next blog we can see some simple exercise with Jenkins by creating and running the project into different builds.
https://vskumar.blog/2017/11/26/2-devops-jenkins2-9-how-to-create-and-build-the-job/
https://vskumar.blog/2018/02/26/15-devops-how-to-setup-jenkins-2-9-on-ubuntu-16-04-with-jdk8/
Note to the reader/user of this blog:
If you are not a student of my class, and looking for it please contact me by mail with your LinkedIn identity. And send a connection request with a message on your need. You can use the below contacts. Please note; I teach globally.
If you want to learn for Ubuntu installation you can visit:
https://vskumar.blog/2018/02/26/15-devops-how-to-setup-jenkins-2-9-on-ubuntu-16-04-with-jdk8/
Please find my Services offering as an Independent IT Consultant from the below card. If you are really interested to know the details of the services please e-mail me with your contacts/location/project details, I can send a video link.
In continuation of my previous blogs on SDLC/Agile/Scrum, this blog can give some tips to Scrum Masters.
As per the Agile manifesto and Scrum principles, the Scrum Master need to work as a servant leader. The typical servant leader how he/she should have characteristics to bring the team alignment for right delivery with CDI speed, I have drafted in the below content. This can be useful as TIPS to new Scrum master on Agile projects.
What characteristics a Servant Leader should have in the organization ?
Creating the right leadership roles is very important and challenging to any organization with the current trend of the rapid technology or business transformation.
They need to look into the person’s characteristics very deeply. At the end of the day these leaders only drive the key aspects of the organization to achieve the results.
There are different leadership roles taken by coaches. One of them and very famous and with value added is; Servant leadership.
The servant leadership denotes as ‘a philosophy and practice’ of leadership. This concept has been appearing from the prehistoric. I would like to give a brief introduction of this role in this article, which can help the professionals who would be pursuing into the leadership roles.
When we move forward on analyzing this role, our mindset might have the following questions:
1. What is servant leadership means?
2. How they can thrive the teams in organizations?
3. How they can improve the corporate culture?
4. What is the significance they can create?
5. How this leader can drive high loyalty of the customers?
6. How this leader can build empowered teams to the organization?
7. How the teams can feel being with this leader?
8. Does the organization get the opportunity to drive long term goals with this role?
9. How the organization work culture can be changed timely with this role?
10. How this leadership role can help the organization with accelerated ROI?
In any organization servant leaders accomplish the results while reaching to the targets. These leaders give preferences to the needs of their contemporaries. By thumb rule, these leaders are being seen as humble stewards in their organizational resources like; human, financial and physical.
Focus on teams: A servant leader focuses on his/her team members needs towards scaling them into higher levels in their organization by helping them to resolve their issues and promotes their personality development also. These leaders feel it’s a management philosophy which can be applied to in the view of quality of people, work and community spirit.
We can see in many organizations there are several leaders’ supports their employees in the above mentioned areas to ascend them further. Every growing organization needs this kind of leaders to achieve their targets. Without these leaders and their characteristics it would have not been possible many companies rapid growth in the relevant industries.
Servant leader’s characteristics: When we think of their characteristics, certainly the following can come into our mind with leadership analysis thought process.
Understanding people closely: A servant leader attempts to understand and empathize with the team. This leader would not consider them as employees. Their individual respect and appreciation on their personal development would be awarded by the leader. As a manager or leader you can consider any team members tasks, look into its complexity, and support the team member to achieve its result. And you can apply your servant leadership compassion. The team members would not have realized you earlier, when you applied these leadership techniques to achieve their targets.
Effective management of people and their skills: The servant leaders don’t use their power in getting the things done by the people. Instead they manage the tasks and people through effective discussions. This way the team member also can understand on how their manager is giving the importance and respect to their individual concerns. Their hidden or unused skills or power can be utilized to complete any complex tasks with easy ways. For the future tasks, the minimal discussion time can be taken place to convince the team members, while having built the relationship empathetically.
Focus on operating targets and objectives: The servant leadership also plays to focus on long term operating goals also, rather than short term benefits. In view of this kind of thought process they derive specific goals towards implementing strategies for the benefits of the organization as well as tuning the teams towards working on the strategic plans and their execution.
Serving with Openness and persuasion: These leaders would have dedication to help and serve others. With their openness and persuasion their leadership qualities can be demonstrates in the organization to achieve any complex activities also with simple.

How the servant leadership can build the teams for competencies ?
You can see this video :
To know some of the basics of Agile/Scum practices, visit the below video:
1. Agile: What are Agile manifesto Principles & How they can be used ?
https://www.facebook.com/MicroServices-and-Docker-328906801086961/
And learn many like this, you can join in my DevOps Practices Group:
https://www.facebook.com/groups/1911594275816833/
Many customers might have outsourced the IT Projects to different countries through different IT vendors. This blogs can give some thoughts on their current practices changes [if needed] towards “Onsite & Offshore co-ordination with Virtual team management. ”
I hope with this process/methods no resource will have bad feedback from customer and also from their managers. Their retention policies can be implemented well by the vendor and customer easily. And the resources also feels happy on this healthy work environment/culture.
Please feel free to contact for any consulting support.


On the above content I have made a video and posted on my youtube channel [Shanthi Kumar V] video URL: http://youtu.be/98zboBaXgoU
By seeing big cloud services vendors you and your team do not need to get confusion and get into their attraction shoes. Each vendor offer the services and their products differently. If you consider the above steps many of the issues or risks can be minimized and you will have your route map for cloud transformation along with the selection steps.
Currently; many testing or DevOps teams setup their test environments by using their existing hardware and using Virtual Machines [VMs] concepts. After certification of the product those VMs can be destroyed also.
Similarly; by having your internal cloud machines [VMs] you can automate the deployment process also by adopting into DevOps culture. Where many global organizations have achieved this activity under their regular management practices.
If you would like to know the basic cloud concepts and models please visit my cloud blogs site: https://vskumarcloudblogs.wordpress.com/
I am open to offer a 2 hours online workshop [globally] to motivate your teams on the above steps, if they are on the similar activities. Please feel free to be in touch with me.
Please contact for any of the below services:
