

I am publishing series of blogs on DevOps tools practice. The interested people can keep watching this site or you can subscribe/follow.
In this blog we will see what are the pre-requisites for Jenkins 2.9 to install and how to install Jenkins.
=====================================>
Visit my current running facebook groups for IT Professionals with my valuable discussions/videos/blogs posted:
https://www.facebook.com/groups/1911594275816833/about/
https://www.facebook.com/groups/585147288612549/about/
Build Cloud Solution Architects [With some videos of the live students classes/feedback]
https://www.facebook.com/vskumarcloud/
=====================================>
MicroServices and Docker [For learning concepts of Microservices and Docker containers]
https://www.facebook.com/MicroServices-and-Docker-328906801086961/
To setup Jenkins, you need to have Java 9 in your local machine.
Hence in the Step1 to setup Java, you need to follow the below steps:
STEP1: How to download and install JDK SE Development kit 9.0.1 ?:
go to URL:
http://www.oracle.com/technetwork/java/javase/downloads/jdk9-downloads-3848520.html
You will see the below page [as on today’s display]

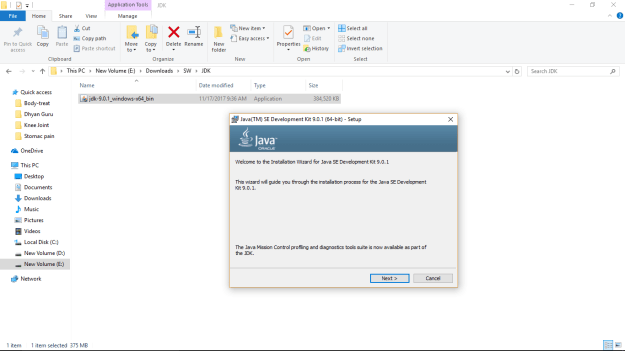
From this web page, Click on Windows file jdk-9.0.1_windows-x64_bin
It will download.
Double click on the file.
You will see the series of screens, while it is doing installation. I have copied some of them here.


You can change the directory if you want, in the above screen.

Finally you should get the below screen as installed it successfully.

Now, you need to set the Java environment and path variable in Windows setting.

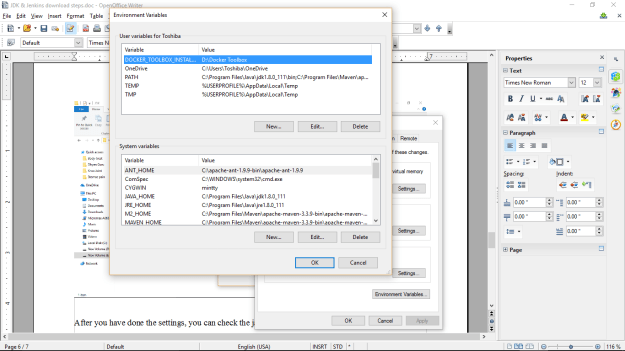
My Java directory path is:

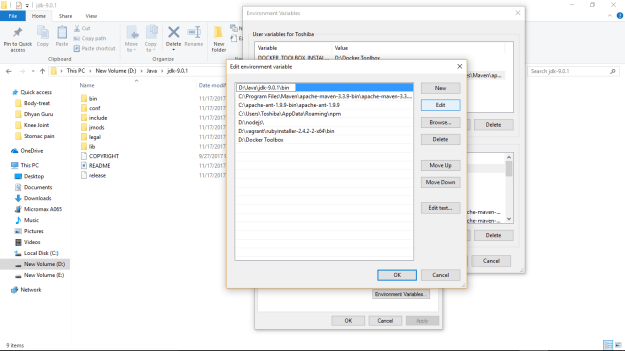
You need to edit the below path variables also for the latest path:


After you have done the settings, you can check the java version as below in a command prompt:

You should get the same version.
Now, You need a simple java program to run and check your compiler and runtime environment.
Please goto google search and check for “Java Hello wordl program”.
Follow the below URL:
https://en.wikiversity.org/wiki/Java_Tutorial/Hello_World!
Copy the program into a text file named as hellowworld.java
Then compile and run the program as below:

If you are getting the above, then your installed java software is working fine.
You need to remember the below:
To compile this program you need to use the below command in command prompt of that program directory:
D:\JavaSamples\Javatest>javac HellowWorld.java
To run the java program you need to use the below command:
D:\JavaSamples\Javatest>java HellowWorld
Hello World
Now, you can plan for setting up Jenkins.
STEP2: How to setup Jenkins on Windows ?:
Follow the below link to download Jenkins for Windows-x64
https://jenkins.io/download/thank-you-downloading-windows-installer/
It downloads the installer as below:
You can see the downloaded installer file for Jenkins.

How to install Jenkins?:
Now you can copy this file into a new directory as Jenkins.
I have copied into the below directory.

You need to unzip this file.

You can see the new directory is created with its unzipped files:

You can double click on it and can see the below screen:

I have changed the path as below:

Click on install and say “Yes” in windows confirmation screen.

You can see the below screen:

Once you click on finish, it will take you to a browser:

Jenkins will have a default user id as “admin” and the password.
The password is available from the given path.

You can open this file in notepad as below:

Now, copy this password as below into windows clipboard.
Now you goto the Jenkins browser and paste this password.
Close your notepad.
Now, on browser press continue.
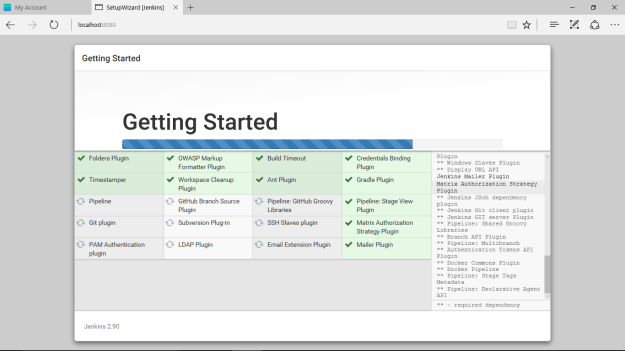
You can see the Jenkins initial screen as below for plugins selection:

Jenkins will have 100s of plugins. But there are default plugins those can be used initially to save you disk space and time. Hence now, you click on “Install suggested plugins”.
It will show the below screen as it is working for this activity:

You can see in the right side window the tasks what Jenkins is doing:
You can also watch as it is doing one by one the plugins installation and the tasks on right side.
It might take more than 30 mts depends on your internet speed and the RAM.
I am copying some of the screens as it is moving on …
Once the plugins are installed, you can see the 1st screen to setup your 1st admin user id and password as below:

You can enter the details and click on “Save and Finish” button.
Now, it shows the below screen with Jenkins readyness to use:

When you click on “Start using Jenkins” button,
You can see the below screen as in the beginning of the Jenkins usage:

Please observe the right corner and verify your created user id.
Now, let us do some login and logout operations to make sure it is working.
When you logout you can see the below screen:
Now let us understand the url of Jenkins server which we are using:
When we install Jenkins in any machine either Windows or Linux.
By default its url should be : http://localhost:8080/
Your local host is your current machine Ip address.
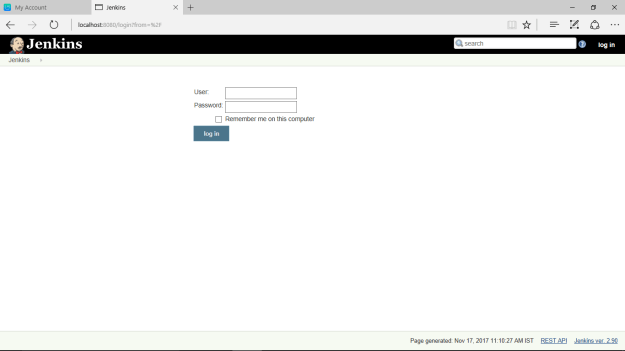
You can see the screen now with the above url:

Now, you can try one more option, check your ip address from command prompt as below:
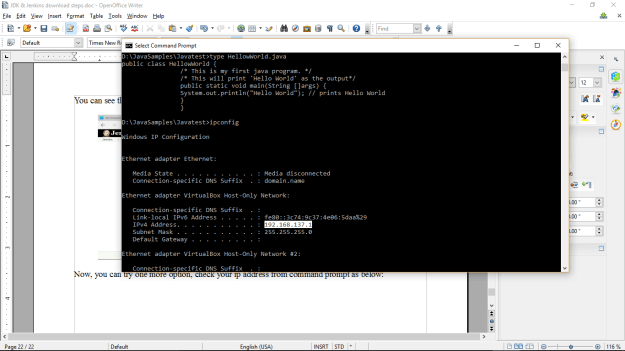
You can pickup the 1st IP address which displays from the command prompt screen.
And key-inn the below url in your browser:
http://192.168.137.1:8080/login?from=%2F
Your ip need to be used in place of 192.168.137.1
Now, let us see What is 8080?:
Every server software creates a port address to access its web pages from the installed machine. In our case Jenkins has been configured on 8080 port as default. The 8080 is a default port for Jenkins. Similarly other server softwares also will have their specific ports.
Now, I have used a different browser using the above url to access Jenkins web page as below:

Using the login screen I am logging into my admin user id: vskumar2017 , which was created earlier.

You can also check in your windows services on Jenkins running status.
Please note on this setup, you have made a standalone Jenkins by using your PC or Laptop.
Now, you can restart your windows machine. You need to start Jenkins as fresh service.
- Open command prompt.
- Go to the directory where your war file is placed and run the following command: java -jar jenkins.war
- OR One more option is; go to your Jenkins directory in CMD window and execute: jenkins.exe start

Open browser and Use you can check the Jenkins access. It should be showing the login page.
How to remove Jenkins from your system?:
If you want to remove Jenkins from your system, you can find the Jenkins Windows installer file from the Jenkins directory and double click on it. You can see the below window to choose your action:

So far we have seen the installation of Java 9 and Jenkins.
Some times, you might need to configure other servers [Ex:Tomcat, etc,]. They might also use 8080 port. Hence there will be conflict. We need to change the port# in that case.
Now, How to change your 8080 port to other port#?:
Please find Jenkins.xml in Jenkins dir:
Ex:
In my system I have the URL:D:\Jenkins\Jenkins 2.9
You need to replace 8080 with the required port# in the below line:
<arguments>-Xrs -Xmx256m -Dhudson.lifecycle=hudson.lifecycle.WindowsServiceLifecycle -jar “%BASE%\jenkins.war” –httpPort=8080 –webroot=”%BASE%\war”</arguments>
In the next blog we can see some simple exercise with Jenkins by creating and running the project into different builds.
https://vskumar.blog/2017/11/26/2-devops-jenkins2-9-how-to-create-and-build-the-job/
https://vskumar.blog/2018/02/26/15-devops-how-to-setup-jenkins-2-9-on-ubuntu-16-04-with-jdk8/
Note to the reader/user of this blog:
If you are not a student of my class, and looking for it please contact me by mail with your LinkedIn identity. And send a connection request with a message on your need. You can use the below contacts. Please note; I teach globally.
If you want to learn for Ubuntu installation you can visit:
https://vskumar.blog/2018/02/26/15-devops-how-to-setup-jenkins-2-9-on-ubuntu-16-04-with-jdk8/
