Let us also be aware: Due to lacks of certified professionals are available globally in the market on AWS, to differentiate them on their needs/selection, most of the clients are asking on the real experience gained or aware of IAC. They give a Console and ask you to setup a specific Infra setup in AWS.
In my coaching I focus on the candidates to gain the real Cloud Architecture implementation experience rather than pushing the course with screen operations only to complete. Through my posted videos you can watch this USP.
Contact for your real Cloud experiences learning and gaining with me and crack the interviews to get offers in AWS Roles globally or even you can transition to the role in the same company after facing the client interview/selection process. Which is very easy with this knowledge.
Please connect me on FB and have a discussion on your background and the needs/goals. I am looking for the serious learners only by having dedicated time. If you are a busy resource on the projects please note; you can wait to become free to learn. One need to spend time consistently on the practice. Otherwise its going to be in no-use.
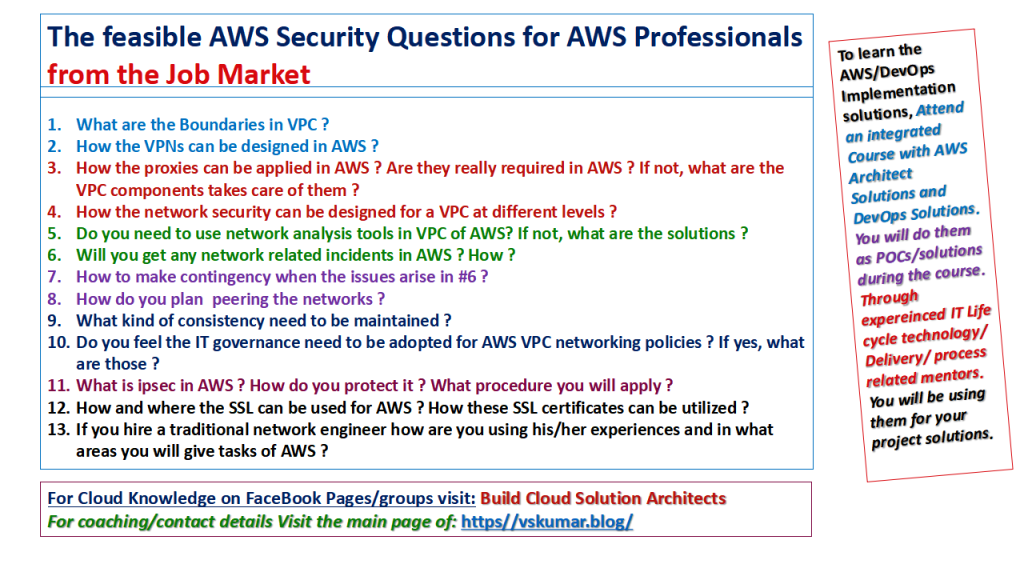
This video talks on the possibility of lack of Skills for some of the Cloud/DevOps Engineers. In continuation of my previous blogs/videos; This video contains the discussion on the “Analysis of Firewall activities from traditional role to AWS”. You can get answers for the below image contained questions through the discussions with an experienced IT Professional.
Possible AWS Interview Questions for a Firewall Engineer experienced professional.
NOTE:
Contact for your real Cloud experiences learning and gaining with me and crack the interviews to get offers in AWS Roles globally or even you can transition to the role in the same company after facing the client interview/selection process. Which is very easy with this knowledge.
Please connect me on FB and have a discussion on your background and the needs/goals. I am looking for the serious learners only by having dedicated time. If you are a busy resource on the projects please note; you can wait to become free to learn. One need to spend time consistently on the practice. Otherwise its going to be in no-use.
Let us also be aware: Due to lacks of certified professionals are available globally in the market on AWS, to differentiate them on their needs/selection, most of the clients are asking on the real experience gained or aware of IAC. They give a Console and ask you to setup a specific Infra setup in AWS.
In my coaching I focus on the candidates to gain the real Cloud Architecture implementation experience rather than pushing the course with screen operations only to complete. Through my posted videos you can watch this USP.
Contact for your real Cloud experiences learning and gaining with me and crack the interviews to get offers in AWS Roles globally or even you can transition to the role in the same company after facing the client interview/selection process. Which is very easy with this knowledge.
Please connect me on FB and have a discussion on your background and the needs/goals. I am looking for the serious learners only by having dedicated time. If you are a busy resource on the projects please note; you can wait to become free to learn. One need to spend time consistently on the practice. Otherwise its going to be in no-use.
Please note; every Cloud/DevOps/Test Engineer need to drive the infra setup tasks through IAC scripts only, when they are advanced in infra setup understanding. For every infra setup tasks they should be able to step down to develop these IAC scripts by using different tools. In AWS, we can use CF, Terraform and Ansible very easily for the medium level config scripts building.
For a jumpstart of learning process, I have started building some videos on understanding the Infra scripts process through CF Templates with POCs/demos. Following link has these videos to watch and do self practice with CF.
Once you are perfect you can choose any of the Infra CM Tools to write scripts and run for automated infra setup.
The samples are made with the below infra setup scenarios:
How to Create a simple WordPress website with CloudFormation[CF] in AWS ? : In this POC exercise, we are using the Readily available template from the CloudFormation[CF] stacks with detailed lab steps in the below attached Video. There are two categories of WP infra building CF Templates mentioned in the CF stacks. In this example initially, I have taken the simple setup without Load balancer and Autoscale setup. The specifications/guidelines are given clearly to follow through video in the below blog:
Let us also be aware: Due to lacks of certified professionals are available globally in the market on AWS, to differentiate them on their needs/selection, most of the clients are asking on the real experience gained or aware of IAC. They give a Console and ask you to setup a specific Infra setup in AWS.
In my coaching I focus on the candidates to gain the real Cloud Architecture implementation experience rather than pushing the course with screen operations only to complete. Through my posted videos you can watch this USP.
Contact for your real Cloud experiences learning and gaining with me and crack the interviews to get offers in AWS Roles globally or even you can transition to the role in the same company after facing the client interview/selection process. Which is very easy with this knowledge.
Please connect me on FB and have a discussion on your background and the needs/goals. I am looking for the serious learners only by having dedicated time. If you are a busy resource on the projects please note; you can wait to become free to learn. One need to spend time consistently on the practice. Otherwise its going to be in no-use.
Through this blog I would like to demonstrate on CloudFormation [CF] templates usage with the IAC.
I have observed in Cloud and DevOps teams, many of them are non-programming background. But when the Infra setup requirement comes into their task following questions will arise:
How can they write the JSON/YAML/Go programming/script coding ?
How can they understand the Cloud services and the domain setup knowledge ?
What are the sequence of steps they need to follow, if they are being asked to setup the environments?
How the VPCs need to be built ?
How the Load Balancers need to be setup ?
How the autoscaling and load balancing can be done in different locations to balance the traffic and maintain the infra setup consistency with low latency ?
What are steps need to be followed to learn on the above process/procedures ?
AWS has given some of the infra setup the CloudFormation templates for us to try and test them. And later on to understand the Script/code of JSON/YAML to implement with any CM Tools.
Please note; every Cloud/DevOps/Test Engineer need to drive the infra setup tasks through IAC scripts only. For every infra setup tasks they should be able to step down to develop these IAC scripts by using different tools. In AWS, we can use CF, Terraform and Ansible very easily for the medium level config scripts building.
For a jumpstart of learning process, I have started building some videos on understanding the Infra scripts process through CF Templates with POCs/demos. Following links have these videos to watch and do self practice with CF.
Once you are perfect you can choose any of the Infra CM Tools to write scripts and run for automated infra setup.
How to Create a simple WordPress website with CloudFormation[CF] in AWS ? : In this POC exercise, we are using the Readily available template from the CloudFormation[CF] stacks with detailed lab steps in the below attached Video. There are two categories of WP infra building CF Templates mentioned in the CF stacks. In this example initially, I have taken the simple setup without Load balancer and Autoscale setup. The specifications/guidelines are given clearly to follow through video.
Let us also be aware: Due to lacks of certified professionals are available globally in the market on AWS, to differentiate them on their needs/selection, most of the clients are asking on the real experience gained or aware of IAC. They give a Console and ask you to setup a specific Infra setup in AWS.
In my coaching I focus on the candidates to gain the real Cloud Architecture implementation experience rather than pushing the course with screen operations only to complete. Through my posted videos you can watch this USP.
Contact for your real Cloud experiences learning and gaining with me and crack the interviews to get offers in AWS Roles globally or even you can transition to the role in the same company after facing the client interview/selection process. Which is very easy.
Please connect me on FB and have a discussion on your background and the needs/goals. I am looking for the serious learners only by having dedicated time. If you are a busy resource on the projects please note; you can wait to become free to learn. One need to spend time consistently on the practice. Otherwise its going to be in no-use.
How to change your linux virtual machines hostname and connect with ssh?
In this blog/video, I would like to demonstrate the following by connecting hostnames with ssh:
Sometimes, we need to have hostnames differently. When you use deployments using Ansible, etc. SCM tools we can connect to the hostnames directly. Now let us analyze and use the exercise as below:
By default we can find the hostname with; $ ls -l /proc/sys/kernel/hostname $ cat /proc/sys/kernel/hostname
We can also look into the details by using; $hostnamectl
To change the new name use; $hostnamectl set-hostname ‘ans-dbserver’ Step1: Checking the current hostname.
Step2: Checking the host details in hostnamectl.
Step3: Changing the hostname.
Step4: Looking for new host details.
Step5: Reboot the machine and check its connection with new hostname.
Step6: Now, let us try to connect to other machines with ssh connectivity.
Step7: Making sure the renamed machine host is being accessed by other machines also through ping.
Step8: Install openssh-server to connect through ssh in the newly named machine.
Step9: Connect through ssh from master machine to current hosts.
The attached video has the demonstration for all the above steps on Linux Virtual machines. Proved with a connectivity through ssh.
For SSH configuration please visit my blog, it has the demonstrated video also:
SSH Keys for Ansible VMs usage:
Before using Ansible we need to make sure the SSH is installed in the
VMs.
I would like to give the steps for this setup as below:
Pre-requisite Step1:
Install OpenSSH on Ubuntu.
Update the package index using the following command:
sudo apt-get update
To install the OpenSSH server application as well as the other related
packages use the command below:
sudo apt-get install openssh-server
Further, you can install the OpenSSH client application using
the following command:
sudo apt-get install openssh-client
Pre-requisite Step2:
Configure OpenSSH on Ubuntu
Before making any changes in OpenSSH configuration,
we need to know how to manage the OpenSSH service on Ubuntu VMs.
How to check ssh version?:
use the command; ssh -V
i) To start the service we can use the following command:
sudo systemctl start sshd.service
ii) To stop the service we can use:
sudo systemctl stop sshd.service
iii) To restart the service we can use:
sudo systemctl restart sshd.service
iv) To check the status of the service we can use:
sudo systemctl status sshd.service
v) If we want to enable the service on system boot we can use:
sudo systemctl enable sshd.service
vi) If we want to disable the service on system boot we can use:
sudo systemctl disable sshd.service
vii) The configuration file for the OpenSSH server application
is in the folder:/etc/ssh/sshd_config
We need to update the default port in this file.
We need to make sure to create a backup of the original configuration before
making any changes:
sudo cp /etc/ssh/sshd_config /etc/ssh/sshd_config.orig
We can edit the file by using a text editor of our choice either vi or vim, etc..
The first thing we must do is to change the default SSH listening port.
Open the file and locate the line that specifies the listening port:
Port 22
Change it to your desired port number. Ex: Port 1990
Save the file and close it.
Then restart the service for the changes to take effect.
Note:
After making any changes in the OpenSSH configuration you need to restart the service
for the changes to take effect.
Pre-requisite Step3: Create an SSH key pair
Please note, during Ansible exercise or other DevOps tools, we need to connect to other VMs using SSH keys.
Let us note; the Key-based authentication uses two keys, one “public” key that anyone is allowed
to see.
And another “private” key that only the owner is allowed to see.
To securely communicate using key-based authentication, one needs to create a key pair,
securely store the private key on the computer which we want to log in from [Source machine],
and store the public key on the other Virtual Machine[Target machine] one wants to log in to.
Using key based logins with ssh is generally considered more secure than using plain password logins.
Now, let us see these steps:
1. Generating RSA Keys:
Our first step involves creating a set of RSA keys for use in authentication.
This should be done on the client.
To create our public and private SSH keys we need to use the below commands:
mkdir ~/.ssh
chmod 700 ~/.ssh
ssh-keygen -t rsa
We will be prompted for a location to save the keys, and a passphrase for the keys.
This passphrase will protect our private key while it’s stored on the hard drive:
=== Sample Output ====>
Generating public/private rsa key pair.
Enter file in which to save the key (/home/b/.ssh/id_rsa):
Enter passphrase (empty for no passphrase):
Enter same passphrase again:
Your identification has been saved in /home/b/.ssh/id_rsa.
Your public key has been saved in /home/b/.ssh/id_rsa.pub.
======================>
Note; An SSH key passphrase is a secondary form of security.
You need to remember it while logging the remote machine.
Now, our public key is now available as .ssh/id_rsa.pub in the home directory.
The file name and pwd can be given when you follow rigid security procedures as per your project setup. Here if you avoid in giving name/pwd, it makes us easy to copy the key file to target machine.
2. Transfer Client Key to Host:
The key we need to transfer to the host is the public one.
If we can log in to a computer over SSH using a password,
we can transfer our RSA key by doing the following from our own computer:
Command format:
====>
ssh-copy-id <username>@<host>
====>
Note: The <username> and <host> should be replaced by our username
and the name of the computer we’re transferring our key to.
TIP on Port# usage:
We cannot specify a port other than the standard port 22 [unless we changed it to
another port# in the target VM]. we can work around this by issuing the
command like this: ssh-copy-id “<username>@<host> -p <port_nr>”.
If we are using the standard port 22, we can ignore this tip.
We can make sure this worked by doing the below command test:
ssh <username>@<host>
We should be prompted for the passphrase for our key:
Enter passphrase for key ‘/home/<user>/.ssh/id_rsa’:
Enter your passphrase, and provided host is configured to allow key-based logins,
we should then be logged in as usual.
How to remove the existing SSH from Ubuntu ?
If we have already ssh we can use the below steps to remove and
get the latest setup.
Step1: Stop SSH service before uninstalling it.
service ssh stop
Step2: Now, we need to Uninstall and remove the ssh package from the machine by using the below
apt-get command.
apt-get purge openssh-server
Now you can check its status using ssh -VM
If it is not there you should not get the version.
Please note my VMs Ips,where i will apply some exercises timely:
IP of Ans-ControlMachine:
192.168.116.132
IP of VM1:
192.168.116.134
IP of VM2:
192.168.116.135
IP of VM3:
192.168.116.133
The machine names are prompted in CLI.
I am using these four Virtual machines on Vmware environment with player as well as Workstation.
I have played around with SSH among these machines.
I have copied most of the screen outputs in this content.
Removing SSH from one Virtual machine for installating procedure testing:
I have preloaded SSH earlier.
I am purging SSH in one Virtual machine to demonstrate the exercise.
And below I have copied the screen outputs also.
==== Screen outputs for Ans-ControlMachine =====>
=== Removing SSH from Ans-ControlMachine=========>
vskumar@ubuntu:~$ ssh -V
OpenSSH_7.2p2 Ubuntu-4ubuntu2.2, OpenSSL 1.0.2g 1 Mar 2016
vskumar@ubuntu:~$ cat /etc/hostname
Ans-ControlMachine
vskumar@ubuntu:~$ service ssh stop
Failed to stop ssh.service: Unit ssh.service not loaded.
vskumar@ubuntu:~$ service ssh status
● ssh.service
Loaded: not-found (Reason: No such file or directory)
Active: inactive (dead)
vskumar@ubuntu:~$
vskumar@ubuntu:~$ apt-get -purge openssh-server
E: Command line option ‘p’ [from -purge] is not understood in combination with the other options.
vskumar@ubuntu:~$ apt-get purge remove openssh-server
E: Could not open lock file /var/lib/dpkg/lock – open (13: Permission denied)
E: Unable to lock the administration directory (/var/lib/dpkg/), are you root?
vskumar@ubuntu:~$ sudo apt-get purge remove openssh-server
Reading package lists… Done
Building dependency tree
Reading state information… Done
E: Unable to locate package remove
vskumar@ubuntu:~$ sudo apt-get purge openssh-server
Reading package lists… Done
Building dependency tree
Reading state information… Done
Package ‘openssh-server’ is not installed, so not removed
0 upgraded, 0 newly installed, 0 to remove and 432 not upgraded.
vskumar@ubuntu:~$ sudo apt-get purge openssh-client
Reading package lists… Done
Building dependency tree
Reading state information… Done
The following packages will be REMOVED:
openssh-client* snapd* ubuntu-core-launcher*
0 upgraded, 0 newly installed, 3 to remove and 429 not upgraded.
After this operation, 61.7 MB disk space will be freed.
Do you want to continue? [Y/n] y
(Reading database … 176110 files and directories currently installed.)
Removing ubuntu-core-launcher (2.25) …
Removing snapd (2.25) …
Warning: Stopping snapd.service, but it can still be activated by:
snapd.socket
Purging configuration files for snapd (2.25) …
Final directory cleanup
Discarding preserved snap namespaces
umount: /run/snapd/ns/*.mnt: mountpoint not found
umount: /run/snapd/ns/: mountpoint not found
Removing extra snap-confine apparmor rules
Removing snapd state
Removing openssh-client (1:7.2p2-4ubuntu2.2) …
Purging configuration files for openssh-client (1:7.2p2-4ubuntu2.2) …
Processing triggers for man-db (2.7.5-1) …
vskumar@ubuntu:~$
s for man-db (2.7.5-1) …
vskumar@ubuntu:~$
vskumar@ubuntu:~$ ssh -V
bash: /usr/bin/ssh: No such file or directory
vskumar@ubuntu:~$
== So we have completely removed the SSH ====>
=== from Ans-ControlMachine=========>
Installing SSH into Ans-ControlMachine:
Now, let me install the SSH server and client also.
Step1:
Let update the packages.
sudo apt-get update
Step2: Installing server
Now, we will use the below command to install ssh srver:
sudo apt-get install openssh-server
==== Screen output ======>
vskumar@ubuntu:~$ sudo apt-get install openssh-server
Reading package lists… Done
Building dependency tree
Reading state information… Done
The following additional packages will be installed:
ncurses-term openssh-client openssh-sftp-server ssh-import-id
Suggested packages:
ssh-askpass libpam-ssh keychain monkeysphere rssh molly-guard
The following NEW packages will be installed:
ncurses-term openssh-client openssh-server openssh-sftp-server ssh-import-id
0 upgraded, 5 newly installed, 0 to remove and 429 not upgraded.
Need to get 1,222 kB of archives.
After this operation, 8,917 kB of additional disk space will be used.
Do you want to continue? [Y/n] y
Get:1 http://us.archive.ubuntu.com/ubuntu xenial-updates/main amd64 openssh-client amd64 1:7.2p2-4ubuntu2.4 [589 kB]
Get:2 http://us.archive.ubuntu.com/ubuntu xenial/main amd64 ncurses-term all 6.0+20160213-1ubuntu1 [249 kB]
Get:3 http://us.archive.ubuntu.com/ubuntu xenial-updates/main amd64 openssh-sftp-server amd64 1:7.2p2-4ubuntu2.4 [38.7 kB]
Get:4 http://us.archive.ubuntu.com/ubuntu xenial-updates/main amd64 openssh-server amd64 1:7.2p2-4ubuntu2.4 [335 kB]
Get:5 http://us.archive.ubuntu.com/ubuntu xenial/main amd64 ssh-import-id all 5.5-0ubuntu1 [10.2 kB]
Fetched 1,222 kB in 7s (162 kB/s)
Preconfiguring packages …
Selecting previously unselected package openssh-client.
(Reading database … 176023 files and directories currently installed.)
Preparing to unpack …/openssh-client_1%3a7.2p2-4ubuntu2.4_amd64.deb …
Unpacking openssh-client (1:7.2p2-4ubuntu2.4) …
Selecting previously unselected package ncurses-term.
Preparing to unpack …/ncurses-term_6.0+20160213-1ubuntu1_all.deb …
Unpacking ncurses-term (6.0+20160213-1ubuntu1) …
Selecting previously unselected package openssh-sftp-server.
Preparing to unpack …/openssh-sftp-server_1%3a7.2p2-4ubuntu2.4_amd64.deb …
Unpacking openssh-sftp-server (1:7.2p2-4ubuntu2.4) …
Selecting previously unselected package openssh-server.
Preparing to unpack …/openssh-server_1%3a7.2p2-4ubuntu2.4_amd64.deb …
Unpacking openssh-server (1:7.2p2-4ubuntu2.4) …
Selecting previously unselected package ssh-import-id.
Preparing to unpack …/ssh-import-id_5.5-0ubuntu1_all.deb …
Unpacking ssh-import-id (5.5-0ubuntu1) …
Processing triggers for man-db (2.7.5-1) …
Processing triggers for ufw (0.35-0ubuntu2) …
Processing triggers for systemd (229-4ubuntu19) …
Processing triggers for ureadahead (0.100.0-19) …
Setting up openssh-client (1:7.2p2-4ubuntu2.4) …
Setting up ncurses-term (6.0+20160213-1ubuntu1) …
Setting up openssh-sftp-server (1:7.2p2-4ubuntu2.4) …
Setting up openssh-server (1:7.2p2-4ubuntu2.4) …
Creating SSH2 RSA key; this may take some time …
2048 SHA256:3yMAIuH8WhE4tf0kwEqrBHo7gxj3nYq/RTXhYMrpz/s root@ubuntu (RSA)
Creating SSH2 DSA key; this may take some time …
1024 SHA256:HoY3UATMD48l8tOWSWQcJWtwK+s98j7WpD7WGEPsbVo root@ubuntu (DSA)
Creating SSH2 ECDSA key; this may take some time …
256 SHA256:sIDDAzkiGiTCzpGHOTEU3QbG/oNn4DNvXxHtm7kzAZ4 root@ubuntu (ECDSA)
Creating SSH2 ED25519 key; this may take some time …
256 SHA256:hGlI7mLNIGbU2bs/igS1YZrNwxxCvFpszZxOCAOozGk root@ubuntu (ED25519)
Setting up ssh-import-id (5.5-0ubuntu1) …
Processing triggers for systemd (229-4ubuntu19) …
Processing triggers for ureadahead (0.100.0-19) …
Processing triggers for ufw (0.35-0ubuntu2) …
vskumar@ubuntu:~$ ssh -V
OpenSSH_7.2p2 Ubuntu-4ubuntu2.4, OpenSSL 1.0.2g 1 Mar 2016
vskumar@ubuntu:~$
=======================>
Step3: install client
We can try to install the OpenSSH client application using
the following command:
sudo apt-get install openssh-client
==== Screen output =====================>
vskumar@ubuntu:~$
vskumar@ubuntu:~$ sudo apt-get install openssh-client
Reading package lists… Done
Building dependency tree
Reading state information… Done
openssh-client is already the newest version (1:7.2p2-4ubuntu2.4).
openssh-client set to manually installed.
0 upgraded, 0 newly installed, 0 to remove and 429 not upgraded.
vskumar@ubuntu:~$
=== It is installed along with server ====>
Step4:
Now, let us check the status:
=== Status of SSH server ===>
vskumar@ubuntu:~$ sudo systemctl status sshd.service
● ssh.service – OpenBSD Secure Shell server
Loaded: loaded (/lib/systemd/system/ssh.service; enabled; vendor preset: enab
Active: active (running) since Sat 2018-05-26 05:21:18 PDT; 6min ago
Main PID: 4645 (sshd)
CGroup: /system.slice/ssh.service
└─4645 /usr/sbin/sshd -D
May 26 05:21:17 ubuntu systemd[1]: Starting OpenBSD Secure Shell server…
May 26 05:21:17 ubuntu sshd[4645]: Server listening on 0.0.0.0 port 22.
May 26 05:21:17 ubuntu sshd[4645]: Server listening on :: port 22.
May 26 05:21:18 ubuntu systemd[1]: Started OpenBSD Secure Shell server.
lines 1-11/11 (END)
vskumar@ubuntu:~$
============================>
Generating RSA Keys:
Step1:
To create our public and private SSH keys we need to use the below commands:
mkdir ~/.ssh
chmod 700 ~/.ssh
ssh-keygen -t rsa
=== Screen output ===>
vskumar@ubuntu:~$ ls
Desktop Downloads Music Public Videos
Documents examples.desktop Pictures Templates
vskumar@ubuntu:~$ ls -la
total 116
drwxr-xr-x 17 vskumar vskumar 4096 May 26 05:30 .
drwxr-xr-x 3 root root 4096 Nov 22 2017 ..
-rw——- 1 vskumar vskumar 524 Mar 6 18:06 .bash_history
-rw-r–r– 1 vskumar vskumar 220 Nov 22 2017 .bash_logout
-rw-r–r– 1 vskumar vskumar 3771 Nov 22 2017 .bashrc
drwx—— 13 vskumar vskumar 4096 May 26 04:45 .cache
drwx—— 14 vskumar vskumar 4096 Nov 22 2017 .config
drwxr-xr-x 2 vskumar vskumar 4096 Nov 22 2017 Desktop
-rw-r–r– 1 vskumar vskumar 25 Nov 22 2017 .dmrc
drwxr-xr-x 2 vskumar vskumar 4096 Nov 22 2017 Documents
drwxr-xr-x 2 vskumar vskumar 4096 Nov 22 2017 Downloads
-rw-r–r– 1 vskumar vskumar 8980 Nov 22 2017 examples.desktop
drwx—— 2 vskumar vskumar 4096 Dec 22 21:36 .gconf
drwx—— 3 vskumar vskumar 4096 May 26 04:42 .gnupg
-rw——- 1 vskumar vskumar 3498 May 26 04:42 .ICEauthority
drwx—— 3 vskumar vskumar 4096 Nov 22 2017 .local
drwx—— 4 vskumar vskumar 4096 Nov 22 2017 .mozilla
drwxr-xr-x 2 vskumar vskumar 4096 Nov 22 2017 Music
drwxr-xr-x 2 vskumar vskumar 4096 Nov 22 2017 Pictures
-rw-r–r– 1 vskumar vskumar 655 Nov 22 2017 .profile
drwxr-xr-x 2 vskumar vskumar 4096 Nov 22 2017 Public
drwxrwxr-x 2 vskumar vskumar 4096 May 26 05:30 .ssh
-rw-r–r– 1 vskumar vskumar 0 Nov 22 2017 .sudo_as_admin_successful
drwxr-xr-x 2 vskumar vskumar 4096 Nov 22 2017 Templates
drwxr-xr-x 2 vskumar vskumar 4096 Nov 22 2017 Videos
-rw——- 1 vskumar vskumar 51 May 26 04:42 .Xauthority
-rw——- 1 vskumar vskumar 82 May 26 04:42 .xsession-errors
-rw——- 1 vskumar vskumar 82 May 26 03:11 .xsession-errors.old
vskumar@ubuntu:~$
vskumar@ubuntu:~$ chmod 700 ~/.ssh
I copied on the below line:
drwx—— 2 vskumar vskumar 4096 May 26 05:30 .ssh
The rights are changed.
======================>
=========================>
vskumar@ubuntu:~$
vskumar@ubuntu:~$ ssh-keygen -t rsa
Generating public/private rsa key pair.
Enter file in which to save the key (/home/vskumar/.ssh/id_rsa):
Enter passphrase (empty for no passphrase):
Enter same passphrase again:
Your identification has been saved in /home/vskumar/.ssh/id_rsa.
Your public key has been saved in /home/vskumar/.ssh/id_rsa.pub.
The key fingerprint is:
SHA256:jLVDx+RqfC+3lo3qcajm+gcHO+44+h/cfTDDLHtsEAg vskumar@ubuntu
The key’s randomart image is:
+—[RSA 2048]—-+
| E . |
| . = |
| + = |
| *.+ + |
| . So+ * |
| o++.O + |
| .o+* O+. |
| ..oo.B+o. |
| .o+O*ooo. |
+—-[SHA256]—–+
vskumar@ubuntu:~$
=== I have given the pwd for passphrase ====>
Step2: Transfer Client Key to Host
ssh-copy-id <username>@<host>
I will try with VM1.
==== Copting ssh id to VM1 ====>
== From Ans-ControlMachine ====>
vskumar@ubuntu:~/.ssh$ cat /etc/hostname
Ans-ControlMachine
vskumar@ubuntu:~/.ssh$ ls
id_rsa id_rsa.pub known_hosts
vskumar@ubuntu:~/.ssh$ ssh ssh-copy-id vskumar@192.168.116.134
ssh: Could not resolve hostname ssh-copy-id: Name or service not known
vskumar@ubuntu:~/.ssh$ sudo ssh-copy-id vskumar@192.168.116.134
[sudo] password for vskumar:
/usr/bin/ssh-copy-id: INFO: Source of key(s) to be installed: “/home/vskumar/.ssh/id_rsa.pub”
The authenticity of host ‘192.168.116.134 (192.168.116.134)’ can’t be established.
ECDSA key fingerprint is SHA256:ZPPT6yQv8nAC1A6cDkeIssDYiim81f4/88I+NNVm1Iw.
Are you sure you want to continue connecting (yes/no)? yes
/usr/bin/ssh-copy-id: INFO: attempting to log in with the new key(s), to filter out any that are already installed
/usr/bin/ssh-copy-id: INFO: 1 key(s) remain to be installed — if you are prompted now it is to install the new keys
vskumar@192.168.116.134’s password:
Number of key(s) added: 1
Now try logging into the machine, with: “ssh ‘vskumar@192.168.116.134′”
and check to make sure that only the key(s) you wanted were added.
vskumar@ubuntu:~/.ssh$
==== Copied ssh key to VM1 ===>
======From VM1 =====>
vskumar@VM1:~$
vskumar@VM1:~$ ssh -V
OpenSSH_7.2p2 Ubuntu-4ubuntu2.2, OpenSSL 1.0.2g 1 Mar 2016
vskumar@VM1:~$ service ssh stop
Failed to stop ssh.service: Unit ssh.service not loaded.
vskumar@VM1:~$ apt-get -purge openssh-server
E: Command line option ‘p’ [from -purge] is not understood in combination with the other options.
vskumar@VM1:~$ sudo apt-get -purge openssh-server
[sudo] password for vskumar:
E: Command line option ‘p’ [from -purge] is not understood in combination with the other options.
vskumar@VM1:~$ sudo apt-get purge openssh-server
Reading package lists… Done
Building dependency tree
Reading state information… Done
Package ‘openssh-server’ is not installed, so not removed
0 upgraded, 0 newly installed, 0 to remove and 432 not upgraded.
vskumar@VM1:~$ ssh -V
OpenSSH_7.2p2 Ubuntu-4ubuntu2.2, OpenSSL 1.0.2g 1 Mar 2016
vskumar@VM1:~$ sudo apt-get purge openssh-client
Reading package lists… Done
Building dependency tree
Reading state information… Done
The following packages will be REMOVED:
openssh-client* snapd* ubuntu-core-launcher*
0 upgraded, 0 newly installed, 3 to remove and 429 not upgraded.
After this operation, 61.7 MB disk space will be freed.
Do you want to continue? [Y/n] y
(Reading database … 176110 files and directories currently installed.)
Removing ubuntu-core-launcher (2.25) …
Removing snapd (2.25) …
Warning: Stopping snapd.service, but it can still be activated by:
snapd.socket
Purging configuration files for snapd (2.25) …
Final directory cleanup
Discarding preserved snap namespaces
umount: /run/snapd/ns/*.mnt: mountpoint not found
umount: /run/snapd/ns/: mountpoint not found
Removing extra snap-confine apparmor rules
Removing snapd state
Removing openssh-client (1:7.2p2-4ubuntu2.2) …
Purging configuration files for openssh-client (1:7.2p2-4ubuntu2.2) …
Processing triggers for man-db (2.7.5-1) …
vskumar@VM1:~$
vskumar@VM1:~$ ssh -V
bash: /usr/bin/ssh: No such file or directory
vskumar@VM1:~$
vskumar@VM1:~$
vskumar@VM1:~$ sudo apt-get install openssh-server
Reading package lists… Done
Building dependency tree
Reading state information… Done
The following additional packages will be installed:
ncurses-term openssh-client openssh-sftp-server ssh-import-id
Suggested packages:
ssh-askpass libpam-ssh keychain monkeysphere rssh molly-guard
The following NEW packages will be installed:
ncurses-term openssh-client openssh-server openssh-sftp-server ssh-import-id
0 upgraded, 5 newly installed, 0 to remove and 429 not upgraded.
Need to get 1,222 kB of archives.
After this operation, 8,917 kB of additional disk space will be used.
Do you want to continue? [Y/n] y
Get:1 http://us.archive.ubuntu.com/ubuntu xenial-updates/main amd64 openssh-client amd64 1:7.2p2-4ubuntu2.4 [589 kB]
Get:2 http://us.archive.ubuntu.com/ubuntu xenial/main amd64 ncurses-term all 6.0+20160213-1ubuntu1 [249 kB]
Get:3 http://us.archive.ubuntu.com/ubuntu xenial-updates/main amd64 openssh-sftp-server amd64 1:7.2p2-4ubuntu2.4 [38.7 kB]
Get:4 http://us.archive.ubuntu.com/ubuntu xenial-updates/main amd64 openssh-server amd64 1:7.2p2-4ubuntu2.4 [335 kB]
Get:5 http://us.archive.ubuntu.com/ubuntu xenial/main amd64 ssh-import-id all 5.5-0ubuntu1 [10.2 kB]
Fetched 1,222 kB in 7s (160 kB/s)
Preconfiguring packages …
Selecting previously unselected package openssh-client.
(Reading database … 176023 files and directories currently installed.)
Preparing to unpack …/openssh-client_1%3a7.2p2-4ubuntu2.4_amd64.deb …
Unpacking openssh-client (1:7.2p2-4ubuntu2.4) …
Selecting previously unselected package ncurses-term.
Preparing to unpack …/ncurses-term_6.0+20160213-1ubuntu1_all.deb …
Unpacking ncurses-term (6.0+20160213-1ubuntu1) …
Selecting previously unselected package openssh-sftp-server.
Preparing to unpack …/openssh-sftp-server_1%3a7.2p2-4ubuntu2.4_amd64.deb …
Unpacking openssh-sftp-server (1:7.2p2-4ubuntu2.4) …
Selecting previously unselected package openssh-server.
Preparing to unpack …/openssh-server_1%3a7.2p2-4ubuntu2.4_amd64.deb …
Unpacking openssh-server (1:7.2p2-4ubuntu2.4) …
Selecting previously unselected package ssh-import-id.
Preparing to unpack …/ssh-import-id_5.5-0ubuntu1_all.deb …
Unpacking ssh-import-id (5.5-0ubuntu1) …
Processing triggers for man-db (2.7.5-1) …
Processing triggers for ufw (0.35-0ubuntu2) …
Processing triggers for systemd (229-4ubuntu19) …
Processing triggers for ureadahead (0.100.0-19) …
Setting up openssh-client (1:7.2p2-4ubuntu2.4) …
Setting up ncurses-term (6.0+20160213-1ubuntu1) …
Setting up openssh-sftp-server (1:7.2p2-4ubuntu2.4) …
Setting up openssh-server (1:7.2p2-4ubuntu2.4) …
Creating SSH2 RSA key; this may take some time …
2048 SHA256:4efQhtH82rrRfTvvYxt3Wu7lJg0HJcW66yEi6WaTN+c root@VM1 (RSA)
Creating SSH2 DSA key; this may take some time …
1024 SHA256:fGZ3vX279MRTXsRhzYyHSPIwVv7ge2/WRQmh+SHlIZo root@VM1 (DSA)
Creating SSH2 ECDSA key; this may take some time …
256 SHA256:ZPPT6yQv8nAC1A6cDkeIssDYiim81f4/88I+NNVm1Iw root@VM1 (ECDSA)
Creating SSH2 ED25519 key; this may take some time …
256 SHA256:5rZGM1Q0vbVD82kcvKS4NdtzCGgDIaiEjL+C01+iJgU root@VM1 (ED25519)
Setting up ssh-import-id (5.5-0ubuntu1) …
Processing triggers for systemd (229-4ubuntu19) …
Processing triggers for ureadahead (0.100.0-19) …
Processing triggers for ufw (0.35-0ubuntu2) …
vskumar@VM1:~$
vskumar@VM1:~$ ssh -V
OpenSSH_7.2p2 Ubuntu-4ubuntu2.4, OpenSSL 1.0.2g 1 Mar 2016
vskumar@VM1:~$
==========================>
===Connecting to >
vskumar@VM1:~$ ssh vskumar@Ans-ControlMachine
ssh: Could not resolve hostname ans-controlmachine: Name or service not known
vskumar@VM1:~$ ssh vskumar@192.168.116.132
The authenticity of host ‘192.168.116.132 (192.168.116.132)’ can’t be established.
ECDSA key fingerprint is SHA256:sIDDAzkiGiTCzpGHOTEU3QbG/oNn4DNvXxHtm7kzAZ4.
Are you sure you want to continue connecting (yes/no)? y
Please type ‘yes’ or ‘no’: yes
Warning: Permanently added ‘192.168.116.132’ (ECDSA) to the list of known hosts.
vskumar@192.168.116.132’s password:
Welcome to Ubuntu 16.04.3 LTS (GNU/Linux 4.10.0-28-generic x86_64)
437 packages can be updated.
251 updates are security updates.
The programs included with the Ubuntu system are free software;
the exact distribution terms for each program are described in the
individual files in /usr/share/doc/*/copyright.
Ubuntu comes with ABSOLUTELY NO WARRANTY, to the extent permitted by
applicable law.
vskumar@ubuntu:~$
vskumar@ubuntu:~$ pwd
/home/vskumar
vskumar@ubuntu:~$ cat /etc/hostname
Ans-ControlMachine
vskumar@ubuntu:~$ exit
logout
Connection to 192.168.116.132 closed.
vskumar@VM1:~$ cat /etc/hostname
VM1
vskumar@VM1:~$
==== Connected from VM1 to ======>
==== Ans-ControlMachine and exit ======>
I am connecting to VM1 from Ans-ControlMachine through ssh.
== Connecting to VM1 from ==>
====Ans-ControlMachine =====>
vskumar@ubuntu:~/.ssh$ ssh vskumar@192.168.116.134
The authenticity of host ‘192.168.116.134 (192.168.116.134)’ can’t be established.
ECDSA key fingerprint is SHA256:ZPPT6yQv8nAC1A6cDkeIssDYiim81f4/88I+NNVm1Iw.
Are you sure you want to continue connecting (yes/no)? yes
Warning: Permanently added ‘192.168.116.134’ (ECDSA) to the list of known hosts.
vskumar@192.168.116.134’s password:
Welcome to Ubuntu 16.04.3 LTS (GNU/Linux 4.10.0-28-generic x86_64)
437 packages can be updated.
251 updates are security updates.
The programs included with the Ubuntu system are free software;
the exact distribution terms for each program are described in the
individual files in /usr/share/doc/*/copyright.
Ubuntu comes with ABSOLUTELY NO WARRANTY, to the extent permitted by
applicable law.
vskumar@VM1:~$ cat /etc/hostname
VM1
vskumar@VM1:~$
vskumar@VM1:~$
vskumar@VM1:~$ exit
logout
Connection to 192.168.116.134 closed.
vskumar@ubuntu:~/.ssh$
vskumar@ubuntu:~/.ssh$ cat /etc/hostname
Ans-ControlMachine
vskumar@ubuntu:~/.ssh$
======= Exit from VM1 And back ====>
==== to Ans-ControlMachine ====>
=== Connecting from VM1 to VM2 ===>
== Connecting in the same SSH ====>
== From VM1 to Ans-ControlMachine ====>
== You can play around with ssh ====>
== Across VMs by using IPs ========>
vskumar@VM2:~$ ssh -V
OpenSSH_7.2p2 Ubuntu-4ubuntu2.2, OpenSSL 1.0.2g 1 Mar 2016
vskumar@VM2:~$ sudo ssh vskumar@VM1
[sudo] password for vskumar:
ssh: Could not resolve hostname vm1: Name or service not known
vskumar@VM2:~$ sudo ssh vskumar@192.168.116.134
The authenticity of host ‘192.168.116.134 (192.168.116.134)’ can’t be established.
ECDSA key fingerprint is SHA256:ZPPT6yQv8nAC1A6cDkeIssDYiim81f4/88I+NNVm1Iw.
Are you sure you want to continue connecting (yes/no)? yes
Warning: Permanently added ‘192.168.116.134’ (ECDSA) to the list of known hosts.
vskumar@192.168.116.134’s password:
Welcome to Ubuntu 16.04.3 LTS (GNU/Linux 4.10.0-28-generic x86_64)
437 packages can be updated.
251 updates are security updates.
Last login: Sat May 26 05:55:36 2018 from 192.168.116.134
vskumar@ubuntu:~$ cat /etc/hostname
Ans-ControlMachine
vskumar@ubuntu:~$
vskumar@ubuntu:~$ exit
logout
Connection to 192.168.116.132 closed.
vskumar@VM1:~$
vskumar@VM1:~$ exit
logout
Connection to 192.168.116.134 closed.
vskumar@VM2:~$ cat /etc/hostname
VM2
vskumar@VM2:~$
== We have played around 3 VMs ===>
=== With SSH =====================>
=== Connecting from VM2 ===>
==== tO Ans-ControlMachine===>
vskumar@VM2:~$ ssh vskumar@192.168.116.132
The authenticity of host ‘192.168.116.132 (192.168.116.132)’ can’t be established.
ECDSA key fingerprint is SHA256:sIDDAzkiGiTCzpGHOTEU3QbG/oNn4DNvXxHtm7kzAZ4.
Are you sure you want to continue connecting (yes/no)? yes
Warning: Permanently added ‘192.168.116.132’ (ECDSA) to the list of known hosts.
vskumar@192.168.116.132’s password:
Welcome to Ubuntu 16.04.3 LTS (GNU/Linux 4.10.0-28-generic x86_64)
437 packages can be updated.
251 updates are security updates.
Last login: Sat May 26 06:05:18 2018 from 192.168.116.134
vskumar@ubuntu:~$
vskumar@ubuntu:~$ cat /etc/hostname
Ans-ControlMachine
vskumar@ubuntu:~$
vskumar@ubuntu:~$ exit
logout
Connection to 192.168.116.132 closed.
vskumar@VM2:~$
==== Conneted from VM2 ==>
=== Removing ssh from VM2 ====>
== To have clean files ========>
vskumar@VM2:~$ sudo apt-get purge openssh-client
Reading package lists… Done
Building dependency tree
Reading state information… Done
The following packages will be REMOVED:
openssh-client* snapd* ubuntu-core-launcher*
0 upgraded, 0 newly installed, 3 to remove and 429 not upgraded.
After this operation, 61.7 MB disk space will be freed.
Do you want to continue? [Y/n] y
(Reading database … 176110 files and directories currently installed.)
Removing ubuntu-core-launcher (2.25) …
Removing snapd (2.25) …
Warning: Stopping snapd.service, but it can still be activated by:
snapd.socket
Purging configuration files for snapd (2.25) …
Final directory cleanup
Discarding preserved snap namespaces
umount: /run/snapd/ns/*.mnt: mountpoint not found
umount: /run/snapd/ns/: mountpoint not found
Removing extra snap-confine apparmor rules
Removing snapd state
Removing openssh-client (1:7.2p2-4ubuntu2.2) …
Purging configuration files for openssh-client (1:7.2p2-4ubuntu2.2) …
Processing triggers for man-db (2.7.5-1) …
vskumar@VM2:~$
vskumar@VM2:~$ ssh -V
bash: /usr/bin/ssh: No such file or directory
vskumar@VM2:~$
===== SSH is removed in VM2 ====>
=== Installing ssh in VM2 ====>
vskumar@VM2:~$ sudo apt-get install openssh-server
Reading package lists… Done
Building dependency tree
Reading state information… Done
The following additional packages will be installed:
ncurses-term openssh-client openssh-sftp-server ssh-import-id
Suggested packages:
ssh-askpass libpam-ssh keychain monkeysphere rssh molly-guard
The following NEW packages will be installed:
ncurses-term openssh-client openssh-server openssh-sftp-server ssh-import-id
0 upgraded, 5 newly installed, 0 to remove and 429 not upgraded.
Need to get 633 kB/1,222 kB of archives.
After this operation, 8,917 kB of additional disk space will be used.
Do you want to continue? [Y/n] y
Get:1 http://us.archive.ubuntu.com/ubuntu xenial/main amd64 ncurses-term all 6.0+20160213-1ubuntu1 [249 kB]
Get:2 http://us.archive.ubuntu.com/ubuntu xenial-updates/main amd64 openssh-sftp-server amd64 1:7.2p2-4ubuntu2.4 [38.7 kB]
Get:3 http://us.archive.ubuntu.com/ubuntu xenial-updates/main amd64 openssh-server amd64 1:7.2p2-4ubuntu2.4 [335 kB]
Get:4 http://us.archive.ubuntu.com/ubuntu xenial/main amd64 ssh-import-id all 5.5-0ubuntu1 [10.2 kB]
Fetched 633 kB in 34s (18.5 kB/s)
Preconfiguring packages …
Selecting previously unselected package openssh-client.
(Reading database … 176023 files and directories currently installed.)
Preparing to unpack …/openssh-client_1%3a7.2p2-4ubuntu2.4_amd64.deb …
Unpacking openssh-client (1:7.2p2-4ubuntu2.4) …
Selecting previously unselected package ncurses-term.
Preparing to unpack …/ncurses-term_6.0+20160213-1ubuntu1_all.deb …
Unpacking ncurses-term (6.0+20160213-1ubuntu1) …
Selecting previously unselected package openssh-sftp-server.
Preparing to unpack …/openssh-sftp-server_1%3a7.2p2-4ubuntu2.4_amd64.deb …
Unpacking openssh-sftp-server (1:7.2p2-4ubuntu2.4) …
Selecting previously unselected package openssh-server.
Preparing to unpack …/openssh-server_1%3a7.2p2-4ubuntu2.4_amd64.deb …
Unpacking openssh-server (1:7.2p2-4ubuntu2.4) …
Selecting previously unselected package ssh-import-id.
Preparing to unpack …/ssh-import-id_5.5-0ubuntu1_all.deb …
Unpacking ssh-import-id (5.5-0ubuntu1) …
Processing triggers for man-db (2.7.5-1) …
Processing triggers for ufw (0.35-0ubuntu2) …
Processing triggers for systemd (229-4ubuntu19) …
Processing triggers for ureadahead (0.100.0-19) …
Setting up openssh-client (1:7.2p2-4ubuntu2.4) …
Setting up ncurses-term (6.0+20160213-1ubuntu1) …
Setting up openssh-sftp-server (1:7.2p2-4ubuntu2.4) …
Setting up openssh-server (1:7.2p2-4ubuntu2.4) …
Creating SSH2 RSA key; this may take some time …
2048 SHA256:JzaY4P+pXshET4rzo/+nkNxGxWe9Hl2Vljd5OV9upko root@VM2 (RSA)
Creating SSH2 DSA key; this may take some time …
1024 SHA256:M49R3FKLVlxGFRw8Caf+s1ktna9h3Ak5Ls93+TyBrac root@VM2 (DSA)
Creating SSH2 ECDSA key; this may take some time …
256 SHA256:/HtM2RyrOSeFO01WW3d1S5fcB9mBM7MApniY54Nq4k4 root@VM2 (ECDSA)
Creating SSH2 ED25519 key; this may take some time …
256 SHA256:lbmYMsRLrCR23898dlX4TidNFYkasm3w/lpyl0oZXfg root@VM2 (ED25519)
Setting up ssh-import-id (5.5-0ubuntu1) …
Processing triggers for systemd (229-4ubuntu19) …
Processing triggers for ureadahead (0.100.0-19) …
Processing triggers for ufw (0.35-0ubuntu2) …
vskumar@VM2:~$ ssh -V
OpenSSH_7.2p2 Ubuntu-4ubuntu2.4, OpenSSL 1.0.2g 1 Mar 2016
vskumar@VM2:~$
== Now VM2 has the complete ssh =====>
=== Now let me connect to ===>
====Ans-ControlMachine ======>
== From VM2 =================>
vskumar@VM2:~$ sudo ssh vskumar@192.168.116.132
The authenticity of host ‘192.168.116.132 (192.168.116.132)’ can’t be established.
ECDSA key fingerprint is SHA256:sIDDAzkiGiTCzpGHOTEU3QbG/oNn4DNvXxHtm7kzAZ4.
Are you sure you want to continue connecting (yes/no)? yes
Warning: Permanently added ‘192.168.116.132’ (ECDSA) to the list of known hosts.
vskumar@192.168.116.132’s password:
Welcome to Ubuntu 16.04.3 LTS (GNU/Linux 4.10.0-28-generic x86_64)
437 packages can be updated.
251 updates are security updates.
Last login: Sat May 26 06:58:14 2018 from 192.168.116.135
vskumar@ubuntu:~$ cat /etc/hostname
Ans-ControlMachine
vskumar@ubuntu:~$
vskumar@ubuntu:~$ exit
logout
Connection to 192.168.116.132 closed.
vskumar@VM2:~$
== Connected and exited ====>
=== Now let me connect to ===>
====From Ans-ControlMachine ======>
==== TO VM2 =================>
vskumar@ubuntu:~/.ssh$ ssh vskumar@192.168.116.135
The authenticity of host ‘192.168.116.135 (192.168.116.135)’ can’t be established.
ECDSA key fingerprint is SHA256:/HtM2RyrOSeFO01WW3d1S5fcB9mBM7MApniY54Nq4k4.
Are you sure you want to continue connecting (yes/no)? yes
Warning: Permanently added ‘192.168.116.135’ (ECDSA) to the list of known hosts.
vskumar@192.168.116.135’s password:
Welcome to Ubuntu 16.04.3 LTS (GNU/Linux 4.10.0-28-generic x86_64)
437 packages can be updated.
251 updates are security updates.
The programs included with the Ubuntu system are free software;
the exact distribution terms for each program are described in the
individual files in /usr/share/doc/*/copyright.
Ubuntu comes with ABSOLUTELY NO WARRANTY, to the extent permitted by
applicable law.
vskumar@VM2:~$ cat /etc/hostname
VM2
vskumar@VM2:~$
vskumar@VM2:~$ exit
logout
Connection to 192.168.116.135 closed.
vskumar@ubuntu:~/.ssh$
===== Connected to VM2 and exited ===>
== SSh key added in VM2 ===>
====From Ans-ControlMachine ======>
vskumar@ubuntu:~/.ssh$
vskumar@ubuntu:~/.ssh$ ssh ssh-copy-id vskumar@192.168.116.135
ssh: Could not resolve hostname ssh-copy-id: Name or service not known
vskumar@ubuntu:~/.ssh$ sudo ssh-copy-id vskumar@192.168.116.135
[sudo] password for vskumar:
/usr/bin/ssh-copy-id: INFO: Source of key(s) to be installed: “/home/vskumar/.ssh/id_rsa.pub”
The authenticity of host ‘192.168.116.135 (192.168.116.135)’ can’t be established.
ECDSA key fingerprint is SHA256:/HtM2RyrOSeFO01WW3d1S5fcB9mBM7MApniY54Nq4k4.
Are you sure you want to continue connecting (yes/no)? yes
/usr/bin/ssh-copy-id: INFO: attempting to log in with the new key(s), to filter out any that are already installed
/usr/bin/ssh-copy-id: INFO: 1 key(s) remain to be installed — if you are prompted now it is to install the new keys
vskumar@192.168.116.135’s password:
Number of key(s) added: 1
Now try logging into the machine, with: “ssh ‘vskumar@192.168.116.135′”
and check to make sure that only the key(s) you wanted were added.
vskumar@ubuntu:~/.ssh$
===== So now, we have made correct ssh connection ====>
=== with VM2 also ============================>
Now, let us try with VM3 as below:
=== Status of VM3 ====>
vskumar@VM3:~$ cat /etc/hostname
VM3
vskumar@VM3:~$ ssh -V
OpenSSH_7.2p2 Ubuntu-4ubuntu2.2, OpenSSL 1.0.2g 1 Mar 2016
vskumar@VM3:~$
vskumar@VM3:~$ ssh vskumar@192.168.116.135
The authenticity of host ‘192.168.116.135 (192.168.116.135)’ can’t be established.
ECDSA key fingerprint is SHA256:/HtM2RyrOSeFO01WW3d1S5fcB9mBM7MApniY54Nq4k4.
Are you sure you want to continue connecting (yes/no)? yes
Warning: Permanently added ‘192.168.116.135’ (ECDSA) to the list of known hosts.
vskumar@192.168.116.135’s password:
Welcome to Ubuntu 16.04.3 LTS (GNU/Linux 4.10.0-28-generic x86_64)
437 packages can be updated.
251 updates are security updates.
Last login: Sat May 26 07:13:07 2018 from 192.168.116.132
vskumar@ubuntu:~$ cat /etc/hostname
Ans-ControlMachine
vskumar@ubuntu:~$
vskumar@ubuntu:~$ exit
logout
Connection to 192.168.116.132 closed.
vskumar@VM2:~$
vskumar@VM2:~$ exit
logout
Connection to 192.168.116.135 closed.
vskumar@VM3:~$
vskumar@VM3:~$ ssh vskumar@192.168.116.132
The authenticity of host ‘192.168.116.132 (192.168.116.132)’ can’t be established.
ECDSA key fingerprint is SHA256:sIDDAzkiGiTCzpGHOTEU3QbG/oNn4DNvXxHtm7kzAZ4.
Are you sure you want to continue connecting (yes/no)? yes
Warning: Permanently added ‘192.168.116.132’ (ECDSA) to the list of known hosts.
vskumar@192.168.116.132’s password:
Welcome to Ubuntu 16.04.3 LTS (GNU/Linux 4.10.0-28-generic x86_64)
437 packages can be updated.
251 updates are security updates.
Last login: Sat May 26 07:35:04 2018 from 192.168.116.135
vskumar@ubuntu:~$ cat /etc/hostname
Ans-ControlMachine
vskumar@ubuntu:~$ exit
logout
Connection to 192.168.116.132 closed.
vskumar@VM3:~$
== So, we could connect from VM3 ====>
=== To all 3 other VMs ==============>
== The issues is resolved for ssh in VM3 ===>
Now, we are ready to use these ssh connection made machines for Ansible future exercises.
In the following video I have demonstrated with trouble shoot methods also:
In this blog, I would like to demonstrate “Installing Ansible on Ubuntu VM”.
At the End of this blog you can see the demonstrated Video.
Let us follow the below steps:
Step 1: To get Ansible for Ubuntu is to add the project’s PPA (personal package archive) to ubuntu system. We can add the Ansible PPA by typing the following command:
$sudo apt-add-repository ppa:ansible/ansible
=== Screen output ====> vskumar@ubuntu:~$ vskumar@ubuntu:~$ sudo apt-add-repository ppa:ansible/ansible [sudo] password for vskumar: Ansible is a radically simple IT automation platform that makes your applications and systems easier to deploy. Avoid writing scripts or custom code to deploy and update your applications— automate in a language that approaches plain English, using SSH, with no agents to install on remote systems.
Step 3:
Now, let us install Ansible as below:
==== Installing Ansible =====>
vskumar@ubuntu:~$ sudo apt-get install ansible
Reading package lists… Done
Building dependency tree
Reading state information… Done
The following additional packages will be installed:
python-ecdsa python-httplib2 python-jinja2 python-markupsafe python-paramiko
sshpass
Suggested packages:
python-jinja2-doc
The following NEW packages will be installed:
ansible python-ecdsa python-httplib2 python-jinja2 python-markupsafe
python-paramiko sshpass
0 upgraded, 7 newly installed, 0 to remove and 0 not upgraded.
Need to get 3,001 kB of archives.
After this operation, 24.1 MB of additional disk space will be used.
Do you want to continue? [Y/n] y
Get:1 http://archive.ubuntu.com/ubuntu xenial/main amd64 python-markupsafe amd64 0.23-2build2 [15.5 kB]
Get:2 http://ppa.launchpad.net/ansible/ansible/ubuntu xenial/main amd64 ansible all 2.4.3.0-1ppa~xenial [2,690 kB]
Get:3 http://archive.ubuntu.com/ubuntu xenial/main amd64 python-jinja2 all 2.8-1 [109 kB]
Get:4 http://archive.ubuntu.com/ubuntu xenial/main amd64 python-ecdsa all 0.13-2 [34.0 kB]
Get:5 http://archive.ubuntu.com/ubuntu xenial/main amd64 python-paramiko all 1.16.0-1 [109 kB]
Get:6 http://archive.ubuntu.com/ubuntu xenial/main amd64 python-httplib2 all 0.9.1+dfsg-1 [34.2 kB]
Get:7 http://archive.ubuntu.com/ubuntu xenial/universe amd64 sshpass amd64 1.05-1 [10.5 kB]
Fetched 3,001 kB in 9s (306 kB/s)
Selecting previously unselected package python-markupsafe.
(Reading database … 218383 files and directories currently installed.)
Preparing to unpack …/python-markupsafe_0.23-2build2_amd64.deb …
Unpacking python-markupsafe (0.23-2build2) …
Selecting previously unselected package python-jinja2.
Preparing to unpack …/python-jinja2_2.8-1_all.deb …
Unpacking python-jinja2 (2.8-1) …
Selecting previously unselected package python-ecdsa.
Preparing to unpack …/python-ecdsa_0.13-2_all.deb …
Unpacking python-ecdsa (0.13-2) …
Selecting previously unselected package python-paramiko.
Preparing to unpack …/python-paramiko_1.16.0-1_all.deb …
Unpacking python-paramiko (1.16.0-1) …
Selecting previously unselected package python-httplib2.
Preparing to unpack …/python-httplib2_0.9.1+dfsg-1_all.deb …
Unpacking python-httplib2 (0.9.1+dfsg-1) …
Selecting previously unselected package sshpass.
Preparing to unpack …/sshpass_1.05-1_amd64.deb …
Unpacking sshpass (1.05-1) …
Selecting previously unselected package ansible.
Preparing to unpack …/ansible_2.4.3.0-1ppa~xenial_all.deb …
Unpacking ansible (2.4.3.0-1ppa~xenial) …
Processing triggers for man-db (2.7.5-1) …
Setting up python-markupsafe (0.23-2build2) …
Setting up python-jinja2 (2.8-1) …
Setting up python-ecdsa (0.13-2) …
Setting up python-paramiko (1.16.0-1) …
Setting up python-httplib2 (0.9.1+dfsg-1) …
Setting up sshpass (1.05-1) …
Setting up ansible (2.4.3.0-1ppa~xenial) …
vskumar@ubuntu:~$
=== Ansible installation is done! ====>
Step 4: Let us add the below python properties also:
sudo apt-get install python-software-properties == Installing python properties =======> vskumar@ubuntu:/etc/ansible$ sudo apt-get install python-software-properties Reading package lists… Done Building dependency tree Reading state information… Done The following additional packages will be installed: python-apt python-pycurl Suggested packages: python-apt-dbg python-apt-doc libcurl4-gnutls-dev python-pycurl-dbg python-pycurl-doc The following NEW packages will be installed: python-apt python-pycurl python-software-properties 0 upgraded, 3 newly installed, 0 to remove and 0 not upgraded. Need to get 202 kB of archives. After this operation, 927 kB of additional disk space will be used. Do you want to continue? [Y/n] y Get:1 http://archive.ubuntu.com/ubuntu xenial/main amd64 python-apt amd64 1.1.0~beta1build1 [139 kB] Get:2 http://archive.ubuntu.com/ubuntu xenial/main amd64 python-pycurl amd64 7.43.0-1ubuntu1 [43.3 kB] Get:3 http://archive.ubuntu.com/ubuntu xenial/universe amd64 python-software-properties all 0.96.20 [20.1 kB] Fetched 202 kB in 1s (181 kB/s) Selecting previously unselected package python-apt. (Reading database … 220895 files and directories currently installed.) Preparing to unpack …/python-apt_1.1.0~beta1build1_amd64.deb … Unpacking python-apt (1.1.0~beta1build1) … Selecting previously unselected package python-pycurl. Preparing to unpack …/python-pycurl_7.43.0-1ubuntu1_amd64.deb … Unpacking python-pycurl (7.43.0-1ubuntu1) … Selecting previously unselected package python-software-properties. Preparing to unpack …/python-software-properties_0.96.20_all.deb … Unpacking python-software-properties (0.96.20) … Setting up python-apt (1.1.0~beta1build1) … Setting up python-pycurl (7.43.0-1ubuntu1) … Setting up python-software-properties (0.96.20) … vskumar@ubuntu:/etc/ansible$ ===== Installed python properties ======>
Step 5: Let us check the version: === Checking ANSIBLE Version ===> vskumar@ubuntu:~$ansible –version ansible 2.4.3.0 config file = /etc/ansible/ansible.cfg configured module search path = [u’/home/vskumar/.ansible/plugins/modules’, u’/usr/share/ansible/plugins/modules’] ansible python module location = /usr/lib/python2.7/dist-packages/ansible executable location = /usr/bin/ansible python version = 2.7.12 (default, Dec 4 2017, 14:50:18) [GCC 5.4.0 20160609] vskumar@ubuntu:~$ =============================> It means from the above display it is confirmed ansible is available.
Step 6: The ansible is on the below dir:
======= Check List of files ===> vskumar@ubuntu:~$ ls -lha /etc/ansible total 48K drwxr-xr-x 4 root root 4.0K Mar 6 08:52 . drwxr-xr-x 142 root root 12K Mar 6 05:59 .. -rw-r–r– 1 root root 19K Jan 31 15:21 ansible.cfg drwxr-xr-x 2 root root 4.0K Mar 6 08:59 group_vars -rw-r–r– 1 root root 1.2K Mar 6 08:20 hosts drwxr-xr-x 2 root root 4.0K Jan 31 19:46 roles vskumar@ubuntu:~$ ========================>
Step 7: Always it is better we need to have backup of the above files in a folder. Now let me copy all of them as below: Make a backup of all the files as below : == Making backup ====>
vskumar@ubuntu:~$ cd ansplatform1 vskumar@ubuntu:~/ansplatform1$ ls ansible.cfg group_vars hosts roles vskumar@ubuntu:~/ansplatform1$
===== Backup files ====>
Step 8: In the above dir, let us modify ansible.cfg to have the below line uncommented: inventory = hosts ====Modifying ansible.cfg ====> vskumar@ubuntu:~/ansplatform1$ sudo vim ansible.cfg vskumar@ubuntu:~/ansplatform1$ ======>
You can see part of the file as below : === Part of config file to update ====> vskumar@ubuntu:/etc/ansible$ ls ansible.cfg group_vars hosts roles vskumar@ubuntu:/etc/ansible$ vim ansible vskumar@ubuntu:/etc/ansible$ vskumar@ubuntu:/etc/ansible$ vim ansible.cfg vskumar@ubuntu:/etc/ansible$
Updated line:
inventory = /etc/ansible/hosts
== Updated area only ===>
Step 9:
Configuring Ansible Hosts: Ansible keeps track of all of the servers. It knows about them through a “hosts” file. We need to set up this file first, before we can begin to communicate with our other computers. Now let us see the current content of hosts file: Using : $sudo cat /etc/ansible/hosts
====== The default Contents of hosts file ===> vskumar@ubuntu:~$ sudo cat /etc/ansible/hosts # This is the default ansible ‘hosts’ file. # # It should live in /etc/ansible/hosts # # – Comments begin with the ‘#’ character # – Blank lines are ignored # – Groups of hosts are delimited by [header] elements # – You can enter hostnames or ip addresses # – A hostname/ip can be a member of multiple groups
# Ex 1: Ungrouped hosts, specify before any group headers.
# Here’s another example of host ranges, this time there are no # leading 0s:
## db-[99:101]-node.example.com
vskumar@ubuntu:~$ ==================>
We can see a file that has a lot of example configurations, none of them will actually work for us since these hosts are made up. So to start with, let’s make sure they all are commented out on the lines in this file by adding a “#” before each line.
We will keep these examples in the file only as they were to help us with configuration.
If we want to implement more complex scenarios in the future these can be reused.
After making sure all of these lines are commented, we can start adding our hosts in the hosts file. To do our lab exercise; Now, we need to identify our local hosts. You can check your laptop or desktop ip as one host. Another host you consider your ubuntu VM, where the current Ansible is configured. For now, let us work with two hosts only. In my systems: To identify my ubuntu host1: ====== ifconfig =====>
vskumar@ubuntu:~$ ifconfig docker0 Link encap:Ethernet HWaddr 02:42:06:95:ca:2d inet addr:172.17.0.1 Bcast:172.17.255.255 Mask:255.255.0.0 UP BROADCAST MULTICAST MTU:1500 Metric:1 RX packets:0 errors:0 dropped:0 overruns:0 frame:0 TX packets:0 errors:0 dropped:0 overruns:0 carrier:0 collisions:0 txqueuelen:0 RX bytes:0 (0.0 B) TX bytes:0 (0.0 B)
vskumar@ubuntu:~$ =======================> I need to consider my base ubuntu VM is as ‘192.168.116.129’ Hence my host1=192.168.116.129 from ens33 You can also check your VM IP.
Now, let me check my local host [laptop] ip:
====== IPCONFIG info from Laptop CMD =====> Connection-specific DNS Suffix . : Link-local IPv6 Address . . . . . : fe80::197c:6a85:f86:a3e4%20 IPv4 Address. . . . . . . . . . . : 192.168.137.1 Subnet Mask . . . . . . . . . . . : 255.255.255.0 Default Gateway . . . . . . . . . : ======================> Let me check the ip connection from my Ubuntu VM. === Testing laptop ip from VM ====> vskumar@ubuntu:~$ ping 192.168.137.1 PING 192.168.137.1 (192.168.137.1) 56(84) bytes of data. 64 bytes from 192.168.137.1: icmp_seq=1 ttl=128 time=3.89 ms 64 bytes from 192.168.137.1: icmp_seq=2 ttl=128 time=1.15 ms 64 bytes from 192.168.137.1: icmp_seq=3 ttl=128 time=1.19 ms 64 bytes from 192.168.137.1: icmp_seq=4 ttl=128 time=1.38 ms 64 bytes from 192.168.137.1: icmp_seq=5 ttl=128 time=1.15 ms 64 bytes from 192.168.137.1: icmp_seq=6 ttl=128 time=1.26 ms 64 bytes from 192.168.137.1: icmp_seq=7 ttl=128 time=1.13 ms 64 bytes from 192.168.137.1: icmp_seq=8 ttl=128 time=1.13 ms 64 bytes from 192.168.137.1: icmp_seq=9 ttl=128 time=1.39 ms 64 bytes from 192.168.137.1: icmp_seq=10 ttl=128 time=1.29 ms 64 bytes from 192.168.137.1: icmp_seq=11 ttl=128 time=1.26 ms 64 bytes from 192.168.137.1: icmp_seq=12 ttl=128 time=1.14 ms 64 bytes from 192.168.137.1: icmp_seq=13 ttl=128 time=1.22 ms 64 bytes from 192.168.137.1: icmp_seq=14 ttl=128 time=1.37 ms 64 bytes from 192.168.137.1: icmp_seq=15 ttl=128 time=1.14 ms ^C — 192.168.137.1 ping statistics — 15 packets transmitted, 15 received, 0% packet loss, time 14032ms rtt min/avg/max/mdev = 1.134/1.411/3.899/0.672 ms vskumar@ubuntu:~$ ==========> Now, I consider my host2 = 192.168.137.1
Let me ping my VM from Laptop CMD:
==== Pinging Ubuntu IP from CMD prompt =====>
C:\Users\Toshiba>ping 192.168.116.129
Pinging 192.168.116.129 with 32 bytes of data:
Reply from 192.168.116.129: bytes=32 time=2ms TTL=64
Reply from 192.168.116.129: bytes=32 time<1ms TTL=64
Reply from 192.168.116.129: bytes=32 time<1ms TTL=64
Reply from 192.168.116.129: bytes=32 time<1ms TTL=64
Ping statistics for 192.168.116.129:
Packets: Sent = 4, Received = 4, Lost = 0 (0% loss),
Approximate round trip times in milli-seconds:
Minimum = 0ms, Maximum = 2ms, Average = 0ms
C:\Users\Toshiba>
====== Replied VM ====>
It means both hosts are working fine.
Now, below block we should add to our hosts file to connect them:
[servers]
host1 ansible_ssh_host=192.168.116.129
host2 ansible_ssh_host=192.168.137.1
We can consider two groups from these two hosts.
Let me check the files as below:
==== List the current files ====>
vskumar@ubuntu:/etc/ansible$ ls -l
total 28
-rw-r–r– 1 root root 19155 Jan 31 15:21 ansible.cfg
-rw-r–r– 1 root root 1016 Jan 31 15:21 hosts
drwxr-xr-x 2 root root 4096 Jan 31 19:46 roles
vskumar@ubuntu:/etc/ansible$
===============================>
Now, let me update the host file.
=== After adding the content of hosts file ===>
vskumar@ubuntu:/etc/ansible$ sudo vim hosts
[sudo] password for vskumar:
Sorry, try again.
[sudo] password for vskumar:
vskumar@ubuntu:/etc/ansible$
vskumar@ubuntu:/etc/ansible$ tail -10 hosts
# Here’s another example of host ranges, this time there are no
# leading 0s:
## db-[99:101]-node.example.com
[servers]
host1 ansible_ssh_host=192.168.116.129
host2 ansible_ssh_host=192.168.137.1
vskumar@ubuntu:/etc/ansible$
== You can see the lst 3 lines of the hosts file ===>
We also need to add the group name as below in the hosts file.
[group_name]
alias ansible_ssh_host=your_server_ip
Here, the group_name is an organizational tag that you will refer to any servers listed
under it with one word.
The alias is just a name to refer to that server.
Now let me add the above lines in hosts above the servers line as below.
[ansible_test1]
alias ansible_ssh_host=192.168.116.129
===== Hosts updated – latest ===>
vskumar@ubuntu:/etc/ansible$ sudo vim hosts
vskumar@ubuntu:/etc/ansible$
vskumar@ubuntu:/etc/ansible$ tail -10 hosts
# leading 0s:
## db-[99:101]-node.example.com
[ansible_test1]
alias ansible_ssh_host=192.168.116.129
Now let me goto ansible dir:
======>
vskumar@ubuntu:~$ cd /etc/ansible
vskumar@ubuntu:/etc/ansible$
======>
Assuming in our Ansible test scenario,
we are imagining that we have two servers we are going to control with Ansible.
These servers are accessible from the Ansible server by typing:
$ssh root@your_server_ip
Means as:
$ssh root@192.168.116.129
==============>
vskumar@ubuntu:/etc/ansible$ ssh root@192.168.116.129
ssh: connect to host 192.168.116.129 port 22: Connection refused
vskumar@ubuntu:/etc/ansible$
==============>
TROUBLE SHOOT THE HOSTS:
=== Trouble shoot ===>
vskumar@ubuntu:/etc/ansible$ ansible -m ping all
host1 | UNREACHABLE! => {
“changed”: false,
“msg”: “Failed to connect to the host via ssh: ssh: connect to host 192.168.116.129 port 22: Connection refused\r\n”,
“unreachable”: true
}
alias | UNREACHABLE! => {
“changed”: false,
“msg”: “Failed to connect to the host via ssh: ssh: connect to host 192.168.116.129 port 22: Connection refused\r\n”,
“unreachable”: true
}
host2 | UNREACHABLE! => {
“changed”: false,
“msg”: “Failed to connect to the host via ssh: \r\n ****USAGE WARNING****\r\n\r\nThis is a private computer system. This computer system, including all\r\nrelated equipment, networks, and network devices (specifically including\r\nInternet access) are provided only for authorized use. This computer system\r\nmay be monitored for all lawful purposes, including to ensure that its use\r\nis authorized, for management of the system, to facilitate protection against\r\nunauthorized access, and to verify security procedures, survivability, and\r\noperational security. Monitoring includes active attacks by authorized entities\r\nto test or verify the security of this system. During monitoring, information\r\nmay be examined, recorded, copied and used for authorized purposes. All\r\ninformation, including personal information, placed or sent over this system\r\nmay be monitored.\r\n\r\nUse of this computer system, authorized or unauthorized, constitutes consent\r\nto monitoring of this system. Unauthorized use may subject you to criminal\r\nprosecution. Evidence of unauthorized use collected during monitoring may be\r\nused for administrative, criminal, or other adverse action. Use of this system\r\nconstitutes consent to monitoring for these purposes.\r\n\r\n\r\nPermission denied (publickey,password,keyboard-interactive).\r\n”,
“unreachable”: true
}
vskumar@ubuntu:/etc/ansible$
===============>
The reason for the above error is;
With our current settings, we tried to connect to any of these hosts with Ansible,
the command failed.
This is because your SSH key is embedded for the root user on the remote systems
and Ansible will by default try to connect as your current user.
A connection attempt will get the above error.
To rectify it;
We can create a file that tells all of the servers in the “servers” group to connect
using the root user.
To do this, we will create a directory in the Ansible configuration structure called group_vars.
Let us use the below dir commands:
$sudo mkdir /etc/ansible/group_vars
========================>
vskumar@ubuntu:/etc/ansible$ sudo mkdir /etc/ansible/group_vars
vskumar@ubuntu:/etc/ansible$ ls -l
total 32
-rw-r–r– 1 root root 19155 Jan 31 15:21 ansible.cfg
drwxr-xr-x 2 root root 4096 Mar 6 08:52 group_vars
-rw-r–r– 1 root root 1158 Mar 6 08:20 hosts
drwxr-xr-x 2 root root 4096 Jan 31 19:46 roles
vskumar@ubuntu:/etc/ansible$
=================> Within this folder, we can create YAML-formatted files for each group we want to configure. By using below command: $sudo vim /etc/ansible/group_vars/servers We can put our configuration in here. YAML files start with “—“, so make sure you don’t forget that part.
Below Code: — ansible_ssh_user: root
==========>
udo vim /etc/ansible/group_vars/servers
vskumar@ubuntu:/etc/ansible$ cat /etc/ansible/group_vars/servers