
All the below commands were copied from the Ubuntu 16.04 VM.
You can see the below video on how to uninstall/install git from Ubuntu 18.04.
https://www.facebook.com/328906801086961/videos/720291215170115/%MCEPASTEBIN%
You can use all the below commands from 8.04 VM also.
In this GIT exercise, I would like to present the below lab sessions for git in an Ubuntu 16.04 VM for the people who attended my sessions so far.
1. How to install git in ubuntu [linux] ?:
2. How To Set Up Git ?:
3. How to check the config file content? :
4. How to clone a project from an url ?:
5. How to Create a test dir or folder for git project?:
6. How initiate the git for the current folder or dir in linux ?:
7. How to Create local files and check the status in the current git folder?:
8. How to commit the files into a local repository and check their status ?:
9. How to commit files into local repo with a message ?:
10. How to check the history of the local git repository ?:
11. How to identify the difference of two commit ids ?:
12. How to check and operate the staged files in local repository ?:
13. What are the ultimate format of the git log ?:
14. How to setup aliases for different git commands?:
15. How to use tags and operate for different versions in a repository?:
16. How to revert back the changes to older version ?:
17. How to cancel the committed changes? :
18. How to reset the reverted changes through commit from the branch? :
19. Working with git directory:
20. Working with git branches and master :
21. How to Merge latest objects into single branch ?:
1. How to install git in ubuntu [linux] ?:
$sudo apt-get update
$sudo apt-get install git
2. How To Set Up Git ?:
$git config –global user.name “Your Name”
$git config –global user.email “youremail@domain.com”
Ex:
git config –global user.kumar2018 “Vskumar”
git config –global user.email “vskumar35@gmail.com”
==== Screen output for the above commands==>
vskumar@ubuntu:~$ git config –global user.kumar2018 “Vskumar”
vskumar@ubuntu:~$ git config –global user.email “vskumar35@gmail.com”
vskumar@ubuntu:~$ git config –list
user.kumar2018=Vskumar
user.email=vskumar35@gmail.com
vskumar@ubuntu:~$
===========>
3. How to check the config file content? :
$cat ~/.gitconfig
==== Output of config file ===>
vskumar@ubuntu:~$ cat ~/.gitconfig
[user]
kumar2018 = Vskumar
email = vskumar35@gmail.com
vskumar@ubuntu:~$
=============>
4. How to clone a project from an url ?: Let us clone one project as below:
$git clone https://github.com/vskumar2017/VSKTestproject1
=== Screen outout ==>
vskumar@ubuntu:~$
vskumar@ubuntu:~$ sudo git clone https://github.com/vskumar2017/VSKTestproject1
Cloning into ‘VSKTestproject1’…
remote: Counting objects: 57, done.
remote: Total 57 (delta 0), reused 0 (delta 0), pack-reused 57
Unpacking objects: 100% (57/57), done.
Checking connectivity… done.
vskumar@ubuntu:~$
vskumar@ubuntu:~$ ls
data-volume1 examples.desktop Pictures VSKTestproject1
Desktop flask-test Public
Documents jdk-9.0.4_linux-x64_bin.tar.gz Templates
Downloads Music Videos
vskumar@ubuntu:~$
=====================>
5. How to Create a test dir or folder for git project?:
=============>
vskumar@ubuntu:~$ mkdir test-git
vskumar@ubuntu:~$ pwd
/home/vskumar
vskumar@ubuntu:~$ ls
data-volume1 examples.desktop Pictures Videos
Desktop flask-test Public VSKTestproject1
Documents jdk-9.0.4_linux-x64_bin.tar.gz Templates
Downloads Music test-git
vskumar@ubuntu:~$
vskumar@ubuntu:~$
vskumar@ubuntu:~$ cd test-git
vskumar@ubuntu:~/test-git$ ls
vskumar@ubuntu:~/test-git$
=======>
6. How initiate the git for the current folder or dir in linux ?:
== Initialize the current dir for git init===>
vskumar@ubuntu:~/test-git$ git init
Initialized empty Git repository in /home/vskumar/test-git/.git/
vskumar@ubuntu:~/test-git$
========>
7. How to Create local files and check the status in the current git folder?:
== Create a text file========>
vskumar@ubuntu:~/test-git$ echo “Testing line1 for git ..” >> test1.txt vskumar@ubuntu:~/test-git$ cat test1.txt Testing line1 for git .. vskumar@ubuntu:~/test-git$ ls -l
total 4
-rw-rw-r– 1 vskumar vskumar 25 Feb 24 04:03 test1.txt
vskumar@ubuntu:~/test-git$ git status On branch master Initial commit Untracked files: (use “git add <file>…” to include in what will be committed) test1.txt nothing added to commit but untracked files present (use “git add” to track) vskumar@ubuntu:~/test-git$
===== Add a new file====>
vskumar@ubuntu:~/test-git$ git add test1.txt
vskumar@ubuntu:~/test-git$ git status
On branch master
Initial commit
Changes to be committed:
(use “git rm –cached <file>…” to unstage)
new file: test1.txt
vskumar@ubuntu:~/test-git$
===========>
8. How to commit the files into a local repository and check their status ?:
Now, let us do simple commit the file to the local repo.
$git commit -m “First Commit”
=== Commite output ==>
vskumar@ubuntu:~/test-git$ git commit -m “First Commit”
[master (root-commit) 56ccc1e] First Commit
1 file changed, 1 insertion(+)
create mode 100644 test1.txt
vskumar@ubuntu:~/test-git$
======================>
We can check the current status:
=== status after commit ===>
vskumar@ubuntu:~/test-git$ git status
On branch master
nothing to commit, working directory clean
vskumar@ubuntu:~/test-git$
==========>
== Added a new message ===>
vskumar@ubuntu:~/test-git$ echo ‘Testing line2 for git—->’ >> test1.txt
vskumar@ubuntu:~/test-git$ cat test1.txt
Testing line1 for git ..
Testing line2 for git—->
vskumar@ubuntu:~/test-git$
===============>
=== Current status ===>
vskumar@ubuntu:~/test-git$ git status
On branch master
Changes not staged for commit:
(use “git add <file>…” to update what will be committed)
(use “git checkout — <file>…” to discard changes in working directory)
modified: test1.txt
no changes added to commit (use “git add” and/or “git commit -a”)
vskumar@ubuntu:~/test-git$
=====================>
Now, add these two files:
git add test1.txt
git add test2.txt
=== Add and check status for two files ==>
vskumar@ubuntu:~/test-git$ git add test1.txt
vskumar@ubuntu:~/test-git$ git add test2.txt
vskumar@ubuntu:~/test-git$ git status
On branch master
Changes to be committed:
(use “git reset HEAD <file>…” to unstage)
modified: test1.txt
new file: test2.txt
vskumar@ubuntu:~/test-git$
====================================>
9. How to commit files into local repo with a message ?:
Commit these two files:
git commit -m “Committed:Changes for test1.txt and test2.txt”
==== Committed changes and status ===>
vskumar@ubuntu:~/test-git$ git commit -m “Committed:Changes for test1.txt and test2.txt”
[master 2a7192d] Committed:Changes for test1.txt and test2.txt
2 files changed, 2 insertions(+)
create mode 100644 test2.txt
vskumar@ubuntu:~/test-git$ git status
On branch master
nothing to commit, working directory clean
vskumar@ubuntu:~/test-git$
======================================>
Now, let us test the add command . prompt by having 2 or more files.
=== Updated two files ==>
vskumar@ubuntu:~/test-git$ cat test1.txt
Testing line1 for git ..
Testing line2 for git—->
Testing test1.tx for add . function
vskumar@ubuntu:~/test-git$ cat test2.txt
File Test2: Testing for Git commit –>
Testing test2.tx for add . function
vskumar@ubuntu:~/test-git$
=============>
Let us check the status:
==== Status ==>
vskumar@ubuntu:~/test-git$ git status
On branch master
Changes not staged for commit:
(use “git add <file>…” to update what will be committed)
(use “git checkout — <file>…” to discard changes in working directory)
modified: test1.txt
modified: test2.txt
no changes added to commit (use “git add” and/or “git commit -a”)
vskumar@ubuntu:~/test-git$
===============>
Now to add these two file together we need to use ‘git addd .’
== Added all files ===>
vskumar@ubuntu:~/test-git$
vskumar@ubuntu:~/test-git$ git add .
vskumar@ubuntu:~/test-git$ git status
On branch master
Changes to be committed:
(use “git reset HEAD <file>…” to unstage)
modified: test1.txt
modified: test2.txt
vskumar@ubuntu:~/test-git$
============>
Now let us commit the changes of one file at a time.
=== test1.txt commitment===>
vskumar@ubuntu:~/test-git$ git commit test1.txt -m ‘Committed test1.txt 3rd change’
[master 6bfd9b0] Committed test1.txt 3rd change
1 file changed, 1 insertion(+)
vskumar@ubuntu:~/test-git$ ^C
============================>
Now, let us check the status:
=======>
vskumar@ubuntu:~/test-git$
vskumar@ubuntu:~/test-git$ git status
On branch master
Changes to be committed:
(use “git reset HEAD <file>…” to unstage)
modified: test2.txt
vskumar@ubuntu:~/test-git$
========>
In git we can check the history by using ‘git log’ command.
=== Histroy ====>
vskumar@ubuntu:~/test-git$ git log
commit 69282e8d8c07e7cbc68e93b16df1d943d3b518d5
Author: Vsk <vskumar35@gmail.com>
Date: Sat Feb 24 06:49:27 2018 -0800
Committed test2.txt 3rd change
commit 6bfd9b045c352f13c36d8f82f12567058a8bb468
Author: Vsk <vskumar35@gmail.com>
Date: Sat Feb 24 06:46:24 2018 -0800
Committed test1.txt 3rd change
commit 2a7192dcdd1a123b8164f0d48dd0631645cf0630
Author: Vsk <vskumar35@gmail.com>
Date: Sat Feb 24 06:32:03 2018 -0800
Committed:Changes for test1.txt and test2.txt
commit 56ccc1ec9ae7db9f97e3a08e5488a64b4f130f1b
Author: Vsk <vskumar35@gmail.com>
Date: Sat Feb 24 06:08:42 2018 -0800
First Commit
vskumar@ubuntu:~/test-git$
=====================>
10. How to check the history of the local git repository ?:
In git we can check the history by using ‘git log’ command. It can give entire committed history with the relevant comments. If we use ‘git log –pretty=oneline’ it gives only chekcsums for different times commited occasions with commit the messages.
If we use ‘git log –pretty=oneline’ it gives only chekcsums for different times commited occasions with commit the messages.
=== Output for pretty ===>
vskumar@ubuntu:~/test-git$ git log –pretty=oneline
69282e8d8c07e7cbc68e93b16df1d943d3b518d5 Committed test2.txt 3rd change
6bfd9b045c352f13c36d8f82f12567058a8bb468 Committed test1.txt 3rd change
2a7192dcdd1a123b8164f0d48dd0631645cf0630 Committed:Changes for test1.txt and test2.txt
56ccc1ec9ae7db9f97e3a08e5488a64b4f130f1b First Commit
vskumar@ubuntu:~/test-git$
==============>
We can also check the commitments by author also using
‘git log –pretty=oneline –author=<your name>’
git log –pretty=oneline –author=kumar
============>
vskumar@ubuntu:~/test-git$ git log –pretty=oneline –author=kumar
69282e8d8c07e7cbc68e93b16df1d943d3b518d5 Committed test2.txt 3rd change
6bfd9b045c352f13c36d8f82f12567058a8bb468 Committed test1.txt 3rd change
2a7192dcdd1a123b8164f0d48dd0631645cf0630 Committed:Changes for test1.txt and test2.txt
56ccc1ec9ae7db9f97e3a08e5488a64b4f130f1b First Commit
============>
Let me give wrong user name to test:
=== Wrong user name ====>
vskumar@ubuntu:~/test-git$ git log –pretty=oneline –author=kumar1
vskumar@ubuntu:~/test-git$ git log –pretty=oneline –author=kumar202
vskumar@ubuntu:~/test-git$
= No files committed for the above users ==>
We can see more detail about a particular commit through show command.
The command ‘git log’ yields a sequential history of the individual commits within the repository.
Then you need to collect the commit id.
=== git show =====>
vskumar@ubuntu:~/test-git$ git show 56ccc1ec9ae7db9f97e3a08e5488a64b4f130f1b
commit 56ccc1ec9ae7db9f97e3a08e5488a64b4f130f1b
Author: Vsk <vskumar35@gmail.com>
Date: Sat Feb 24 06:08:42 2018 -0800
First Commit
diff –git a/test1.txt b/test1.txt
new file mode 100644
index 0000000..73b0484
— /dev/null
+++ b/test1.txt
@@ -0,0 +1 @@
+Testing line1 for git ..
vskumar@ubuntu:~/test-git$
=============================>
11. How to identify the difference of two commit ids ?:
The diff command recalls both full commit ID names and run ‘git diff’
git diff 2a7192dcdd1a123b8164f0d48dd0631645cf0630 6bfd9b045c352f13c36d8f82f12567058a8bb468
== Output of two commit diffs ==>
vskumar@ubuntu:~/test-git$ git diff 2a7192dcdd1a123b8164f0d48dd0631645cf0630 6bfd9b045c352f13c36d8f82f12567058a8bb468
diff –git a/test1.txt b/test1.txt
index 931bb8b..b9132c1 100644
— a/test1.txt
+++ b/test1.txt
@@ -1,2 +1,3 @@
Testing line1 for git ..
Testing line2 for git—->
+Testing test1.tx for add . function
vskumar@ubuntu:~/test-git$
==============================>
12. How to check and operate the staged files in local repository ?:
We can use the below command:
git ls-files –stage
=== Stage of current files ===>
vskumar@ubuntu:~/test-git$
vskumar@ubuntu:~/test-git$ git ls-files –stage
100644 b9132c1dd4ac08fa9c1e3dea5d7100e33557ad20 0 test1.txt
100644 0866cfd2c7ac9bf17f0a0590551a3580359e7250 0 test2.txt
vskumar@ubuntu:~/test-git$
========================>
=== Rm and later files stage ==>
vskumar@ubuntu:~/test-git$ git rm –cached test1.txt
rm ‘test1.txt’
vskumar@ubuntu:~/test-git$ git ls-files –stage
100644 0866cfd2c7ac9bf17f0a0590551a3580359e7250 0 test2.txt
vskumar@ubuntu:~/test-git$
vskumar@ubuntu:~/test-git$ git rm –cached test1.txt
rm ‘test1.txt’
vskumar@ubuntu:~/test-git$ git ls-files –stage
100644 0866cfd2c7ac9bf17f0a0590551a3580359e7250 0 test2.txt
vskumar@ubuntu:~/test-git$
=====>
You can see the removed file is back into dir:
== Status of removed file ==>
vskumar@ubuntu:~/test-git$ git status
On branch master
Changes to be committed:
(use “git reset HEAD <file>…” to unstage)
deleted: test1.txt
Untracked files:
(use “git add <file>…” to include in what will be committed)
test1.txt
vskumar@ubuntu:~/test-git$
=== It need to be be added and committed ====>
vskumar@ubuntu:~/test-git$ git add .
vskumar@ubuntu:~/test-git$ git status
On branch master
nothing to commit, working directory clean
vskumar@ubuntu:~/test-git$
======= It need to be added only===.
====== list the stage files =>
vskumar@ubuntu:~/test-git$
vskumar@ubuntu:~/test-git$ git ls-files –stage
100644 b9132c1dd4ac08fa9c1e3dea5d7100e33557ad20 0 test1.txt
100644 0866cfd2c7ac9bf17f0a0590551a3580359e7250 0 test2.txt
vskumar@ubuntu:~/test-git$
=========================>
13. What are the ultimate format of the git log ?:
We can use the ultimate format of the log as: git log –pretty=format:”%h %ad | %s%d [%an]” –graph –date=short
===== Screen output ==========>
vskumar@ubuntu:~$ cd test-git vskumar@ubuntu:~/test-git$ pwd /home/vskumar/test-git vskumar@ubuntu:~/test-git$ git log –pretty=format:”%h %ad | %s%d [%an]” –graph –date=short * 69282e8 2018-02-24 | Committed test2.txt 3rd change (HEAD -> master) [Vsk] * 6bfd9b0 2018-02-24 | Committed test1.txt 3rd change [Vsk] * 2a7192d 2018-02-24 | Committed:Changes for test1.txt and test2.txt [Vsk] * 56ccc1e 2018-02-24 | First Commit [Vsk] vskumar@ubuntu:~/test-git$
==============================>
14. How to setup aliases for different git commands?:
If there is a common and complex the Git command you type frequently, consider setting up a simple Git alias for it.
We can use the below common aliases:
git config –global alias.ci commit
git config –global alias.st status
git config –global alias.br branch
git config –global alias.hist “log –pretty=format:’%h %ad | %s%d [%an]’ –graph –date=short”
Once you setup the above aliases for git commands you need to use them only, instead of commands.
Like; for command: ‘log –pretty=format:’%h %ad | %s%d [%an]’ –graph –date=short You need to use git hist, etc.
You also need to remember them well. Once you setup the above aliases for git commands you need to use them only instead of commands.
Like; for command: ‘log –pretty=format:”%h %ad | %s%d [%an]” –graph –date=short’
You need to use git hist, etc. You also need to remember them well.
Let us try one command for branch:
===== Screen output ==========>
vskumar@ubuntu:~$ cd test-git
vskumar@ubuntu:~/test-git$ pwd /home/vskumar/test-git
vskumar@ubuntu:~/test-git$ git log –pretty=format:”%h %ad | %s%d [%an]” –graph –date=short
* 69282e8 2018-02-24 | Committed test2.txt 3rd change (HEAD -> master) [Vsk]
*6bfd9b0 2018-02-24 | Committed test1.txt 3rd change [Vsk]
* 2a7192d 2018-02-24 | Committed:Changes for test1.txt and test2.txt [Vsk]
* 56ccc1e 2018-02-24 | First Commit [Vsk] vskumar@ubuntu:~/test-git$ ==========================>
=== History =======>
vskumar@ubuntu:~/test-git$ git log –pretty=format:”%h %ad | %s%d [%an]” –graph –date=short
* 69282e8 2018-02-24 | Committed test2.txt 3rd change (HEAD -> master) [Vsk]
* 6bfd9b0 2018-02-24 | Committed test1.txt 3rd change [Vsk]
* 2a7192d 2018-02-24 | Committed:Changes for test1.txt and test2.txt [Vsk]
* 56ccc1e 2018-02-24 | First Commit [Vsk]
vskumar@ubuntu:~/test-git$ git config –global alias.hist “log –pretty=format:’%h %ad | %s%d [%an]’ –grap h –date=short”
==== With alias hist ========>
vskumar@ubuntu:~/test-git$ git hist
* 69282e8 2018-02-24 | Committed test2.txt 3rd change (HEAD -> master) [Vsk]
* 6bfd9b0 2018-02-24 | Committed test1.txt 3rd change [Vsk]
* 2a7192d 2018-02-24 | Committed:Changes for test1.txt and test2.txt [Vsk]
* 56ccc1e 2018-02-24 | First Commit [Vsk]
vskumar@ubuntu:~/test-git$
==========================>
15. How to use tags and operate for different versions in a repository?:
Tags for previous versions of git: W
We can tag latest committed versions from a local repo to reuse them later stages. Let’s tag the version prior to the current version with the name v1.
First, we will checkout the previous version. Instead of looking up the hash, we are going to use the notation indicating “the parent of v1”. git tag v1
=== You can see the tagging process for the latest commit ===>
vskumar@ubuntu:~/test-git$
vskumar@ubuntu:~/test-git$ git hist
* 69282e8 2018-02-24 | Committed test2.txt 3rd change (HEAD -> master) [Vsk]
* 6bfd9b0 2018-02-24 | Committed test1.txt 3rd change [Vsk]
* 2a7192d 2018-02-24 | Committed:Changes for test1.txt and test2.txt [Vsk]
* 56ccc1e 2018-02-24 | First Commit [Vsk]
vskumar@ubuntu:~/test-git$ git tag v1
vskumar@ubuntu:~/test-git$ git checkout v1
Note: checking out ‘v1’. You are in ‘detached HEAD’ state. You can look around, make experimental changes and commit them, and you can discard any commits you make in this state without impacting any branches by performing another checkout. If you want to create a new branch to retain commits you create, you may do so (now or later) by using -b with the checkout command again. Example: git checkout -b <new-branch-name> HEAD is now at 69282e8… Committed test2.txt 3rd change
vskumar@ubuntu:~/test-git$ git hist
* 69282e8 2018-02-24 | Committed test2.txt 3rd change (HEAD, tag: v1, master) [Vsk]
* 6bfd9b0 2018-02-24 | Committed test1.txt 3rd change [Vsk]
* 2a7192d 2018-02-24 | Committed:Changes for test1.txt and test2.txt [Vsk]
* 56ccc1e 2018-02-24 | First Commit [Vsk]
vskumar@ubuntu:~/test-git$ git status
HEAD detached at v1 nothing to commit, working directory clean vskumar@ubuntu:~/test-git$
================================>
Now, let us add a line to test1.txt and commit it.
===== Screen output ===>
vskumar@ubuntu:~/test-git$ ls -l total 8
-rw-rw-r– 1 vskumar vskumar 88 Feb 24 06:37 test1.txt
-rw-rw-r– 1 vskumar vskumar 75 Feb 24 06:37 test2.txt
vskumar@ubuntu:~/test-git$ git status
HEAD detached at v1 nothing to commit, working directory clean vskumar@ubuntu:~/test-git$
vskumar@ubuntu:~/test-git$ echo ‘Testing test1.txt for tagging v2’ >> test1.txt vskumar@ubuntu:~/test-git$ cat test1.txt
Testing line1 for git .. Testing line2 for git—->
Testing test1.tx for add . function
Testing test1.txt for tagging v2
vskumar@ubuntu:~/test-git$ git status
HEAD detached at v1 Changes not staged for commit: (use “git add <file>…” to update what will be committed) (use “git checkout — <file>…” to discard changes in working directory) modified: test1.txt no changes added to commit (use “git add” and/or “git commit -a”)
vskumar@ubuntu:~/test-git$
========================>
Now let me add and commit
=== Add and commit for tagging 2nd time ===>
vskumar@ubuntu:~/test-git$ git add .
vskumar@ubuntu:~/test-git$ git status
HEAD detached at v1 Changes to be committed: (use “git reset HEAD <file>…” to unstage) modified: test1.txt
vskumar@ubuntu:~/test-git$ git commit -m ‘Added for tagging 2nd time’
[detached HEAD 0bec7c0] Added for tagging 2nd time 1 file changed, 1 insertion(+) vskumar@ubuntu:~/test-git$ git status HEAD detached from v1 nothing to commit, working directory clean
vskumar@ubuntu:~/test-git$
===============>
Now, let us tag 2nd time :
== You can see two versions are tagged ===>
vskumar@ubuntu:~/test-git$
vskumar@ubuntu:~/test-git$ git hist
* 0bec7c0 2018-02-24 | Added for tagging 2nd time (HEAD) [Vsk]
* 69282e8 2018-02-24 | Committed test2.txt 3rd change (tag: v1, master) [Vsk]
* 6bfd9b0 2018-02-24 | Committed test1.txt 3rd change [Vsk]
* 2a7192d 2018-02-24 | Committed:Changes for test1.txt and test2.txt [Vsk]
* 56ccc1e 2018-02-24 | First Commit [Vsk]
vskumar@ubuntu:~/test-git$ git tag v2
vskumar@ubuntu:~/test-git$ git hist
* 0bec7c0 2018-02-24 | Added for tagging 2nd time (HEAD, tag: v2) [Vsk]
* 69282e8 2018-02-24 | Committed test2.txt 3rd change (tag: v1, master) [Vsk]
* 6bfd9b0 2018-02-24 | Committed test1.txt 3rd change [Vsk]
* 2a7192d 2018-02-24 | Committed:Changes for test1.txt and test2.txt [Vsk]
* 56ccc1e 2018-02-24 | First Commit [Vsk]
vskumar@ubuntu:~/test-git$
===========================>
Now let us check the latest version of test1.txt content.
=== Latest version test1.txt ===>
vskumar@ubuntu:~/test-git$ ls -l
total 8 -rw-rw-r– 1
vskumar vskumar 121 Feb 24 20:58 test1.txt -rw-rw-r– 1 vskumar vskumar 75 Feb 24 06:37 test2.txt
vskumar@ubuntu:~/test-git$ cat test1.txt
Testing line1 for git .. Testing line2 for git—-> Testing test1.tx for add . function Testing test1.txt for tagging v2
vskumar@ubuntu:~/test-git$
============>
Now, let us checkout the older version to test the content of test1.txt. using : git checkout v1
====== Chekout v1 to track changes ====>
vskumar@ubuntu:~/test-git$ git checkout v1
Previous HEAD position was 0bec7c0… Added for tagging 2nd time HEAD is now at 69282e8… Committed test2.txt 3rd change
vskumar@ubuntu:~/test-git$ cat test1.txt
Testing line1 for git .. Testing line2 for git—->
Testing test1.tx for add . function
vskumar@ubuntu:~/test-git$
vskumar@ubuntu:~/test-git$ git status
HEAD detached at v1 nothing to commit, working directory clean
vskumar@ubuntu:~/test-git$
=== We can see the older version content only===>
===== We can see the hist and make the current master checkout s v1 ===> vskumar@ubuntu:~/test-git$ git hist
* 69282e8 2018-02-24 | Committed test2.txt 3rd change (HEAD, tag: v1, master) [Vsk]
* 6bfd9b0 2018-02-24 | Committed test1.txt 3rd change [Vsk]
* 2a7192d 2018-02-24 | Committed:Changes for test1.txt and test2.txt [Vsk]
* 56ccc1e 2018-02-24 | First Commit [Vsk]
vskumar@ubuntu:~/test-git$
vskumar@ubuntu:~/test-git$ git checkout
master Switched to branch ‘master’
vskumar@ubuntu:~/test-git$ git hist
* 69282e8 2018-02-24 | Committed test2.txt 3rd change (HEAD -> master, tag: v1) [Vsk]
* 6bfd9b0 2018-02-24 | Committed test1.txt 3rd change [Vsk]
* 2a7192d 2018-02-24 | Committed:Changes for test1.txt and test2.txt [Vsk]
* 56ccc1e 2018-02-24 | First Commit [Vsk] vskumar@ubuntu:~/test-git$ vskumar@ubuntu:~/test-git$ git status On branch master nothing to commit, working directory clean
vskumar@ubuntu:~/test-git$
==============================>
16. How to revert back the changes to older version ?:
Now, let us understand on how to revertback the changes in a local file.
We can use reset command to bring back the previous version. If you have a modified object in the working dir and want to revertback to older version you can follow the below steps.
The reset command resets the buffer zone to HEAD. This clears the buffer zone from the changes that we have just staged. The reset command (default) does not change the working directory. Hence, the working directory still contains unwanted comments.
We can use the checkout command from the previous tutorial to remove unwanted changes from working directory.
===== to revertback Reset the modified file and checkout that file only =====> vskumar@ubuntu:~/test-git$ git status On branch master nothing to commit, working directory clean
vskumar@ubuntu:~/test-git$ echo ‘Testing for reset Head command’ >> test1.txt vskumar@ubuntu:~/test-git$ git status On branch master Changes not staged for commit: (use “git add <file>…” to update what will be committed) (use “git checkout — <file>…” to discard changes in working directory) modified: test1.txt no changes added to commit (use “git add” and/or “git commit -a”)
vskumar@ubuntu:~/test-git$ git reset HEAD test1.txt Unstaged changes after reset: M test1.txt
vskumar@ubuntu:~/test-git$ git status On branch master Changes not staged for commit: (use “git add <file>…” to update what will be committed) (use “git checkout — <file>…” to discard changes in working directory) modified: test1.txt no changes added to commit (use “git add” and/or “git commit -a”)
vskumar@ubuntu:~/test-git$
=== Finally, You can see the older version contents only ====>
17. How to cancel the committed changes? :
We have seen on how to cancel the modified files.
Now we can check on how to revert back the committed changes in the local git repo.
== Let us see the current hist ===>
vskumar@ubuntu:~/test-git$ git hist
* 69282e8 2018-02-24 | Committed test2.txt 3rd change (HEAD -> master, tag: v1) [Vsk]
* 6bfd9b0 2018-02-24 | Committed test1.txt 3rd change [Vsk]
* 2a7192d 2018-02-24 | Committed:Changes for test1.txt and test2.txt [Vsk]
* 56ccc1e 2018-02-24 | First Commit [Vsk]
vskumar@ubuntu:~/test-git$
=================>
Now let us consider v1 to revert back.
We need to use command:git revert HEAD. When we use this command it will open a editor by showing the details.
We can save it using ‘wq!’ like in vi/vim.
===== Output =======>
vskumar@ubuntu:~/test-git$ git revert HEAD
[master fdc40ac] Revert “Committed test2.txt 3rd change” 1 file changed, 1 deletion(-)
vskumar@ubuntu:~/test-git$
===================>
Now, let us check hist
=== git hist ====>
vskumar@ubuntu:~/test-git$ git hist
* fdc40ac 2018-02-24 | Revert “Committed test2.txt 3rd change” (HEAD -> master) [Vsk]
* 69282e8 2018-02-24 | Committed test2.txt 3rd change (tag: v1) [Vsk]
* 6bfd9b0 2018-02-24 | Committed test1.txt 3rd change [Vsk]
* 2a7192d 2018-02-24 | Committed:Changes for test1.txt and test2.txt [Vsk]
* 56ccc1e 2018-02-24 | First Commit [Vsk]
vskumar@ubuntu:~/test-git$
=================>
============ Exercise ====================>
If you want to can do an Exercise: You can checkout the committed version. You can add a test to text1 file and commit it. Again you can use the same lab practice.
============ You can revert back also =====>
18. How to reset the reverted changes through commit from the branch? :
Check the previous screen display for the usage of revert command.
Now, if we have decided to reset the changes we can use the command: ‘git reset –hard v1’
=== Screen output for resetting reverted commit=====>
vskumar@ubuntu:~/test-git$ git reset –hard v1
HEAD is now at 69282e8 Committed test2.txt 3rd change
vskumar@ubuntu:~/test-git$ git hist
* 69282e8 2018-02-24 | Committed test2.txt 3rd change (HEAD, tag: v1) [Vsk]
* 6bfd9b0 2018-02-24 | Committed test1.txt 3rd change [Vsk]
* 2a7192d 2018-02-24 | Committed:Changes for test1.txt and test2.txt [Vsk]
* 56ccc1e 2018-02-24 | First Commit [Vsk]
vskumar@ubuntu:~/test-git$
=====================>
We can check the committed history using the below command: git hist –all
==== Screen output git hist –all ===>
vskumar@ubuntu:~/test-git$ git hist –all
* fdc40ac 2018-02-24 | Revert “Committed test2.txt 3rd change” (master) [Vsk] |
* 0bec7c0 2018-02-24 | Added for tagging 2nd time (tag: v2) [Vsk] |
* 69282e8 2018-02-24 | Committed test2.txt 3rd change (HEAD, tag: v1) [Vsk]
* 6bfd9b0 2018-02-24 | Committed test1.txt 3rd change [Vsk]
* 2a7192d 2018-02-24 | Committed:Changes for test1.txt and test2.txt [Vsk]
* 56ccc1e 2018-02-24 | First Commit [Vsk]
vskumar@ubuntu:~/test-git$
=====================>
You can also observe the reverted information.
We can also drop the tags as below: git tag -d v1
===== Output for tag removal ====>
vskumar@ubuntu:~/test-git$ git tag -d v2
Deleted tag ‘v2’ (was 0bec7c0)
vskumar@ubuntu:~/test-git$ git hist –all
* fdc40ac 2018-02-24 | Revert “Committed test2.txt 3rd change” (master) [Vsk]
* 69282e8 2018-02-24 | Committed test2.txt 3rd change (HEAD, tag: v1) [Vsk]
* 6bfd9b0 2018-02-24 | Committed test1.txt 3rd change [Vsk]
* 2a7192d 2018-02-24 | Committed:Changes for test1.txt and test2.txt [Vsk]
* 56ccc1e 2018-02-24 | First Commit [Vsk]
vskumar@ubuntu:~/test-git$
==========So, now v2 tag is removed ========>
You can also see the config file as below:
=== Config file ====>
vskumar@ubuntu:~/test-git$ cat .git/config
[core] repositoryformatversion = 0 filemode = true bare = false logallrefupdates = true vskumar@ubuntu:~/test-git$
=====This configuration file is created for each individual project.===============>
19. Working with git directory:
Every Git project will have directories and files.
We can see the git dir items:
==================== Git dir items ===>
vskumar@ubuntu:~/test-git$ ls -l -C .git
branches config HEAD index logs ORIG_HEAD
COMMIT_EDITMSG description hooks info objects refs
vskumar@ubuntu:~/test-git$
======Root folder of git project =====>
We can explore the objects dir to check the objects details.
using ls -l -C .git/objects
==== Output ====>
vskumar@ubuntu:~/test-git$ ls -l -C .git/objects
07 0b 44 4f 68 6b 92 b0 bd fd pack
08 2a 47 56 69 73 93 b9 e0 info
vskumar@ubuntu:~/test-git$
================>
We can see a lot of folders named with two characters.
The first two letters sha1 hash of the object stored in git are the directory names.
What is SHA1 ?:
The SHA-1 (Secure Hash Algorithm 1) is a cryptographic hash function.
It takes an input and produces a 160-bit (20-byte) hash value known as a message digest to the object.
Typically it is rendered as a hexadecimal number, with 40 digits long.
Now, let us see it by inquiring our database objects from the above listed items:
Using the below command we can check the files in dir.
ls -C .git/objects/<dir> — The dir is the two characters of the above shown values.
==== Checking one dir ====>
vskumar@ubuntu:~/test-git$ ls -l -C .git/objects/07
5e722b3161a24fd5adcefb574b5360118abbef
vskumar@ubuntu:~/test-git$ ls -l -C .git/objects/92
d62ee30d26c444d85b3d81a4e2b8b69e0f093f
vskumar@ubuntu:~/test-git$
==== You can see 40 digits size hexadecimal value of objects in 07 and 92 objects dir====>
Note, we have seen the config file from the previous exercises.
Now, We will check the branches and tags as below commands:
ls .git/refs
ls .git/refs/heads
ls .git/refs/tags
cat .git/refs/tags/v1
== Checking branches and tags ===>
vskumar@ubuntu:~/test-git$
vskumar@ubuntu:~/test-git$ ls .git/refs
heads tags
vskumar@ubuntu:~/test-git$ ls .git/refs/heads
master
vskumar@ubuntu:~/test-git$ ls .git/refs/tags
v1
vskumar@ubuntu:~/test-git$ cat .git/refs/tags/v1
69282e8d8c07e7cbc68e93b16df1d943d3b518d5
vskumar@ubuntu:~/test-git$
=================================>
Let us note; each file corresponds to the tag previously created using the git tag command.
Its content is a hash commit attached to the tag.
We have only one branch, and everything we see here in this folder is a master branch.
Now, let us check what the HEAD file contains?:
using :cat .git/HEAD
==============>
vskumar@ubuntu:~/test-git$ cat .git/HEAD
683ed74fda585e10f38111ebb4c84026d5678290
vskumar@ubuntu:~/test-git$
=============>
Let us search for the last committed items:
We can explore the structure of the database objects
using SHA1 hashes for searching the content in the repository.
The below command should find the last commit in the repository.
======= SHA hash of git hist ==>
vskumar@ubuntu:~/test-git$ git hist –max-count=1
* 683ed74 2018-02-24 | Added updated test1.txt (HEAD) [Vsk]
vskumar@ubuntu:~/test-git$
==============================>
SHA1 hash is probably different on our systems from this git format.
Now, let us check the last commit details.
Using the below commands:
git cat-file -t <hash>
git cat-file -p <hash>
==== SHA1 content and the tree details ===>
vskumar@ubuntu:~/test-git$ git cat-file -t 683ed74
commit
vskumar@ubuntu:~/test-git$ git cat-file -p 683ed74
tree 44298909c5e8873c5870f9f1ca77951ea4e028eb
parent 69282e8d8c07e7cbc68e93b16df1d943d3b518d5
author Vsk <vskumar35@gmail.com> 1519544092 -0800
committer Vsk <vskumar35@gmail.com> 1519544092 -0800
Added updated test1.txt
vskumar@ubuntu:~/test-git$
==========================================>
Now, we can display the tree referenced in the above commit.
Using :git cat-file -p <treehash>
From the couple of characters shown for tree.
====== We can see the real files stored under git blob ====>
vskumar@ubuntu:~/test-git$ git cat-file -p 44298909
100644 blob 075e722b3161a24fd5adcefb574b5360118abbef test1.txt
100644 blob 0866cfd2c7ac9bf17f0a0590551a3580359e7250 test2.txt
vskumar@ubuntu:~/test-git$
================================================>
== See the contents for text1.txt also ===>
vskumar@ubuntu:~/test-git$ git cat-file -p 075e722b
Testing line1 for git ..
Testing line2 for git—->
Testing test1.tx for add . function
Checking for changing commit comment
vskumar@ubuntu:~/test-git$
====================================>
So we have seen the main branch to till the object content level.
20. Working with git branches and master :
Now, let us see the branches operation. We can create different branches as each developer
can have his/her own branch while working with the same or different objects.
Let us see the current statusof git project:
=========>
vskumar@ubuntu:~/test-git$ pwd
/home/vskumar/test-git
vskumar@ubuntu:~/test-git$ git status
HEAD detached from v1
Changes not staged for commit:
(use “git add <file>…” to update what will be committed)
(use “git checkout — <file>…” to discard changes in working directory)
modified: test1.txt
modified: test2.txt
Untracked files:
(use “git add <file>…” to include in what will be committed)
class
test1.class
test1.java
no changes added to commit (use “git add” and/or “git commit -a”)
vskumar@ubuntu:~/test-git$
======================>
Now, Let us create a new branch as below [using checkout] and test the operations.
git checkout -b testgitbr1
git status
====== We are just copied the same project as a branch ======>
vskumar@ubuntu:~/test-git$ git checkout -b testgitbr1
M test1.txt
M test2.txt
Switched to a new branch ‘testgitbr1’
vskumar@ubuntu:~/test-git$ git status
On branch testgitbr1
Changes not staged for commit:
(use “git add <file>…” to update what will be committed)
(use “git checkout — <file>…” to discard changes in working directory)
modified: test1.txt
modified: test2.txt
Untracked files:
(use “git add <file>…” to include in what will be committed)
class
test1.class
test1.java
no changes added to commit (use “git add” and/or “git commit -a”)
vskumar@ubuntu:~/test-git$
==================>
Assume a developer want to add his own program.
Now, I would like to add the test1.java program into this new branch:
======= Adding new file ====>
vskumar@ubuntu:~/test-git$ git add test1.java
vskumar@ubuntu:~/test-git$ git status
On branch testgitbr1
Changes to be committed:
(use “git reset HEAD <file>…” to unstage)
new file: test1.java
Changes not staged for commit:
(use “git add <file>…” to update what will be committed)
(use “git checkout — <file>…” to discard changes in working directory)
modified: test1.txt
modified: test2.txt
Untracked files:
(use “git add <file>…” to include in what will be committed)
class
test1.class
vskumar@ubuntu:~/test-git$
=== New branch has a java program also ===>
Now, let me commit this file with a message:
git commit -m “Added a java program [test1.java] to new branch”
========>
vskumar@ubuntu:~/test-git$ git commit -m “Added a java program [test1.java] to new branch”
[testgitbr1 4e7baf8] Added a java program [test1.java] to new branch
1 file changed, 11 insertions(+)
create mode 100644 test1.java
vskumar@ubuntu:~/test-git$
=============>
Let us see the status:
=== Current status ====>
vskumar@ubuntu:~/test-git$ git status
On branch testgitbr1
Changes not staged for commit:
(use “git add <file>…” to update what will be committed)
(use “git checkout — <file>…” to discard changes in working directory)
modified: test1.txt
modified: test2.txt
Untracked files:
(use “git add <file>…” to include in what will be committed)
class
test1.class
no changes added to commit (use “git add” and/or “git commit -a”)
vskumar@ubuntu:~/test-git$
========================>
Now let me add all the modified files also with a commit:
=======>
vskumar@ubuntu:~/test-git$ git add .
vskumar@ubuntu:~/test-git$ git status
On branch testgitbr1
Changes to be committed:
(use “git reset HEAD <file>…” to unstage)
new file: class
new file: test1.class
modified: test1.txt
modified: test2.txt
vskumar@ubuntu:~/test-git$
vskumar@ubuntu:~/test-git$
vskumar@ubuntu:~/test-git$ git commit -m “Added all 4 files [2-new and 2 modified]”
[testgitbr1 26b971b] Added all 4 files [2-new and 2 modified]
4 files changed, 14 insertions(+), 4 deletions(-)
create mode 100644 class
create mode 100644 test1.class
mode change 100644 => 100755 test1.txt
mode change 100644 => 100755 test2.txt
vskumar@ubuntu:~/test-git$
vskumar@ubuntu:~/test-git$ git status
On branch testgitbr1
nothing to commit, working directory clean
vskumar@ubuntu:~/test-git$
== So, we have updated the new branch ====>
Now we need to navigate the available branches.
Let us apply git hist command and check the history as below:
== Checking the git project repo history ====>
vskumar@ubuntu:~/test-git$ git hist
* 26b971b 2018-03-05 | Added all 4 files [2-new and 2 modified] (HEAD -> testgitbr1) [Vsk]
* 4e7baf8 2018-03-05 | Added a java program [test1.java] to new branch [Vsk]
* 683ed74 2018-02-24 | Added updated test1.txt [Vsk]
* 69282e8 2018-02-24 | Committed test2.txt 3rd change (tag: v1) [Vsk]
* 6bfd9b0 2018-02-24 | Committed test1.txt 3rd change [Vsk]
* 2a7192d 2018-02-24 | Committed:Changes for test1.txt and test2.txt [Vsk]
* 56ccc1e 2018-02-24 | First Commit [Vsk]
vskumar@ubuntu:~/test-git$
== You can see the latest branch and commit messages===>
Now, let us toggle or do workaround between the branch and the master as below:
Please note so far we are with the testgitbr1 which is branch.
Now let us use master as below:
git checkout master
==== Master ====>
vskumar@ubuntu:~/test-git$ git checkout master
Switched to branch ‘master’
vskumar@ubuntu:~/test-git$ git status
On branch master
nothing to commit, working directory clean
vskumar@ubuntu:~/test-git$
================>
Let us check some files and their content:
=== Checking master ===>
vskumar@ubuntu:~/test-git$ cat test1.txt
Testing line1 for git ..
Testing line2 for git—->
Testing test1.tx for add . function
vskumar@ubuntu:~/test-git$ cat test1.java
cat: test1.java: No such file or directory
vskumar@ubuntu:~/test-git$
==========>
Now, let us switch to branch and check the files:
== You can see the difference from master ====>
vskumar@ubuntu:~/test-git$ git checkout testgitbr1
Switched to branch ‘testgitbr1’
vskumar@ubuntu:~/test-git$ git status
On branch testgitbr1
nothing to commit, working directory clean
vskumar@ubuntu:~/test-git$ cat test1.java
class test1{
public static void main(String args[]){
System.out.println(“Hello Welcome to DevOps course”);
System.out.println(“Hope you are practicing well Jenkins 2.9”);
System.out.println(“Now, create a java object file through javac compiler”);
System.out.println(“Using Jenkins job creation”);
System.out.println(“Once it is created, you run it by java runtime”);
System.out.println(“Now, compare the console output with your expectation!!”);
}
}
vskumar@ubuntu:~/test-git$ cat test1.txt
echo ‘Testing line1 for git ..’
echo ‘Testing line2 for git—->’
echo ‘Testing test1.tx for add . function’
echo ‘Checking for changing commit comment’
echo ‘For removal of old comment’
vskumar@ubuntu:~/test-git$
==Note the test1.txt has different content from master =====>
Now, let us try to add one README file into master.
I want to create the README file as below:
== README file content ===>
vskumar@ubuntu:~/test-git$ pwd
/home/vskumar/test-git
vskumar@ubuntu:~/test-git$ git checkout master
Switched to branch ‘master’
vskumar@ubuntu:~/test-git$ git status
On branch master
nothing to commit, working directory clean
vskumar@ubuntu:~/test-git$
vskumar@ubuntu:~/test-git$ touch README
vskumar@ubuntu:~/test-git$ echo “Testing Master and branches” >> README
vskumar@ubuntu:~/test-git$ cat README
Testing Master and branches
vskumar@ubuntu:~/test-git$ echo “Added this README file into master only” >> README
vskumar@ubuntu:~/test-git$ cat README
Testing Master and branches
Added this README file into master only
vskumar@ubuntu:~/test-git$
===================================>
Let us commit this file into master.
=== Status ====>
vskumar@ubuntu:~/test-git$ git status
On branch master
Untracked files:
(use “git add <file>…” to include in what will be committed)
README
nothing added to commit but untracked files present (use “git add” to track)
vskumar@ubuntu:~/test-git$
=======>
Add and Commit it with message :
==== Commit master ===>
vskumar@ubuntu:~/test-git$ git add README
vskumar@ubuntu:~/test-git$ git status
On branch master
Changes to be committed:
(use “git reset HEAD <file>…” to unstage)
new file: README
vskumar@ubuntu:~/test-git$
===== Added README ====>
Now, Commit:
==== Commit master ===>
vskumar@ubuntu:~/test-git$ git commit -m “Added README file into mater”
[master 1fad32b] Added README file into mater
1 file changed, 2 insertions(+)
create mode 100644 README
vskumar@ubuntu:~/test-git$
======================>
Now, let us view the current hist of master and branch as below with git hist –all:
== Current history ===>
vskumar@ubuntu:~/test-git$ git hist –all
* 1fad32b 2018-03-05 | Added README file into mater (HEAD -> master) [Vsk]
* fdc40ac 2018-02-24 | Revert “Committed test2.txt 3rd change” [Vsk]
| * 26b971b 2018-03-05 | Added all 4 files [2-new and 2 modified] (testgitbr1) [Vsk]
| * 4e7baf8 2018-03-05 | Added a java program [test1.java] to new branch [Vsk]
| * 683ed74 2018-02-24 | Added updated test1.txt [Vsk]
|/
* 69282e8 2018-02-24 | Committed test2.txt 3rd change (tag: v1) [Vsk]
* 6bfd9b0 2018-02-24 | Committed test1.txt 3rd change [Vsk]
* 2a7192d 2018-02-24 | Committed:Changes for test1.txt and test2.txt [Vsk]
* 56ccc1e 2018-02-24 | First Commit [Vsk]
vskumar@ubuntu:~/test-git$
=== You can see on top last two commits of both master and branch =========>
21. How to Merge latest objects into single branch ?:
Now, we have two different branches. We can consolidate both branches versions and
merge them into a new branch for future developers to use them as one latest project.
Let us go back to the testgitbr1 branch and merge it with master by using the below commands.
git checkout testgitbr1
git merge master
================>
vskumar@ubuntu:~/test-git$ git checkout testgitbr1
Switched to branch ‘testgitbr1’
======>
When you use merge command a file opens in vi, just save it as it is.
==========================>
vskumar@ubuntu:~/test-git$ git merge master
Auto-merging test2.txt
Merge made by the ‘recursive’ strategy.
README | 2 ++
test2.txt | 1 –
2 files changed, 2 insertions(+), 1 deletion(-)
create mode 100644 README
vskumar@ubuntu:~/test-git$
=================>
And let us see the current history:
git hist –all
===== History =====>
vskumar@ubuntu:~/test-git$ git hist –all
* 6b67f05 2018-03-05 | Merge branch ‘master’ into testgitbr1 (HEAD -> testgitbr1) [Vsk]
|\
| * 1fad32b 2018-03-05 | Added README file into mater (master) [Vsk]
| * fdc40ac 2018-02-24 | Revert “Committed test2.txt 3rd change” [Vsk]
* | 26b971b 2018-03-05 | Added all 4 files [2-new and 2 modified] [Vsk]
* | 4e7baf8 2018-03-05 | Added a java program [test1.java] to new branch [Vsk]
* | 683ed74 2018-02-24 | Added updated test1.txt [Vsk]
|/
* 69282e8 2018-02-24 | Committed test2.txt 3rd change (tag: v1) [Vsk]
* 6bfd9b0 2018-02-24 | Committed test1.txt 3rd change [Vsk]
* 2a7192d 2018-02-24 | Committed:Changes for test1.txt and test2.txt [Vsk]
* 56ccc1e 2018-02-24 | First Commit [Vsk]
vskumar@ubuntu:~/test-git$
== Let us check the above commit history also =============>
From the above exercise, we can conclude any developer can merge his/her current branch into master once they decide to release the code.
22. How to reset the earlier created branch from the local repository?:
We will see from this exercise, how a developer can reset the earlier branch.
We need to be on the branch now.
we should use ‘git checkout testgitbr1’
= Switching to testgitbr1 branch ==>
vskumar@ubuntu:~/test-git$ git checkout testgitbr1
Switched to branch ‘testgitbr1’
vskumar@ubuntu:~/test-git$
============>
Now. let us see the current history of the git local repo:
==== Git hist====>
vskumar@ubuntu:~/test-git$ git hist
* 6b67f05 2018-03-05 | Merge branch ‘master’ into testgitbr1 (HEAD -> testgitbr1) [Vsk]
|\
| * 1fad32b 2018-03-05 | Added README file into mater (master) [Vsk]
| * fdc40ac 2018-02-24 | Revert “Committed test2.txt 3rd change” [Vsk]
* | 26b971b 2018-03-05 | Added all 4 files [2-new and 2 modified] [Vsk]
* | 4e7baf8 2018-03-05 | Added a java program [test1.java] to new branch [Vsk]
* | 683ed74 2018-02-24 | Added updated test1.txt [Vsk]
|/
* 69282e8 2018-02-24 | Committed test2.txt 3rd change (tag: v1) [Vsk]
* 6bfd9b0 2018-02-24 | Committed test1.txt 3rd change [Vsk]
* 2a7192d 2018-02-24 | Committed:Changes for test1.txt and test2.txt [Vsk]
* 56ccc1e 2018-02-24 | First Commit [Vsk]
vskumar@ubuntu:~/test-git$
== Note, both branches info is available ===>
To remove the testgitbr1 branch we need to reset it.
git reset –hard <hash> —> Here the testgitbr1 branch 1st commit Hash is 4e7baf8.
So our command is; git reset –hard 4e7baf8
=== Resetting branch ===>
vskumar@ubuntu:~/test-git$ git reset –hard 4e7baf8
HEAD is now at 4e7baf8 Added a java program [test1.java] to new branch
==== Rsetting is done for branch ===>
Now let us check the hist all:
===== Hist all =====>
vskumar@ubuntu:~/test-git$ git hist –all
* 1fad32b 2018-03-05 | Added README file into mater (master) [Vsk]
* fdc40ac 2018-02-24 | Revert “Committed test2.txt 3rd change” [Vsk]
| * 4e7baf8 2018-03-05 | Added a java program [test1.java] to new branch (HEAD -> testgitbr1) [Vsk]
| * 683ed74 2018-02-24 | Added updated test1.txt [Vsk]
|/
* 69282e8 2018-02-24 | Committed test2.txt 3rd change (tag: v1) [Vsk]
* 6bfd9b0 2018-02-24 | Committed test1.txt 3rd change [Vsk]
* 2a7192d 2018-02-24 | Committed:Changes for test1.txt and test2.txt [Vsk]
* 56ccc1e 2018-02-24 | First Commit [Vsk]
vskumar@ubuntu:~/test-git$
== Note;testgitbr1 branch is disappeared ====>
Now let us see the latest history.
So, this way any developer can create and merge a branch and later on it can be destroyed also.
23. How to add the current code to github?:
create a new repository or use the existing repo on the command line
Create your own github userid and a project in it.
Then you can create repository online. You will see set of commands display on the web page.
Follow them. Or follow as below:
Steps for Guthub access:
You need to set the project url as below:
========================>
vskumar@ubuntu:~/test-git$ git remote set-url origin https://github.com/vskumar2017/git-test1.git
vskumar@ubuntu:~/test-git$
========================>
Please see the below content, I have pushed the code to my account VSKUMAR2017 as below:
==== Pushed code to github account ====>
vskumar@ubuntu:~/test-git$ git push origin master –force
Username for ‘https://github.com’: VSKUMAR2017
Password for ‘https://VSKUMAR2017@github.com’:
Counting objects: 20, done.
Compressing objects: 100% (16/16), done.
Writing objects: 100% (20/20), 1.85 KiB | 0 bytes/s, done.
Total 20 (delta 2), reused 0 (delta 0)
remote: Resolving deltas: 100% (2/2), done.
To https://github.com/vskumar2017/git-test1.git
* [new branch] master -> master
vskumar@ubuntu:~/test-git$
====================>
I have gone throuhg my account and saw the below url:
https://github.com/vskumar2017/git-test1
=== As per the below hist it is stored ===>
vskumar@ubuntu:~/test-git$ git hist
* e3fab98 2018-03-05 | first commit (HEAD -> master) [Vsk]
* 1fad32b 2018-03-05 | Added README file into mater [Vsk]
* fdc40ac 2018-02-24 | Revert “Committed test2.txt 3rd change” [Vsk]
* 69282e8 2018-02-24 | Committed test2.txt 3rd change (tag: v1) [Vsk]
* 6bfd9b0 2018-02-24 | Committed test1.txt 3rd change [Vsk]
* 2a7192d 2018-02-24 | Committed:Changes for test1.txt and test2.txt [Vsk]
* 56ccc1e 2018-02-24 | First Commit [Vsk]
vskumar@ubuntu:~/test-git$
=====================>
I have done one more push:
==== One more push to github ===>
vskumar@ubuntu:~/test-git$ git checkout master
Switched to branch ‘master’
vskumar@ubuntu:~/test-git$ git add .
vskumar@ubuntu:~/test-git$ git commit -m “A shell sample added “
[master c61b3dd] A shell sample added
1 file changed, 3 insertions(+)
create mode 100644 sh1.sh
vskumar@ubuntu:~/test-git$ git push origin master –force
Username for ‘https://github.com’: VSKUMAR2017
Password for ‘https://VSKUMAR2017@github.com’:
Counting objects: 3, done.
Compressing objects: 100% (2/2), done.
Writing objects: 100% (3/3), 299 bytes | 0 bytes/s, done.
Total 3 (delta 1), reused 0 (delta 0)
remote: Resolving deltas: 100% (1/1), completed with 1 local object.
To https://github.com/vskumar2017/git-test1.git
e3fab98..c61b3dd master -> master
vskumar@ubuntu:~/test-git$
=========================>
I have see the below content on my guthub web page of url:https://github.com/vskumar2017/git-test1
===== Message ===>
sh1.sh A shell sample added just now
======>
Hope you enjoyed it technically!!
END OF LAB SESSION FOR Git

If you are keen practicing Mock interviews for a Job Description, Please read the below blog to contact:
https://vskumar.blog/2020/02/03/contact-for-aws-devops-sre-roles-mock-interview-prep-not-proxy-for-original-profile/


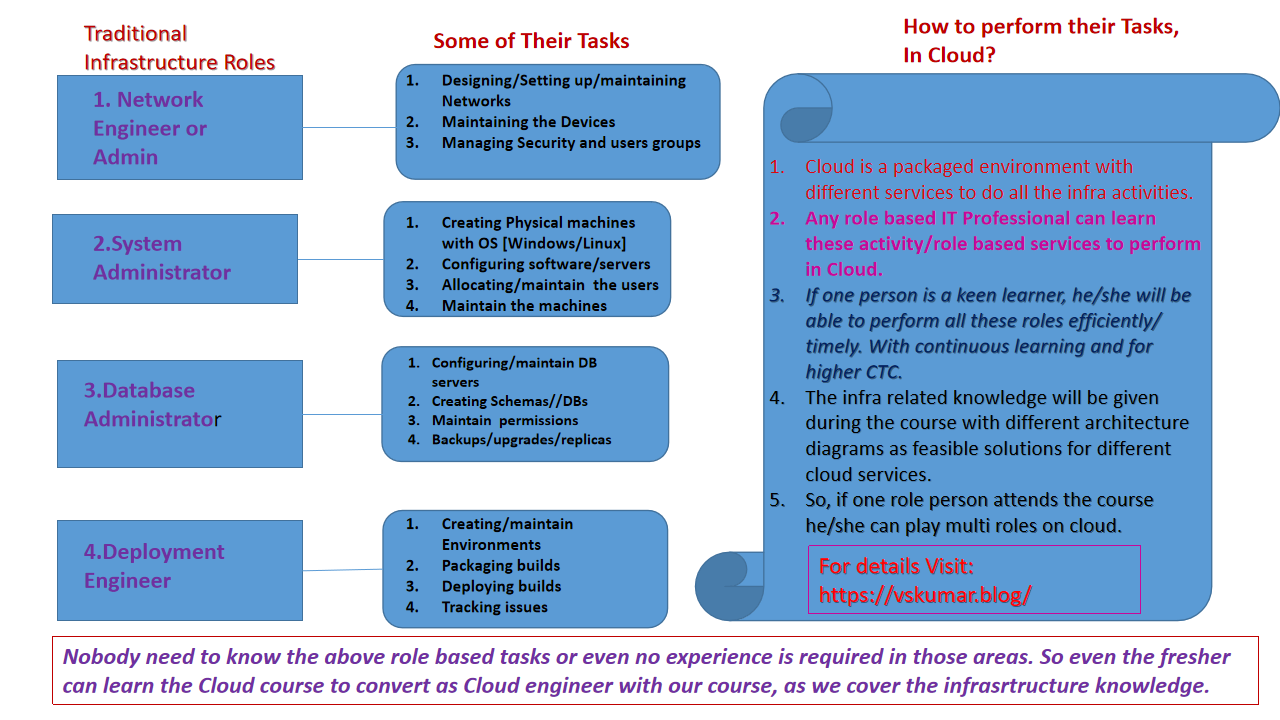
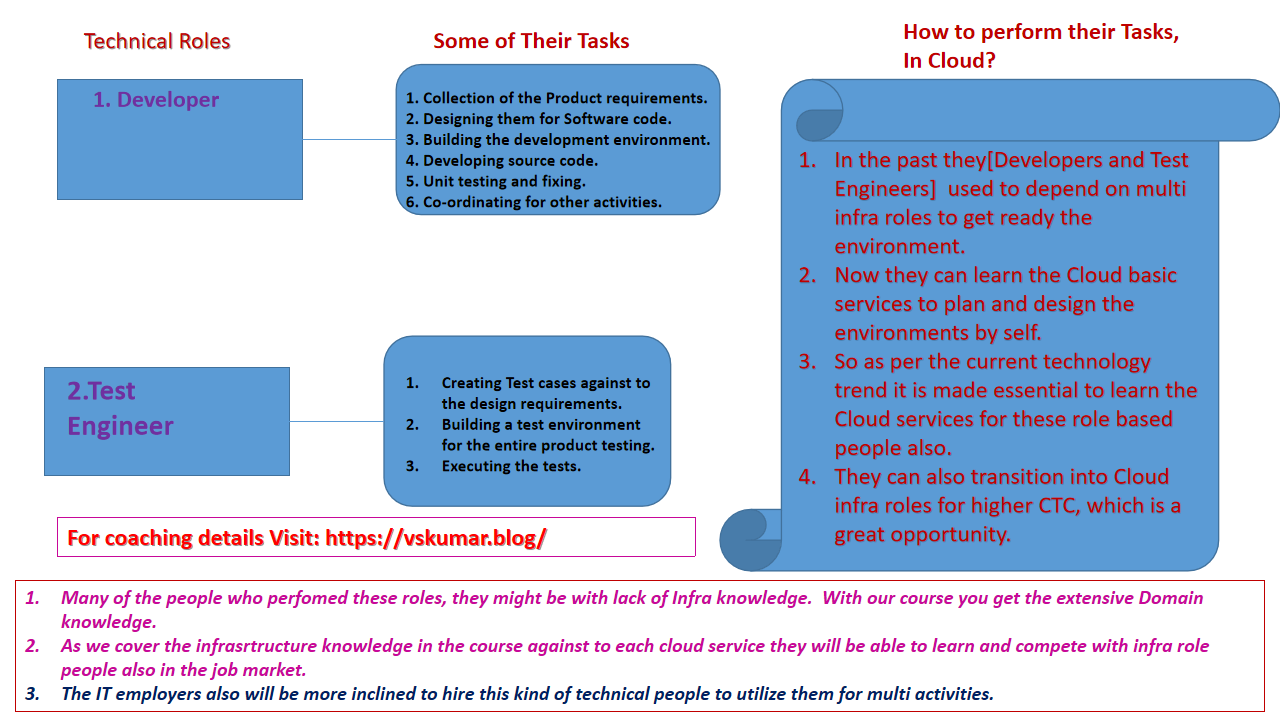


 Why do you need to learn from Infra domain knowledge as certified Cloud Professional ?


 If we scroll down we can see the job status message:


